Do you have a question about the UNI-T UT330+ Series and is the answer not in the manual?
Confirms the included components: operating manual, batteries, and USB data cable.
Highlights critical safety instructions to prevent electrical shock or injury.
Specifies approved battery types, correct installation, and storage precautions.
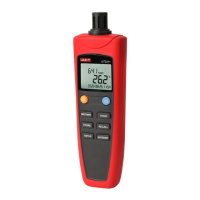
Details the physical components of the Meter and its display screen layout.
Guides users through configuring unit settings, limits, sleep mode, system time, and offsets.
Instructions for turning the Meter on/off, controlling the backlight, and activating alarms.
Covers viewing Max/Min readings, dew-point/wet-bulb temps, data access, recall, and transfer.
Explains manual and auto data storage, recalling recorded data, and clearing stored data.
Details how to transfer data to a PC and use USB for power supply.
Provides a detailed list of measurement ranges, accuracy, resolution, and features.
Instructions for connecting the Meter to a PC and using the master computer software.
Guides on replacing batteries and cleaning the Meter's casing.
The UT330+ series digital temperature humidity meters are advanced instruments designed for precise environmental monitoring. These meters incorporate a high-precision sensor and a super-low power consumption microprocessor, ensuring accurate measurements and extended battery life. Key features include high accuracy, manual and automatic data storage, USB data transfer, USB power supply, backlight alarm, real-time display, and low power consumption. These meters are suitable for a wide range of applications in factories, laboratories, research institutes, food and health industries, and environmental protection.
The meters offer comprehensive functionality for temperature and humidity measurement and data management. Users can select between Celsius and Fahrenheit units for temperature display. The device supports setting time intervals for automatic data storage, allowing for continuous monitoring. Upper and lower limits for temperature and humidity, including dew-point and wet-bulb temperatures, can be configured, triggering alarms when these thresholds are exceeded. A sleep mode is available to conserve battery life, with adjustable sleep times or the option to disable it. The system time can be set, including year, month, day, hour, and minute. To ensure accuracy, the meters allow for temperature and humidity offset adjustments, including dew-point and wet-bulb temperature offsets, within a range of -6 to 6.
The backlight feature can be toggled on and off. An alarm function, when activated, provides visual cues: a red backlight flashes for upper-limit alarms, and a blue backlight flashes for lower-limit alarms. If both upper and lower limits are exceeded, the red and blue backlights flash alternately. The corresponding icons (e.g., temperature icon, HI/LO icons) also flash to indicate the specific alarm condition.
The meters support viewing maximum and minimum readings recorded during a measurement session. Users can also view dew-point temperature and wet-bulb temperature, with "DEW POINT" or "WET BULB" displayed on the screen, respectively. An offset value can be used to adjust for measurement errors in temperature and humidity.
Data storage is a core function. In manual storage mode (time interval set to 00:00), users can manually save data by pressing the STORE button. The meters flash and display the storage area (e.g., LOG 001). The UT331+ can store 299 groups of data, while the UT332+ can store 999 groups. In automatic storage mode (time interval not 00:00), long pressing the STORE button initiates automatic data saving at the set interval, with data stored in a circular manner.
Recorded data can be recalled by short pressing the RECALL button. Users can scroll through stored readings using the ▼▲ buttons. The meters default to the last saved reading. Under RECALL mode, short pressing ENTER allows for quick review of data and facilitates data transfer to a PC via USB. Long pressing RECALL under RECALL MODE clears all recorded data, displaying "dELE" until the process is complete. This action is irreversible, so users are advised to exercise caution.
Data transfer to a PC is possible in two scenarios: when in RECALL status, short pressing ENTER not only reviews data but also automatically transfers it to the PC; and when the PC is running the supplied software and connected to the meters, measured data is automatically transferred.
Turning On/Off: To power on the meters, long press the yellow button. To power off, long press the yellow button again. If the sleep time is set, the meters will automatically power off if no button is pressed within the specified time. For accurate results, it's recommended to wait a moment before taking readings if there's a significant change in humidity or temperature.
Data Hold: Press the HOLD button to freeze the displayed reading; "HOLD" will appear on the LCD. Press HOLD again to exit this function.
Setting Meters: Short press the SETUP button to enter the setting mode. The sequence of settings is: Temperature unit setup → Time interval setup → Temperature & Humidity Upper Limit Alarm Setup → Temperature & Humidity Lower Limit Alarm Setup → Sleep time setup → System time setup → Temperature & Humidity Offset setup. The setting mode will automatically exit if no button is pressed for 15 seconds.
Temperature Unit Setup: In setting mode, use the (HOLD)/▲ (MAX/MIN) buttons to select °C or °F.
Time Interval Setup: In time interval mode ("int" displayed), use ▼▲ to change the interval for automatic data storage. Long pressing ▼▲ allows for quick adjustment. The interval can be set from 00:00 (disabled) to 59:59.
Upper/Lower Limit Setting: In upper/lower limit setup mode ("HI" or "LO" displayed), short press ENTER/DP to switch between temperature, humidity, dew-point, and wet-bulb settings. Use ▼▲ to adjust the values.
Sleep Mode Setting: In sleep setting mode ("SLP" icon displayed), use ▼▲ to set the sleep time (5-60 minutes). Setting the time below 5 minutes disables the sleep function ("OFF" icon displayed).
System Time Setting: In system time setting mode, short press ENTER/DR to switch between Year/Month/Day/Hour/Minute. Use ▼▲ to adjust the time values. The system time is stored only after the minute setting is completed and ENTER/DP is pressed again.
Offset Setting: In offset setting mode ("t-o" displayed), short press ENTER/DP to switch between temperature, humidity, dew-point, and wet-bulb temperature offsets. Use ▼▲ to change the offset values within -6 to 6.
USB Power Supply: Connect the USB cable to a PC USB interface or a 5V DC adapter. The meters will automatically switch to USB power. Disconnecting the USB cable switches back to battery power. Note that using a DC voltage over 5V for USB power may damage the meters.
USB Communication: To use USB communication, download and install the PC software. Connect the USB cable to the computer, then browse and analyze data through the software. Refer to the "Software Manual" for detailed instructions.
Replacing the Battery: When the battery indicator "" appears, replace the batteries promptly. Unscrew the battery cover, remove it, replace with new 4xAAA batteries, and then reattach the cover and tighten the screw.
Cleaning the Casing: To clean the surface of the meters, use a soft cloth or sponge dampened with a small amount of water, soap, or mild detergent. Do not wash the meters directly with water, as this may damage the internal circuits.
| Display | LCD |
|---|---|
| Resolution | 0.1°C (0.1°F) |
| Sampling Rate | 1s |
| Operating Temperature | 0°C to 50°C (32°F to 122°F) |
| Storage Temperature | -20°C to 60°C (-4°F to 140°F) |