Do you have a question about the Union 57039 and is the answer not in the manual?
Precautions to follow before and during safe installation to ensure safety and proper function.
Guidelines for the safe and proper operation of the safe, including child safety.
Steps for securely mounting the safe to the floor using provided anchors and lag screws.
Procedure for installing the 9V battery into the keypad, emphasizing proper polarity and handling.
Identifies key components like keypad, handle, and internal access points of the safe.
Steps for opening the safe using the physical key, including accessing the keyhole.
Guidelines for protecting the safe from moisture and cleaning its exterior and lock mechanisms.
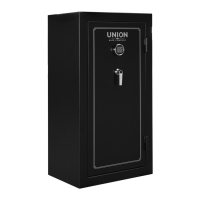
This document is an owner's manual and safety instructions for a Union Safe Company 24-Gun Fire Resistant Combination Safe. It provides comprehensive information on the safe's specifications, installation, operation, and maintenance.
The Union Safe Company 24-Gun Fire Resistant Combination Safe is designed to securely store firearms and other valuables, offering protection against theft and fire. It features a combination lock for primary access and an emergency key override. The safe is intended for installation on a stable, level, clean, and dry floor capable of supporting its weight and contents. It includes internal shelving for organized storage.
Installation: The safe must be installed on a stable, level, clean, and dry floor. It requires two people to move due to its weight. The installation process involves removing two steel plates from the bottom of the safe, locating mounting holes, marking locations on the floor, drilling holes, inserting floor anchors, placing the safe over the anchors, and securing it with lag screws and gasket washers. The interior floor liner and black caps must be removed and replaced during this process. It is crucial to verify that the installation surface has no hidden utility lines and to wear ANSI-approved safety goggles.
Battery Installation: The 9V alkaline battery is accessed by turning the keypad cover counterclockwise. The battery should be installed with proper polarity, and swollen or leaking batteries should not be used. The keypad cover is then screwed back in place. The door should be left open until a new entry code is set. A red light on the keypad indicates when the battery needs replacement.
Shelf Installation: Shelves are installed by placing clips into the shelf mounting rails at the desired location and then setting the shelves in place. Four clips are used per shelf.
Opening with Key: To open the safe with the key, the keypad cover is removed by turning it counterclockwise. The safe key is inserted into the keyhole and turned 1/4 turn clockwise to unlock the safe. The handle is then turned clockwise to open the door. The door should remain open until a new entry code is entered, and the key should be removed before replacing the keypad cover. It is critical not to store emergency keys inside the safe.
Opening with Entry Code (Preset): To open the safe for the first time, install the battery and press 1-5-9-# on the keypad. After entering the code, turn the handle clockwise within 5 seconds to open the door. If the handle is not turned within this timeframe, the locking mechanism will reactivate, requiring re-entry of the code.
Changing the Entry Code: The door must be left open when setting a new entry code. A small red button on the inside of the door, near the hinge, is pressed and released. Two beeps will sound, and a yellow light will illuminate on the keypad, indicating the time window to enter the new code. The new code, which must be 3 to 8 digits long, is then entered. To confirm the new code, the "#" key on the keypad is pressed. Two beeps and two flashes of the yellow light indicate acceptance, while three flashes and a beep indicate rejection. The new entry code should be tested before closing the door. The lock is deactivated for a few seconds after entering a new code; wait 6 seconds before trying to lock the safe.
Keypad Sound Control: To turn off the "beep" sound of the keypad, press "*". To turn it back on, press "*".
Closing: To close the safe, the door is closed, and the handle is turned counterclockwise until it stops. If the handle is not fully turned, the door will not be locked.
Safety Precautions:
General Maintenance:
Battery Replacement: When the red light illuminates upon pressing any keypad button, it indicates that the battery needs to be replaced. Used batteries should be disposed of according to local regulations.
Professional Service: Procedures not specifically explained in the manual must be performed only by a qualified technician.
Warranty: The product comes with a Limited 90 Day Warranty from Harbor Freight Tools Co., covering defects in materials and workmanship. The warranty does not cover damage from misuse, abuse, negligence, accidents, repairs or alterations outside facilities, criminal activity, improper installation, normal wear and tear, or lack of maintenance. The company is not liable for incidental, contingent, special, or consequential damages. To claim warranty, the product must be returned with transportation charges prepaid, proof of purchase, and an explanation of the complaint.
Contact Information:
Note: Replacement parts are not available for this item. Reference UPC 792363570398.