To remove the guard, simply reverse the installation procedure. Grip the two halves of the guard and
pull it open. Use an upward motion to release each half of the guard from the bracket.
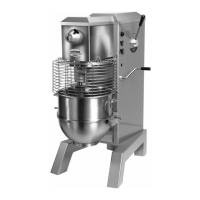
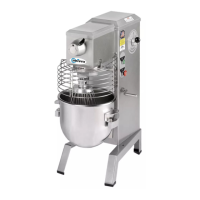
To open the guard for access to the bowl, first turn the mixer off by pushing the red “Stop” push-
button (Figure 1 [15]). Pull open the two halves of the guard and swing one or both guards outward. It is
not necessary to remove them. Close the guards and press the green “Start” push-button (Figure 1[14])
to resume mixing operations.
OPERATING THE SRM60+ MIXER
Your Univex SRM60+ mixer is designed to meet the cook’s and baker’s demand for an efficient,
dependable appliance. It should give unfailing performance over a period of years when operated and
maintained according to the instructions contained herein.
The mixer drives various agitator attachments through a beater head shaft to beat, mix, or whip liquid,
viscous, or dry ingredients. The shaft is driven by a sturdy motor whose power is transmitted by a
rugged, cogged belt and a continuously variable transmission (CVT) through a gear train and a planetary
gear set. The speed of the beater shaft can be varied from approximately 75 to340 revolutions per minute
(RPM). (See Figure 3 on page 11 for part numbers of various agitators, attachments and accessories.)
The SRM60+ mixer is equipped with a power take-off (PTO) that operates other attachments such as
slicers, graters and grinders. The PTO speed can be varied from 85 to 395 rpm. Be sure to read and
follow all safety instructions provided by the manufacturers of attachments that you operate on
the PTO. The PTO hub should be covered with the PTO cap provided with your mixer when not in use
to prevent accidental insertion of fingers into the PTO housing during operation.
Warning: Never put hands, spoons, utensils or other objects into the bowl while the mixer is
operating!
Note: Noise emissions for this mixer are below 70db (A).
SECURING THE BOWL AND INSTALLING THE MIXER AGITATOR
Place the bowl on the bowl support (Figure 1 [18]). The indentation on the bowl ring must align with the
pin at the rear of the bowl support. Align the holes in the bowl rim with the pins on the bowl support and
lower the bowl into position. Secure the bowl in place by turning the bowl clamps (Figure 1 [19]).
With the bowl in the “down” position, install the desired agitator by sliding it upward on the beater head
shaft (Figure 1[3]). Rotate the agitator counter-clockwise until it is engaged.
Note: Serious injury may result if the bowl is not positioned properly on the bowl support using the
bowl support pins and firmly closing the clamps.
With the bowl secured, add ingredients. Liquids should be added first. The bowl is now ready to be
raised to the “up”(mixing) Position by turning the bowl lift handle (Figure 1 [16]) clockwise.
Note: Exceeding the mixer capacity, (Figure 4) on page 12, can cause damage to the mixer and will void
the factory warranty.
When using the wire whip agitator, raise the bowl to the “up” position first and then add ingredients to
avoid wire whip damage.
Close and secure the Swing Ring™ Safety Guard before proceeding.
Page 5