38
57
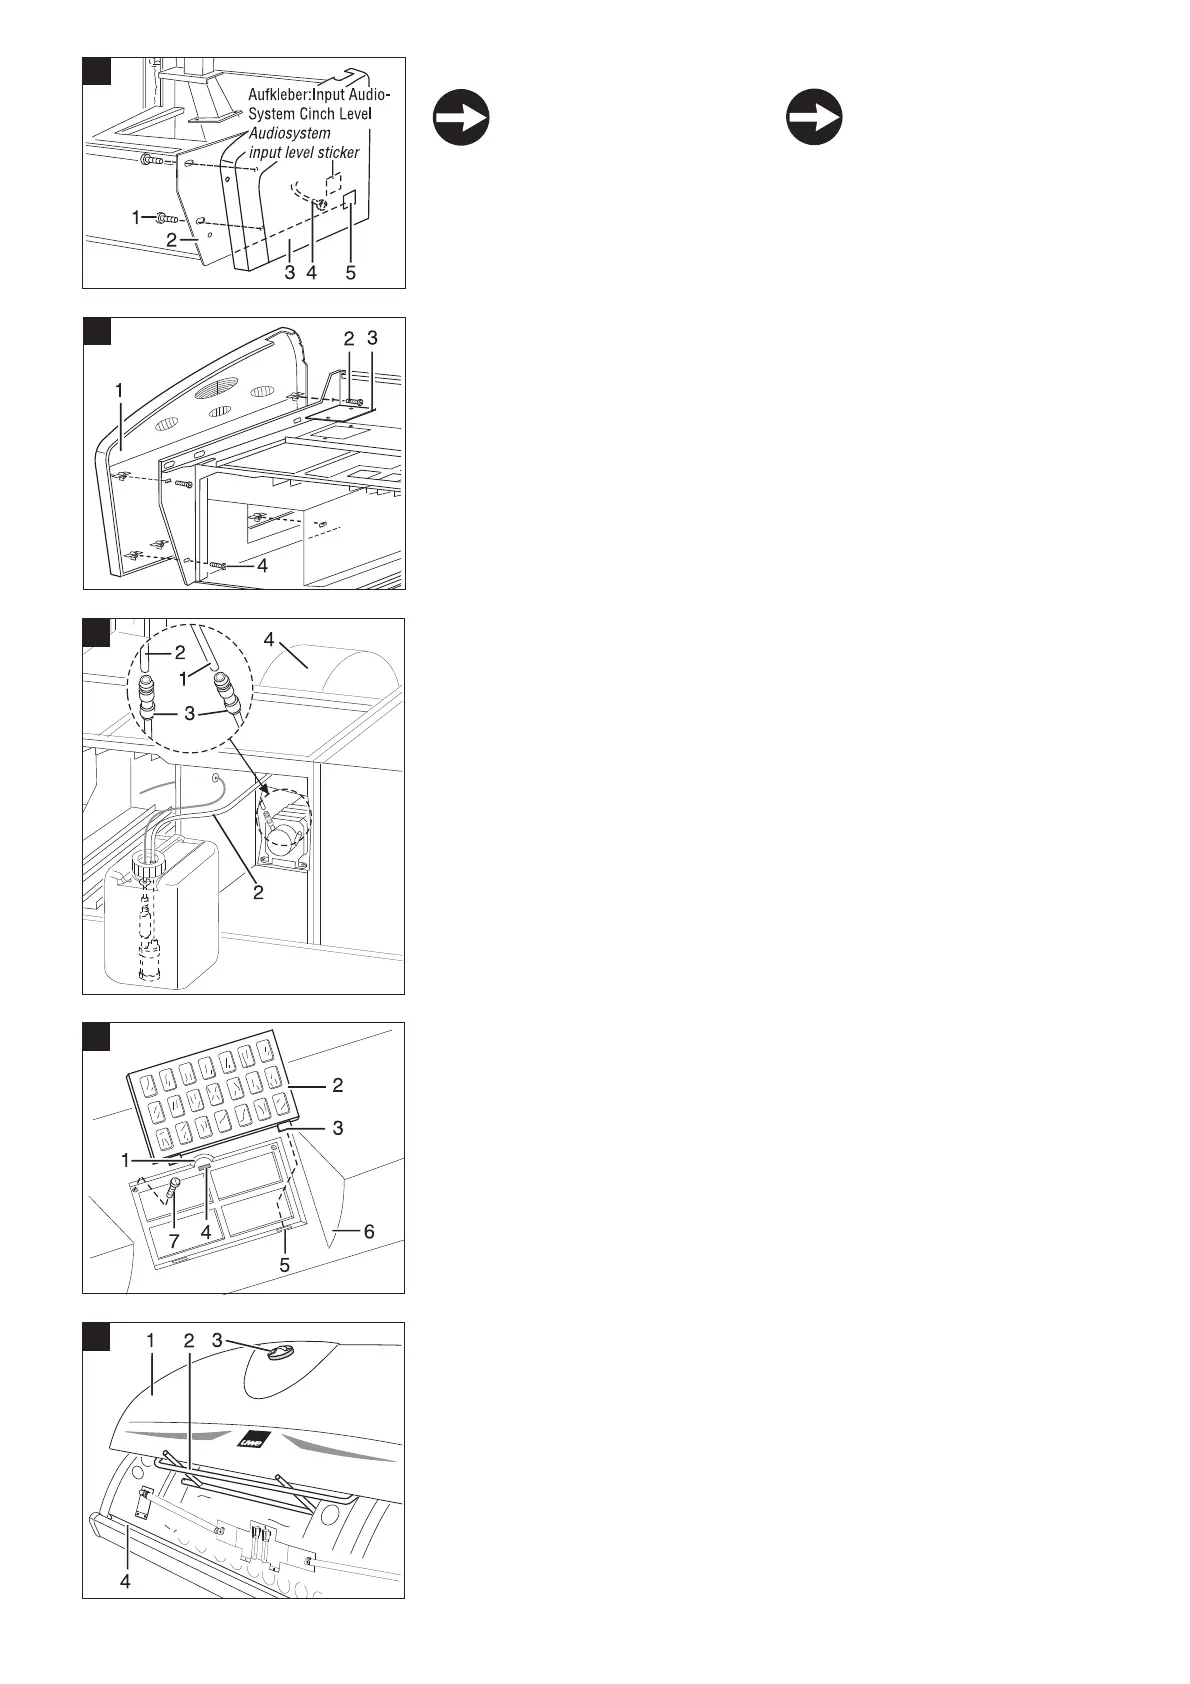
9.2.5 Demontage Verkleidungsteile
Alle Kunststoff-Verkleidungsteile des
Fußgestells sind mit metrischen
Schrauben 6 x 20 am Fußgestell be-
festigt.
Verkleidungsteile Fußgestell demontieren
1. Drehen Sie die 6 Schrauben (55/1) vom
Fußgestell her heraus und nehmen Sie die
komplette Seitenverkleidung (55/3) ab.
Beim Audio Komfort Paket (Option) ziehen
Sie das Lautsprecherkabel (Option, 55/4)
mit der Seitenverkleidung nach aussen
weg.
Beim Audio Basis Paket (Option) ist das
Lautsprecherkabel auf den Klemmen auf
derAbdeckplatte (55/5) angeklemmt und
muss bei der Demontage nicht weiter
beachtet werden.
2. Demontieren Sie fußseitig die Abdeckplatte
(56/3).
3. Fassen Sie gegebenenfalls durch die Öffnung
und drehen Sie die 8 Schrauben
(56/2, 56/4) vom Fußgestell her heraus und
nehmen Sie die linke Seitenverkleidung
(56/1) komplett ab.
9.2.6 BREEZE Leitungen trennen
(BREEZE Option)
Die Breeze-Einheit im Fluter ist im Fußgestell
mit einer Luftzuleitung (57/1) an die Luft-
pumpe, sowie der Wasserleitung (57/2) der
Tauchpumpe im Breeze-Kanister, ange-
schlossen. Die Schnellsteckkupplungen (57/3)
befinden sich ebenfalls im Fußgestell zwischen
der Schottwand und dem Hauptlüfter (57/4).
1. Drücken Sie den Ring der Schnellsteck-
kupplung (57/3) der Wasserleitung (57/2)
nach hinten, der Wasserschlauch löst sich
aus der Schnellsteckkupplung.
2. Trennen Sie die Luftzuleitung (57/1) auf die
gleiche Weise.
9.2.7 Demontage Fluter
Kleine Abdeckhaube Fluter abnehmen
1. Fassen Sie in die Griffmulde (58/1) über der
kleinen Abdeckhaube und ziehen Sie die
kleine Abdeckhaube weg.
Die Magnetverbindung (58/4) löst sich.
2. Führen Sie die Laschen (58/3) der kleinen
Abdeckhaube (58/2) aus den Aussparungen
(58/5) der grossen Abdeckhaube (58/6)
heraus.
3. Nehmen Sie die kleine Abdeckhaube nach
oben weg.
4. Drehen Sie die Schrauben (58/7) aus.
Grosse Abdeckhaube Fluter hochklappen
1. Befestigen Sie auf der Abdeckhaube (59/1)
den Sauger (59/3).
2. Kippen Sie die Abdeckhaube nach oben, bis
deren Längskante aus dem vorderen
Längsträger des Fluters (59/4) rutscht.
Nehmen Sie die Abdeckhaube herunter.
55
Function
56
9.2.5 Removing the Casing
All plastic housing parts are faste-
ned to the base with metric screws
6 x 20 between the side parts and
carry this unit to the installation site.
Removing the Base Casing
1. Unscrew the 6 screws (55/1) on the base
and take off the complete side housing
(55/3).
For the Audio DeLuxe Package (optional)
pull the loudspeaker cable (optional,
55/4) with the side housing to the outside.
For the Audio Basic Package (optional)
the loudspeaker cable is plugged to the
clamps on the cover plate (55/5) and need
not be observed during dismantling.
2. Remove the cover (56/3) at the lower end.
3. If necessary grasp through the opening and
unscrew the 8 screws (56/2, 56/4) from the
base and take off the left hand side housing
(56/1) completely.
9.2.6 Disconnect the BREEZE lines
(BREEZE optional)
The BREEZE device is connected with the air
pump an with the immersion pump in the
canister (air tube 57/1 and water tube 57/2).
The instant plug in clutches are in the foot
area between the wall and the fan (57/4).
1. To disconnect the water tube (57/2) press
the ring of the instant plug in clutch (57/3)
backwards.
2. Disconnect the air tube (57/1) in an
analogous manner.
9.2.7 Removing the Canopy
Removing the Small Canopy Covering Panel
1. Hold the recessed grip (58/1) above the small
covering panel and lift away the small
covering panel.
The magnetic connection (58/4) is
released.
2. Guide the tabs (58/3) of the small covering
panel (58/2) out of the recesses (58/5) of
the large covering panel (58/6).
3. Remove the small covering panel from the
top.
4. Unscrew the bolts (58/7).
Lifting the Large Canopy Covering Panel
1. Attach the sucker (59/3) to the covering panel
(59/1).
2. Lift the covering panel upwards until the long
side slides out of the front longitudinal beam
of the canopy (59/4).
Funktion
58
59