EasyManua.ls Logo

V-TAC VT-5555 - User Manual

V-TAC VT-5555
28 pages
Print Icon
To Next Page IconTo Next Page
Loading...
Ha a gombot rövid időre megnyomja (vagy megnyomja az automatikus tisztitás gombját a
távirányitón), a Robot elkezdi az automatikus tisztitást. Ahhóz hogy a Robot felvegye a
szuper műkődési módot, nyomja meg még egyszer a gombot. (Lásd a 5. ábrát)
EGY SZÓBÁNAK A TISZTITÁSA:
Használati javaslat: egyszobás tisztitási mód
Beallitasi modszer: Addig nyomkodja a tisztitásimódot kiválasztó gombot a távirányitón,
amig kiválasztotta az egy szóba tisztitási módot .
Figyelmeztetés: Ha csak egy szobát kell tisztítani, kérjük zárja be a szba ajtóját és a Robot
központosított takarítást végez ebben a szobában.
Ha ez a szoba nem rendelkezik töltőüléssel, a készülék visszatér a kiindulási ponthoz.
Az egyágyas szoba tisztítási mód mindig a szuperfunkciós tisztítási mód.
ÉLTISZTÍTÁS:
Használati javaslat: A beltéri saroktisztításnál a Robot megtisztítja a rögzített tárgyak
(például falak) kerületét és a éltisztítás befejezése után visszatér a töltőüléshez.
Beállítási módszer: Addig nyomkodja a tisztitásimódot kiválasztó gombot a távirányitón,
amig kiválasztotta az éltisztítási módot az éltisztítás elindításához.
MANUÁLIS (KÉZI) VEZÉRLÉS:
Használati javaslat: Kézi vezérlésű tisztításhóz alkalmas.
Beállítási módszer: A távirányító gombjára kattintva vezérelheti a Robotot, hogy előre és
hátra mozduljon el és forduljon.
FUNKCIÓK - SZÜNET, FELÉBRESZTÉS ÉS KIKAPCSOLÁS
Szünet: A robot működése közben nyomja meg a Roboton lévő vagy a távvezérlőn lévő
szünet gombot, a robot működésének szüneteltetéséhez.
Félébresztés: Ha a Robot műkődését megállitjük több mint 10 percre, a készülék
automatikuson át fog váltani alvó üzemmódba. (Ekkor a jelzőfénye kialszik)
A Robot-ot felébresztheti a rajta található Start / Szünet gomb (Robot key) megnyomásával,
majd kattintson a Robot key-re vagy a távvezérlőn és az alkalmazáson lévő bármelyik
gombra, hogy újraindítsa a Robotot.
Kikapcsolás: Miután a robot leállt, hosszan nyomja meg a Roboton a Start / Szünet gombot
és a Robot jelzőfénye kialszik, jelezve hogy a gép ki van kapcsolva.
* Miután a robot befejezte a munkáját, ajánljük hogy ne kapcsoljuk ki, ahhóz hogy maradjon
a töltöttségi állapotban, hogy a következő alkalomra jó teljesitőképes legyen.
A KÉSZÜLÉK HASZNÁLATA – ELŐKÉSZITÉS
TÁVOLITSA EL A VÉDŐ ELMEKET
A Robot használata előtt, távolitsa el a védő csikkot a Robot-on. (Lásd a 1. ábrát)
A KÉSZÜLÉK FELTÖLTÉSE
1. Elhelyezés és töltés: A töltőülést a falmellett, egy sik felületre kell beszerelni. A
távolságtartási követelmények olyanok, hogy a töltőülés jobb és bal oldalától számitott 0.5
méterre illetve az elülső oldalától számitott 1.5 méterre ne helyezenek bármilyen tárgyat
sem. (Lásd a 2. ábrát)
2. Tápegység: Csatlakoztassa a hálozati adaptert az egyenáramú csatlakozóhóz.
3. Oldalsó kefe szerelése: Szerelje be az oldalsókefét a bal és a jobb oldalnak megfelelően
(Lásd a 3. ábrát)
4. Töltés: Helyezze el a Robot-ot a töltőülésre feltöltődni (töltés alatt a jelzőlámpa villog és
amikor a töltés befejeződött, a lámpa átválik folyamatos világitásra. A feltöltési idő k.b. 5 óra.
(Lásd a 4. ábrát)
A tisztitás során a Robot érzékeli a hátramaradó teljesitmény szintjét és amikor ezt nem
elegndőnek itéli, akkor automatikuson elinditja az újratöltési módot, azaz automatikuson
megkeresi a töltőülést és elkezdi az újratöltödését. A Robot házigazdája is elindithatja az
újratöltési módot, a távirányitón lévő és ezt a célt szolgáló gomb megérintésével.
TÖLTÉSI ÓVINTÉZKEDÉSEK:
1. Biztositsa, hogy a töltőülés ne legyen kitéve a napsugárzásra, sőt a visszareflektált
napfényre sem. Ha olyan tárgyak vannak a lakásban, amelyek a fényt visszaverik a
Robot-ra, sziveskedjék ezeket eltakarni, eltávolitani vagy megfelelően áthelyezni.
2. Ahhóz, hogy biztositsák az előretervezett munkaidőt a Robot-nak, gondoskodjanak, hogy
használat előtt a Robot teljesen fel legyen töltődve. A feltöltési idő k.b. 5 óra.
3. A töltési folyamat közben ne kezdeményezzék a viztartály ki/be szerelését. Ezzel
biztositják a töltés biztonságát és nem teszik lehetővé, hogy a nedves mosópárna
megrongálja a padlót.
A TISZTITÁSIMÓD KIVÁLASZTÁSA
A különbőző tisztitási igényeknek megfelelően, a készülék számos tisztitási módja közül
választhat. Ön különböző tisztitási módot indithat el a Robot-on, a távvezérlő-n vagy a
V-TAC Smart Light Applikáción keresztül.
Automatikus tisztitás:
Használati javaslat: A leggyakrabban használt tisztitási módszer az, hogy a főmotor egy
ijalakú mozgást megtervez és el kezdi végezni – igy az egyész területet kitisztitja, az aktuális
otthoni környezetnek megfelelően.
Beallitasi modszer: A leállitott állapotban hosszan nyomja meg a gombot és amikor a
Robot jellzőlámpája mutat ON – ez azt jelenti, hogy a Robot be van kapcsolva.
Question and Answer IconNeed help?

Do you have a question about the V-TAC VT-5555 and is the answer not in the manual?

Summary

Introduction and Warranty

Multi-Language Manual QR Code

QR code for accessing the manual in multiple languages.

Package Contents

Product Composition Overview

Front Robot Components

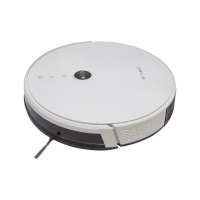
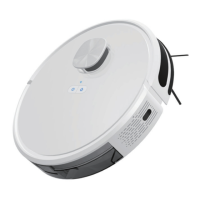
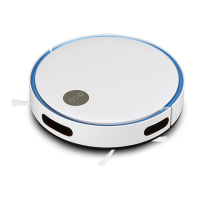
Diagram showing the front view of the robot and its parts.

Back Robot Components

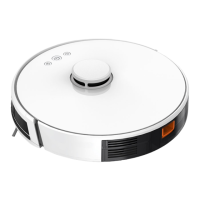
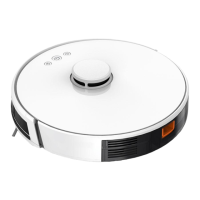
Diagram showing the back view of the robot and its parts.

Product Component Details

Dust Box Assembly

Illustration of the dust box and its components.

Water Tank and Mopping Pad Assembly

Illustration of the water tank and mopping pad.

Charging Dock Details

Illustration of the charging dock.

Remote Control Details

Illustration of the remote control.

Product Usage Preparation

Remove Protective Elements

Guidance on removing protective elements from the robot before use.

Charging The Robot

Charging Attention Points

Important notes and warnings regarding the charging process.

Cleaning Modes

Auto Cleaning Mode

Details on the automatic cleaning mode and its operation.

Single Room Cleaning Mode

Instructions for using the single room cleaning mode.

Edge Cleaning Mode

Instructions for using the edge cleaning mode.

Manual Robot Control

Guide for manually controlling the robot's movement.

Robot Functions: Pause, Wakeup, Shutdown

Time Scheduling Function

Setting up a cleaning schedule for the robot via the app.

Using The Water Tank

Add Water to Tank

Steps to add water to the robot's water tank.

Install Water Tank

Steps to install the water tank onto the robot.

Install Mopping Pad

Steps to install the mopping pad onto the water tank assembly.

Start Mopping Function

Initiating the floor mopping function of the robot.

Dust Box Maintenance Part 1

Remove Dust Box

Procedure for removing the dust box from the robot.

Open Dust Box Side Cover

Procedure for opening the side cover of the dust box.

Empty Dust Box

Procedure for emptying the collected dust from the dust box.

Access High Efficiency Filter

Procedure for opening the compartment housing the high efficiency filter.

Dust Box Maintenance Part 2

Remove Filters from Dust Box

Procedure for removing filters from the dust box compartment.

Clean Primary Filter Screen

Instructions for cleaning the primary filter screen with water.

Clean Dust Box with Cloth

Instructions for cleaning the dust box using a dishcloth.

Dust Box Maintenance Part 3

Dry and Reassemble Dust Box

Procedure for drying and reassembling the dust box and filters.

Replace Dust Box Filters

Procedure for reinstalling the primary and high efficiency filters.

Reinstall Dust Box

Procedure for closing and reinstalling the dust box onto the robot.

Water Tank & Mopping Pad Maintenance

Remove Water Tank

Procedure for removing the water tank from the robot.

Remove Mopping Pad

Procedure for removing the mopping pad.

Empty Water Tank

Procedure for emptying the water from the water tank.

Clean Mopping Pad

Instructions for cleaning the mopping pad.

Dry Mopping Pad

Procedure for drying the mopping pad.

Dry Water Tank

Procedure for drying the water tank.

Main Brush & Side Brush Maintenance

Open Main Brush Cover

Procedure for opening the main brush cover assembly.

Remove Main Brush Shaft

Procedure for removing the main brush shaft.

Clean Main Brush Hair

Using a utility tool to clean tangled hair from the main brush.

Clean Side Brush

Procedure for cleaning the side brush.

Charging Pins, Sensor & Wheel Maintenance

Clean Charging Dock Pins

Procedure for cleaning the charging pins on the charging dock.

Clean Drive & Universal Wheels

Procedure for cleaning the robot's drive and universal wheels.

Clean Down-View Sensor

Procedure for cleaning the robot's down-view sensor.

Troubleshooting Common Issues

Robot Suspended (Wheels Off Ground)

Robot suspended due to wheels being off the ground.

Dust Box Not Installed

Robot malfunction: dust box removed or not installed.

Battery Failure Issues

Troubleshooting abnormal battery charging problems.

Wheel Jammed

Check and clear obstructions if the wheel is jammed.

Front Collision Sensor Stuck

Check if the front collision sensor is stuck or not rebounding.

Robot Connection Failure

Troubleshooting robot connection issues with the server.

Low Battery Warning

Robot indicates low battery and automatically enters recharge mode.

Tangled or Jammed Side Brush

Check and fix side brush entanglement or jamming.

Robot Stuck in Area

Robot is stuck; move it to an open area for clearing.

Technical Specifications

Structural Specifications

Details on the robot's physical dimensions and weight.

Battery Specifications

Information on battery voltage and capacity.

Operational Parameters

Details on dust box, water tank, charging, cleaning modes, and working time.

Robot Power and Voltage

Specifications for robot's rated power and operating voltage.

App Installation Instructions (1;4)

Turn On Device

Instruction to turn on the robot device.

Download V-TAC Smart Light App

Guidance on downloading the V-TAC Smart Light mobile application.

Register New App Account

Procedure for opening the app and registering a new user account.

App Installation Instructions (2;4)

Enter Mobile Number for Registration

Instruction to select country and enter mobile number for app registration.

Enter Email for Registration

Instruction to enter email address for app registration.

Verify Account and Set Password

Verify account with code and set a new password for the app.

Add Robot Device to App

Instruction to add the robot device to the V-TAC Smart Light app.

App Installation Instructions (3;4)

Select Robot Device in App

Procedure to select the Robot Vacuum from Home Appliances in the app.

Ensure Rapid Blinking for Pairing

Confirm that the device's indicator light is blinking rapidly for pairing.

Initiate Rapid Flashing

Long-press power button for 5 seconds to make the indicator flash rapidly.

Confirm Wi-Fi Pairing

Confirm rapid blinking, enter Wi-Fi password, and confirm pairing.

App Installation Instructions (4;4)

Device Connecting and Initializing

App searches, registers, and initializes the device after pairing.

Rename and Complete Setup

Rename the paired device and tap 'Completed' to finish setup.

Control Robot via App

Access robot controls and features by tapping its name on the app home page.

App Modes and Features (1;3)

Select Cleaning Modes and Strength

Select cleaning modes and adjust suction power via the app interface.

Set Cleaning Schedules

Configure cleaning schedules for specific days and times through the app.

App Modes and Features (2;3)

Manage Robot Modes (Standby;Pause)

Manage standby, sleeping, and pause modes using the app.

Track Robot Cleaning Path

View the robot's cleaning path on the app's working map.

Locate Robot Function

Use the 'Find Robot' function to locate the robot via sound.

App Modes and Features (3;3)

Share Device Control

Share robot control with other users through the app.

Reset Wi-Fi Connection

Reconnect the robot to a new Wi-Fi network after changing networks.

V-TAC VT-5555 Specifications

General IconGeneral
BrandV-TAC
ModelVT-5555
CategoryVacuum Cleaner
LanguageEnglish

Related product manuals