Do you have a question about the VAM KOA and is the answer not in the manual?
Read all instructions and safety information before installation. Ensure electrical connections comply with codes and hire a qualified electrician if needed.
Ensure blades rotate without obstruction, with at least 7 feet clearance from the floor. Use a metal outlet box secured to the building structure.
Secure all connections after installation. Do not insert objects into fan blades. Turn off fan before reversing direction. Avoid sloped ceilings and solid-state devices.
Check all parts against the provided list and assembly drawing before installation to ensure no marks or damages.
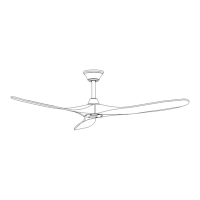
Visual guide showing the placement of components during fan assembly, including bracket, canopy, downrod, and blades.
Securely attach the hanger bracket to the ceiling joist using lag bolts and washers. Pre-install canopy screws.
Prepare the fan motor assembly, install blades using hex key, and attach downrod with clevis pin and hairpin clip.
Connect main power to the terminal block and fan wires to the receiver, ensuring correct live, neutral, and earth connections.
Slide the canopy up to the mounting bracket, align keyhole slots, and secure it with screws. Install canopy ring.
Install battery, then set DIP switches for Universal Mode (UPPER) or Learning Mode (LOWER).
Use UP/DOWN buttons for speed, OFF button to turn off, and Forward/Reverse button for airflow direction.
Install the transmitter wall mount cradle using provided screws and replace the trim plate.
Set DIP switches to DOWN, turn on power, press SET for 4 seconds until receiver beeps.
Program each fan sequentially, waiting 3 minutes between fans. Ensure fans are on separate power supplies if possible.
Motor stops after 30 seconds of obstruction. Remove obstacles and reset by turning fan off and on.
Limits maximum current output if fan load increases abnormally to protect the device.
Tips for fan operation, including reset procedures, controlling multiple fans, and forward/reverse function behavior.
Periodically clean with a soft brush or lint-free cloth. Avoid abrasive agents and solvents.
Periodically check that the blade setscrews are secure and tight.
Some movement is normal; minor wobble is not a fault. Ensure fan is not rigidly mounted.
Check blade mounting screws, ensure consistent blade level, and check for warped blades or uneven screw tightness.
A balancing kit is provided to assist with reducing wobble. Retain the kit for future use.