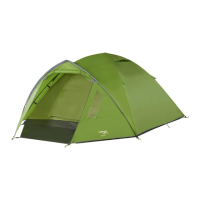
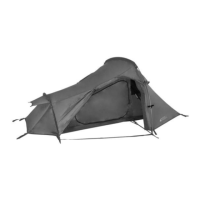
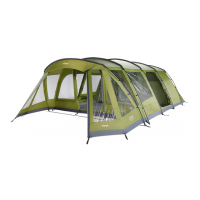
TENT PITCHING INSTRUCTIONS – TAY (EN)
Inner First Pitching
Assemble poles and lay them parallel on the ground (3 poles - 2 longer poles and 1 shorter porch pole).
Open out inner and position in required direction.
Insert the two longer poles diagonally through pole sleeves on inner tent.
Locate one end of each diagonal pole onto pin system at groundsheet corners.
Push each diagonal pole into an arch from opposite end and locate pole ends onto corresponding pin system.
Attach all clips that connect inner tent to poles.
Peg each of the 4 corners of the inner tent through the ring of the ring and pin system.
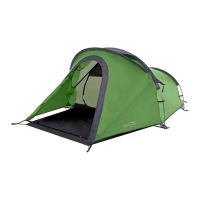
Flysheet
Open out flysheet and position so that the inner doorway and the flysheet doorway correspond.
Pull flysheet over the inner tent and position seams to correspond with poles on inner.
A number of velcro strips are located on the underside of the flysheet. These must be secured around the poles of the inner tent.
Peg down each side of flysheet through the shock-cord pegging points, adjacent to the metal rings of the inner tent. Use the pin-pegs
supplied.
Insert remaining porch pole into the pole sleeve on the outside of flysheet.
Locate one end of the porch pole onto second pin at front pole of tent.
Push the opposite end of the pole into an arch and locate pole end onto the corresponding pin system.
Pull porch taut, away from main body of tent and peg down the corners of the porch through the shock-cord pegging points using pin-
pegs.
Peg out all remaining shock-cord pegging points on the base of the flysheet using pin-pegs.
Peg out ALL guy lines using pin-pegs ensuring that guy line fabric attachment points are evenly tensioned.
Open flysheet door and peg front corners of porch groundsheet
……………………………………………………………………………………………………………………………………………………………………………………………………………
AUFBAUANLEITUNG – TAY (DE)
Innenzelt-zuerst-Aufbau
Stecken Sie die Stangen zusammen und legen Sie sie parallel zueinander auf den Boden (3 Stangen - 2 längere und 1 kürzere
Vorbaustange).
Innenzelt auslegen und korrekt ausrichten.
Stecken Sie die beiden längeren Stangen diagonal durch die Gestängekanäle des Innenzelts ein.
Befestigen Sie ein Ende jeder diagonalen Stange mit dem Stift-System an der Ecke der Bodenplane (Abbildung 1).
Drücken Sie jede diagonale Stange gewölbeförmig von der gegenüberliegenden Seite aus hoch und fixieren Sie die Stangenenden mit
dem passenden Stift-System.
Befestigen alle Halterungsklemmen, mit denen das Innenzelt am Gestänge befestigt wird.
Stecken Sie jede der 4 Ecken des Innenzelts durch die Ringe des Ring-und-Stift-Systems (Abbildung 2).
Außenzelt
Außenzelt ausfalten und so ausrichten, dass Inneneingang und Außenzelteingang übereinstimmen.
Ziehen Sie das Außenzelt über das Innenzelt und richten Sie die Nähte so aus, dass sie an den Stangen des Innenzelts verlaufen.
An den Unterseite des Außenzelts befinden sich eine Reihe von Klettverschlussstreifen. Diese müssen um die Stangen des Innenzelts
befestigt werden.
Befestigen Sie jede Seite des Außenzelts durch die mit Gummizug versehenen Befestigungspunkte, die sich neben den Metallringen
des Innenzelts befinden. Verwenden Sie die mitgelieferten Stiftheringe.
Stecken Sie die übrige Vorbaustange in den Gestängekanal auf der Außenseite des Außenzelts ein.
Stecken Sie ein Ende der Vorbaustange auf den zweiten Stift an der Vorderstange des Zeltes auf.
Schieben Sie das gegenüberliegende Ende der Stange in eine gewölbte Form und stecken Sie das Stangenende auf das zugehörige
Stiftsystem auf.
Ziehen Sie den Vorbau straff und vom Hauptzelt weg und fixieren Sie die Ecken des Vorbaus durch die mit Gummizug ausgestatteten
Befestigungspunkte mit Stiftheringen.
Befestigen Sie alle übrigen mit Gummizug versehenen Befestigungspunkte mithilfe der Stiftheringe an der Basis des Außenzelts.
Stecken Sie alle Spannschnüre mit den mitgelieferten Arretierstiften aus und stellen Sie sicher, dass die Befestigungspunkte der
Spannschnüre gleichmäßig unter Spannung sind.
Richten Sie die Bodenplane des Vorbaus aus und klippen/stecken Sie sie an Ihren Platz.
……………………………………………………………………………………………………………………………………………………………………………………………………………