9) Adjust the air pressure and paint flow to provide a uniform dispersion of atomized
paint throughout the pattern. Keep air pressure as low as possible to minimize
paint “bounce back” and overspray. Excessive fluid flow will result in a heavy
center spray pattern. Inadequate flows will cause the spray pattern to split.
Please see the Troubleshooting section of this guide if any problems occur.
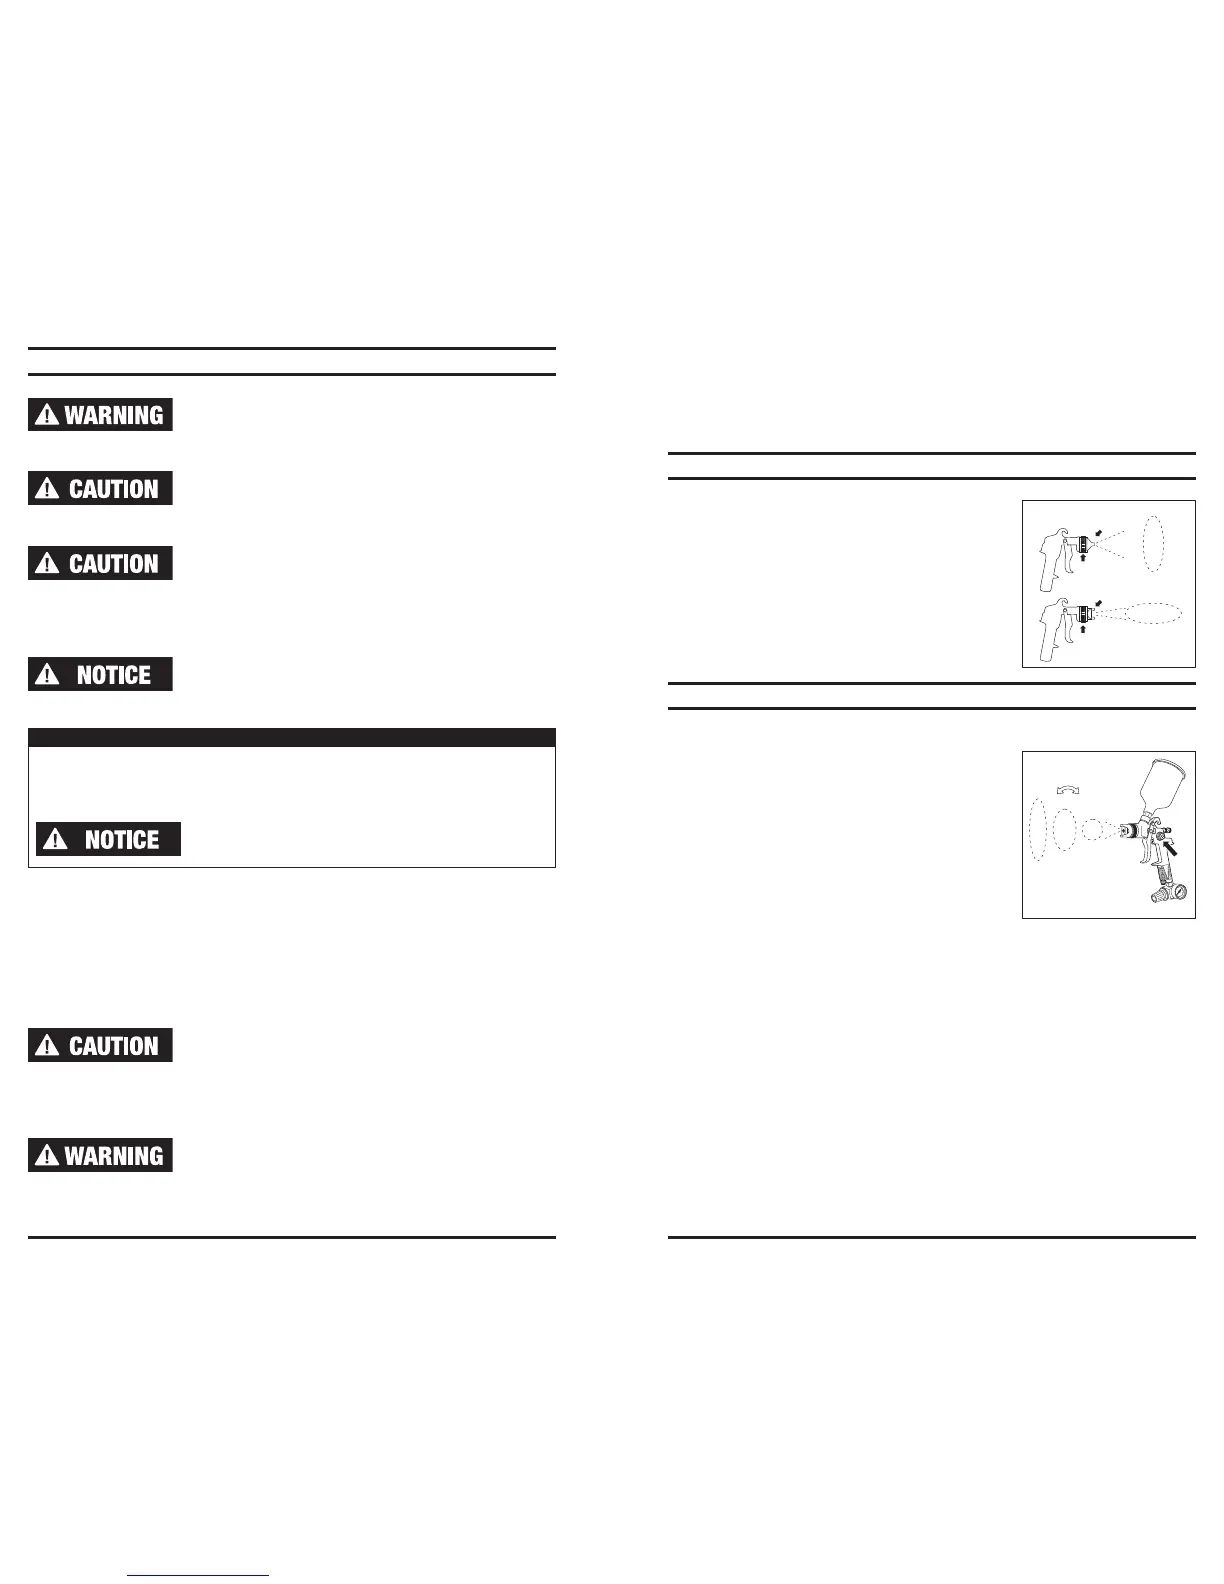
FAN DIRECTION
The position of the air cap horns determines the direc-
tion of the fan (horizontal or vertical spray pattern).
Loosen the lock ring on the air cap and rotate the horns
to achieve the desired pattern. Hand tighten lock ring
after adjustment.
SPRAY PATTERN ADJUSTMENT
SIPHON AND GRAVITY FEED GUNS
1) Adjust air pressure to the spray gun according to the
recommendations supplied by the spray material
manufacturer. This air pressure is typically below 20
PSI for HVLP spray guns and between 40 to 60 PSI
for conventional spray guns. Adjust air pressure with
the trigger pulled and the air control knob (if applica-
ble) fully open.
2) The width of the “fan spray” is controlled by the pat-
tern control knob. Turn knob counterclockwise to
increase the width of the fan spray pattern. Turn knob
clockwise to decrease the spread of the fan spray pattern for a round pattern.
3) Trigger a short burst while turning fluid control knob until the desired pattern on
the test target and adjust the fluid control knob until the desired atomization
(spray) pattern is achieved. If the spray is too fine, creating excessive overspray,
there is too much air for the amount of paint being sprayed - Reduce the air pres-
sure or open the fluid control to spray more material. If the spray is too coarse,
(spitting globs of paint), reduce the amount of material with the fluid control knob
or thin the paint.
10 11
PREPARATION FOR SPRAYING
DDOO NNOOTT AATTTTEEMMPPTT TTOO UUNNCCLLOOGG ((BBAACCKK FFLLUUSSHH)) SSPPRRAAYY GGUUNN
BBYY SSQQUUEEEEZZIINNGG TTRRIIGGGGEERR WWHHIILLEE HHOOLLDDIINNGG FFIINNGGEERR IINN
FFRROONNTT OOFF FFLLUUIIDD NNOOZZZZLLEE
PPrreessssuurree mmaayy vvaarryy aaccccoorrddiinngg ttoo vviissccoossiittyy ooff mmaatteerriiaall uusseedd..
MMaaxxiimmuumm wwoorrkkiinngg pprreessssuurree ooff tthhiiss gguunn iiss 110000 PPSSII.. DDOO NNOOTT
EEXXCCEEEEDD PPRREESSSSUURREE LLIIMMIITT OOFF GGUUNN OORR AANNYY CCOOMMPPOONNEENNTT IINN TTHHEE SSYYSSTTEEMM..
PPrriioorr ttoo ddaaiillyy ooppeerraattiioonn,, mmaakkee cceerrttaaiinn tthhaatt aallll ccoonnnneeccttiioonnss
aanndd ffiittttiinnggss aarree sseeccuurree.. CChheecckk hhoossee aanndd aallll ccoonnnneeccttiioonnss ffoorr
wweeaakk oorr wwoorrnn ccoonnddiittiioonnss tthhaatt ccoouulldd rreennddeerr tthhee ssyysstteemm uunnssaaffee..
AAllll rreeppllaacceemmeenntt ccoommppoonneennttss mmuusstt hhaavvee aa wwoorrkkiinngg pprreessssuurree eeqquuaall oorr ggrreeaatteerr tthhaann
tthhee ssyysstteemm pprreessssuurree..
TThhiiss sspprraayy gguunn wwaass ttrreeaatteedd wwiitthh aann aannttiiccoorrrroossiivvee aaggeenntt
pprriioorr ttoo sshhiippmmeenntt..
CCAARREEFFUULLLLYY FFLLUUSSHH GGUUNN WWIITTHH TTHHIINNNNEERR BBEEFFOORREE UUSSEE..
WATER AND/OR OIL IN COMPRESSED AIR
All compressor pumps discharge some condensed water, oil or contaminates with
the compressed air.
IIMMPPOORRTTAANNTT::
This condensation will cause “fish eyes” to appear
in the paint job. Install appropriate water/oil removal filter equipment and controls
as necessary for the intended application.
Failure to install appropriate water/oil removal equipment
may result in damage to machinery or workpiece.
1) Thoroughly mix paint to be sprayed in accordance with the manufacturer’s
instructions, adding thinner where necessary.
2) Strain material through 60 to 90 mesh screen.
3) Fill the gravity feed paint cup with the material. Be careful not to overfill the cup.
Install cup lid and make sure vent hole is clear.
4) Attach 1/4" NPS (F) air outlet of locking pressure regulator to 1/4" NPS air inlet on
spray gun.
5) Attach air supply to 1/4" NPT (M) air inlet on locking pressure regulator.
NNEEVVEERR ppooiinntt sspprraayy gguunn aatt sseellff oorr ootthheerrss.. AAcccciiddeennttaall ddiiss--
cchhaarrggee ooff mmaatteerriiaall mmaayy rreessuulltt iinn sseerriioouuss iinnjjuurryy..
5) Start the air compr
essor.
6) Adjust air pressure via air supply regulator.
NNOOTTEE:: HHVVLLPP ooppeerraattiioonn rreeqquuiirreess aa
mmaaxxiimmuumm ooff 1100 PPSSII mmeeaassuurreedd aatt tthhee nnoozzzzllee.. DDOO NNOOTT eexxcceeeedd 2211 PPSSII aatt tthhee aaiirr
iinnlleett ttoo aavvooiidd eexxcceeeeddiinngg 1100 PPSSII nnoozzzzllee pprreessssuurree..
DDOO NNOOTT eexxcceeeedd 110000 PPSSII MMaaxxiimmuumm pprreessssuurree
7) Prepare a piece of scrap material for use as a spray gun test target.
8) Depress spray gun trigger fully to spray material.
NNOOTTEE
: Depressing trigger partially will cause only air to be released.
 Loading...