5
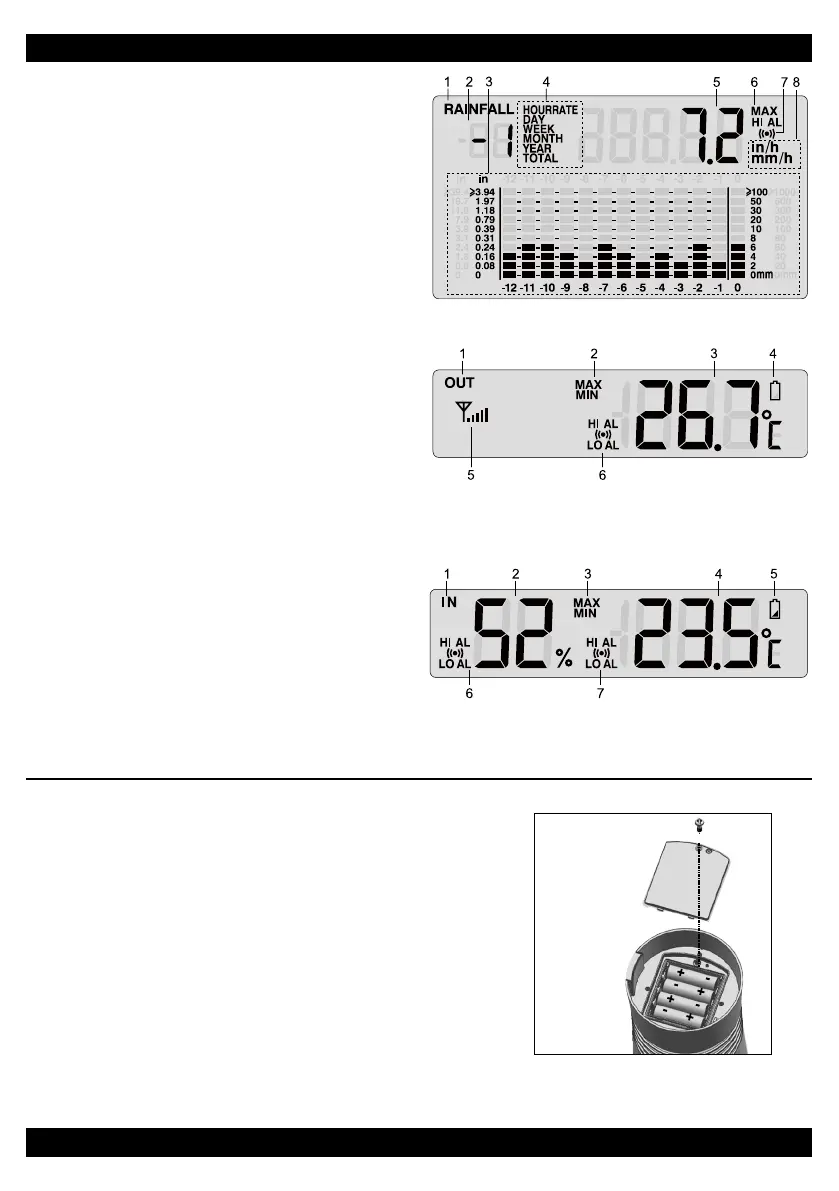
Rainfall Display
1. Rainfall indicator
2. Past time
3. Histogram
4. Time range record indicator
5. Rainfall reading
6. MAX indicator
7. HI Alert and Alarm
8. Rainfall unit (in/h / mm/h)
Outdoor Temperature Display
1. OUT indicator
2. MAX/MIN indicator
3. Outdoor temperature
4. Low battery indicator for sensor
5. Outdoor signal strength indicator
6. HI / LO Alert and Alarm
Indoor Temperature & Humidity Display
1. IN indicator
2. Indoor humidity
3. MAX/MIN indicator
4. Indoor temperature
5. Low battery indicator for main unit
6. HI / LO Alert and Alarm for humidity
7. HI / LO Alert and Alarm for temperature
INSTALLATION OF WIRELESS RAIN GAUGE SENSOR
Your wireless rain gauge sensor measures rainfall and temperature for you. It’s fully assembled
and calibrated for your easy installation.
Battery and Installation
Unscrew the battery door at bottom of the unit and insert the
batteries according to the “+/-” polarity indicated. Screw the
battery door compartment on tightly. Press [ RESET ] button
after each battery change.
NOTE:
7KHUHG/('ZLOOEHJLQÀDVKLQJHYHU\VHFRQGV
Mounting Guidelines
1. Install the Thermo-Rain Gauge sensor in an open location with no obstructions above and
around the sensor for accurate rain and temperature measurement.
2. Ensure the rain gauge is installed as level as possible to achieve accurate rain measurement.
3. The sensor and the main display unit should be positioned within an effective range of 100 m
(329 ft) in an open area
Add rubber pad before
mounƟng on pole or pos
Pole (not included)
Mounted horizontally
and 1.5m off the ground
5 6
Rainfall Display
1. Rainfall indicator
2. Past time
3. Histogram
4. Time range record indicator
5. Rainfall reading
6. MAX indicator
7. HI Alert and Alarm
8. Rainfall unit (in/h / mm/h)
Outdoor Temperature Display
1. OUT indicator
2. MAX/MIN indicator
3. Outdoor temperature
4. Low battery indicator for sensor
5. Outdoor signal strength indicator
6. HI / LO Alert and Alarm
Indoor Temperature & Humidity Display
1. IN indicator
2. Indoor humidity
3. MAX/MIN indicator
4. Indoor temperature
5. Low battery indicator for main unit
6. HI / LO Alert and Alarm for humidity
7. HI / LO Alert and Alarm for temperature
INSTALLATION OF WIRELESS RAIN GAUGE SENSOR
Your wireless rain gauge sensor measures rainfall and temperature for you. It’s fully assembled
and calibrated for your easy installation.
Battery and Installation
Unscrew the battery door at bottom of the unit and insert the
batteries according to the “+/-” polarity indicated. Screw the
battery door compartment on tightly. Press [ RESET ] button
after each battery change.
NOTE:
7KHUHG/('ZLOOEHJLQÀDVKLQJHYHU\VHFRQGV
Mounting Guidelines
1. Install the Thermo-Rain Gauge sensor in an open location with no obstructions above and
around the sensor for accurate rain and temperature measurement.
2. Ensure the rain gauge is installed as level as possible to achieve accurate rain measurement.
3. The sensor and the main display unit should be positioned within an effective range of 100 m
(329 ft) in an open area
Add rubber pad before
mounƟng on pole or pos
Pole (not included)
Mounted horizontally
and 1.5m off the ground

 Loading...