EasyManua.ls Logo

VEVOR SY-1200-V1 - User Manual

VEVOR SY-1200-V1
16 pages
Print Icon
To Next Page IconTo Next Page
Loading...
Technical Support and E-Warranty Certificate
www.vevor.com/support
PASTE LIQUID FILLING MACHINE
USER MANUAL
We continue to be committed to provide you tools with competitive price.
"Save Half", "Half Price" or any other similar expressions used by us only represents an
estimate of savings you might benefit from buying certain tools with us compared to the major
top brands and does not necessarily mean to cover all categories of tools offered by us. You
are kindly reminded to verify carefully when you are placing an order with us if you are
actually saving half in comparison with the top major brands.
Question and Answer IconNeed help?

Do you have a question about the VEVOR SY-1200-V1 and is the answer not in the manual?

Overview

This document describes the VEVOR Paste Liquid Filling Machine, a device designed for accurately dispensing various free-flowing pastes and liquids without particles. The machine is available in several models, including the SY-1200 series (SY-1200-V1, SY-1200-V2, SY-1200-V3) and the SY-M90 series (SY-M90-V1, SY-M90-V2, SY-M90-V3), each with slightly different specifications tailored to various filling needs.

Function Description

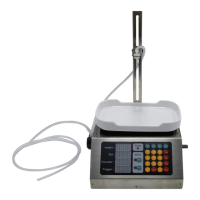
The VEVOR Paste Liquid Filling Machine is designed for precise and efficient filling of liquids and pastes. It operates in both manual and automatic modes, allowing for flexibility in different production environments. The machine features a control panel with a digital display to show weight, set values, counter, and trigger values, enabling users to monitor and adjust filling parameters. It utilizes a peristaltic pump system to draw liquid from an inlet hose with a filter and dispense it through an outlet hose with a filling nozzle. The machine can store up to four groups of filling weights for quick recall and use. It also includes an automatic peeling function to tare the weight of empty bottles, ensuring accurate net filling. The flow rate is adjustable, allowing users to control the speed of filling from 1 to 100, with the value displayed digitally. Additionally, the machine can be set to a time-based filling method, providing precision down to 0.01 seconds.

Important Technical Specifications

The technical specifications vary slightly between the SY-1200 and SY-M90 series:

Suitable Liquid: Both series are suitable for all free-flowing pastes and liquids without particles, such as soy sauce, beverages, white wine, vinegar, milk, and alcohol (less than 75%).

Filling Range:

  • SY-1200 series: 5g to 300g
  • SY-M90 series: 5g to 50g

Max Flow Rate:

  • SY-1200 series: 1000ml/min
  • SY-M90 series: 100ml/min

Control Mode: Both series operate in Automatic control mode.

Rating(s):

  • AC 120V 60Hz
  • AC 230V 50Hz (Specific models within each series may have different voltage/frequency ratings, e.g., SY-1200-V1 and SY-M90-V1 are AC 120V 60Hz, while others are AC 230V 50Hz).

Power (Max.):

  • SY-1200 series: 39W
  • SY-M90 series: 15W

Components: Both series include a power cord, bracket, sponge strip (black), and two filling nozzles.

  • SY-1200 series includes a hose with filter and a short silicone hose.
  • SY-M90 series includes an inlet hose and an outlet hose.

Usage Features

Assembly and Setup:

  1. Place the tray on top of the machine.
  2. Install the bracket by removing screws, positioning the bracket, and locking it with screws.
  3. Open the cover and clips of the peristaltic pump.
  4. Wrap the hose into the peristaltic pump.
  5. Fasten the clips and cover the lid.
  6. Adjust the filling nozzle height and plug in the hose.
  7. Insert the power cord.
  8. The product is supplied with a thin filling nozzle; additional nozzles can be installed as needed.
  9. Before first use, the machine should be cleaned by repeatedly pumping water or replacing the hose.

Control Panel and Button Functions:

  • Display Window:
    • Weight: Displays the actual weight of the item being weighed.
    • Set: User-defined weight to be filled.
    • Counter: Number of bottles filled.
    • Trigger: Weight value that triggers auto-start.
  • Button Functions:
    • Man: Enter manual mode.
    • Auto: Enter automatic mode.
    • Tare: Peel and set to zero.
    • Set: Set the filling weight.
    • Trig: Set the trigger value.
    • Run: Manually start the filling function (click again to pause).
    • Save: Store 4 groups of commonly used filling data.
    • M1-M4: Call the stored filling weight data.
    • 0: Clear counter value.
    • The green Run button and foot switch have the same function as the Run button on the keyboard.

Operating Instructions:

  • Setting Method: Press Set, enter the value (e.g., set 100g, enter 1 0), then press Set again.
  • Trigger Setting Method: Press Trig, enter the value (e.g., set 35g, enter 35), then press Trig again. The trigger value is set to empty bottle weight. In automatic mode, filling starts when the weight of the empty bottle exceeds the trigger value.
  • Manual Mode: Press Man (the manual light turns on).
    1. Put an empty bottle, press Tare to remove the empty bottle weight.
    2. Press Run to start filling. The filling stops when the poured liquid reaches the set filling weight.
  • Automatic Mode: Press Auto (the automatic light turns on).
    1. Put an empty bottle; the system automatically tares and starts filling after a delay (x seconds).
    2. When the weight reaches the filling weight, filling stops.
    3. Remove the filled bottle; the system resets to zero after a delay (x seconds) and automatically starts the next filling.
    4. If the machine doesn't fill properly in automatic mode due to an incomplete cycle, remove the bottle and press Tare to reset.
  • Storing Filling Weights (M1-M4): Press Save (filling weights flash), input the value, then press M1 (or M2, M3, M4) to store. To use a stored value, press the corresponding M button.
  • Canceling Automatic Peeling: Restart the machine, press Auto, then hold 3 until an alarm sounds. Repeat to re-enable.
  • Setting Mid-Range Deceleration Ratio: Press Auto, set flow rate (e.g., 80), long-press the flow knob until a "Beep" is heard. This causes the machine to slow down to medium speed at a certain percentage of the set amount.
  • Setting Slow Down Value: Press Trig, Save. This determines how many grams before the end the machine automatically slows down.
  • Factory Settings: Press Auto, then hold 5 until an alarm sounds. The machine will revert to factory settings.

Flow Rate Regulation:

  1. The machine has a flow rate adjustment knob, adjustable from 1-100, with a digital display.
  2. Rotating the knob adjusts the speed, which is displayed digitally. The display exits after 3 seconds of no operation.
  3. Pressing the knob displays the current flow rate value, which also exits after 3 seconds.
  4. Flow rate adjustments are automatically saved and remembered after power-off.

Time-Based Filling Method:

  1. Press Auto, long-press 2 to switch to time-based filling (can be restored to weight-based filling the same way).
  2. Time-based filling displays the number in seconds, accurate to 0.01 seconds.
  3. Press Settings, input filling time, then press Settings again to set.
  4. Press Trigger, input interval time, then press Trigger again to set the interval time for automatic filling.
  5. To extract filling time: Press Set, Start, load the required amount, then press Start, Set.
  6. Automatic mode allows for fixed intervals between automatic starts; manual mode requires pressing the start button.

Maintenance Features

  1. Selection: Users should select a quantitative filling machine with a suitable range according to the products.
  2. Scale Accuracy: The machine contains a precision electronic scale; it is forbidden to be overweight.
  3. Filling Head Height: The height of the filling head can be adjusted to about 10 mm from the bottle mouth.
  4. Stability: Keep the machine level and stable to avoid big vibrations or impact, which may cause damage.
  5. Initial Use/Long Term Storage: If the pump does not absorb water during first use or after long periods of disuse, add some water from the intake pipe to the pump and then start the machine.
  6. Cleaning: It is best to clean the machine with clean water after every use, which prolongs the pump's service life.
  7. Storage: When the machine is not in use, empty the liquid and store it in a ventilated and dry place.
  8. Filter Cleaning: Clean the product and the filter in time after each use.
  9. Product Protection: Always keep the product outside clean.
  10. Storage Location: Store the product in a dry and ventilated place.
  11. Long-Term Disuse: If not used for a long time, clean and empty the liquid in the product.
  12. Consumable Parts: Regularly replace consumable parts such as the hose, filter, and filling nozzle.

Troubleshooting:

  • Not absorbing water: If the machine doesn't absorb water (first use or long disuse), add water to the intake pipe and start the pump.
  • Pump can't get liquid out:
    • Hose inlet and outlet inverted: Confirm hose inlet into liquid tank.
    • Power cord not plugged in: Reconnect the power cord.
    • Hose folded or damaged: Smooth hose or replace hose.
  • Power indicator is off: Power cord not plugged in: Reconnect the power cord.

Environmental Compliance: This product complies with European Directive 2012/19/EC. The crossed-out wheelie bin symbol indicates that the product and its accessories should not be discarded with normal domestic waste but must be taken to a collection point for recycling electrical and electronic devices.

VEVOR SY-1200-V1 Specifications

General IconGeneral
BrandVEVOR
ModelSY-1200-V1
CategoryTools
LanguageEnglish

Related product manuals