Do you have a question about the Viavi P5000i and is the answer not in the manual?
Lists necessary equipment for P5000i fiber inspection, including SmartOTDR and cleaning tools.
Outlines the process of connecting the P5000i microscope to the SmartOTDR.
Attaches inspection tips to the P5000i probe or barrel assembly using retaining nuts.
Inserts the P5000i USB connector into a USB port on the SmartOTDR device.
Presses the Home button to display the device's main screen.
Taps the Microscope icon to launch the inspection application.
Taps the Setup soft key to access configuration options.
Configures tip settings and profiles based on connection type, using the provided table.
Presses the Back soft key to return to the main inspection screen.
Inserts the appropriate bulkhead inspection tip into the connector, aligning keys as needed.
Adjusts the P5000i's Focus Control wheel for optimal fiber focus on the screen.
Initiates the inspection test by pressing the P5000i Test button or tapping the SmartOTDR soft key.
Interprets results via a green checkmark (PASS) or red X (FAIL) on the screen.
Cleans the fiber end-face and re-runs the inspection if the test failed.
Inserts the patch cord into the correct inspection tip, aligning keys for SC-APC and OptiTap connectors.
Adjusts focus and runs the inspection test using the P5000i or SmartOTDR.
Interprets patch cord inspection results as PASS (checkmark) or FAIL (X).
Cleans the fiber end-face and re-runs the test if a FAIL result is obtained.
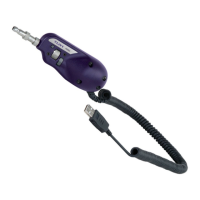
The VIAVI P5000i Microscope is a sophisticated fiber inspection tool designed to work seamlessly with the SmartOTDR handheld fiber tester, enabling users to efficiently inspect common single-mode fiber end faces. This quick card provides a comprehensive guide to its operation, from initial setup to performing detailed inspections and troubleshooting.
The primary function of the P5000i Microscope is to visually inspect fiber optic end faces for defects, contamination, or damage that could impair signal quality. When connected to a SmartOTDR, it displays a magnified view of the fiber end face, allowing for precise analysis against industry standards. The device is capable of performing automated pass/fail analysis, significantly streamlining the inspection process and ensuring compliance with quality benchmarks. It supports various fiber types and connector styles through its interchangeable inspection tips, making it a versatile tool for different network environments.
The P5000i Microscope is designed for ease of use, integrating several features that simplify fiber inspection:
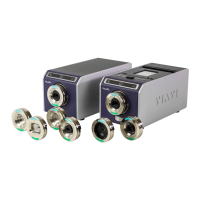
Connectivity and Setup: The P5000i connects to the SmartOTDR via a USB port, typically found under a flap on the SmartOTDR. Before inspection, users must attach the appropriate inspection tip to the front of the P5000i probe. These tips are crucial for adapting the microscope to different fiber types and connector styles. Standard patch cord tips and bulkhead tips connect to the Barrel Assembly (FBPT-BAP1) by threading the collar and securing it with a retaining nut. Ribbon tips and specific Corning OptiTap bulkhead tips (FBPT-COD-L) connect directly to the probe without the need for the Barrel Assembly.
SmartOTDR Integration: The SmartOTDR serves as the display and control unit for the P5000i. After connecting the microscope, users navigate to the "Microscope" icon on the SmartOTDR's home screen and then to the "Setup" soft key. Here, critical parameters like "Tip Setting" and "Profile" are configured. The "Tip Setting" specifies the type of inspection tip being used, while the "Profile" defines the inspection standard (e.g., SM APC (IEC-61300-3-35 Ed. 2.0)) against which the fiber end face will be evaluated. If a required tip setting is not available on the SmartOTDR, it can be loaded from a PC using FiberChekPRO™ software.
Bulkhead Inspection: For inspecting bulkheads, the appropriate inspection tip is inserted directly into the bulkhead. For SC-APC bulkheads, keys on the inspection tip must be aligned with those on the bulkhead connector. For OptiTap bulkheads, the arc and flat pin on the inspection tip need to align with the matching insertions in the OptiTap receptacle adapter. For OptiTip patch cord inspection, a patch cord adapter slides onto the main tip assembly, and a wheel is rotated to view and test each fiber.
Patch Cord Inspection: Inspecting patch cords involves inserting the patch cord into the inspection tip. For SC-APC patch cord inspection through an SC-SC Optical Coupler, the patch cord is inserted into the SC APC optical coupler, ensuring proper alignment of keys. For OptiTap and SC-APC patch cord inspection without an optical coupler, the patch cord is inserted into a 2.5mm APC patch cord inspection tip, with the connector key aligned to the notch on the tip. Similar to bulkhead inspection, OptiTip patch cord inspection uses a bulkhead adapter that slides onto the main tip assembly, allowing rotation to view and test individual fibers.
Focus Control: A key feature is the "Focus Control" wheel on the P5000i microscope. This wheel allows users to adjust the focus of the optical fiber. The SmartOTDR screen displays a vertical bar indicating the focus level, with a line within the bar showing the optimal focus point for the current image. Users adjust the wheel until the bar is as close to this line as possible, ensuring a clear and accurate view of the fiber end face.
Automated Pass/Fail Analysis: The P5000i, in conjunction with the SmartOTDR, offers automated inspection tests. Users can initiate a test either by pressing the "Test" button on the P5000i itself or by tapping the "Test" soft key on the SmartOTDR. The system then performs an analysis of the fiber end face against the configured profile. A green checkmark on the SmartOTDR indicates a "PASS" result, while a red "X" signifies a "FAIL" result. This automated analysis significantly reduces the subjective element of manual inspection and speeds up the process.
Live Fiber View: After an inspection, users can return to a "Live" fiber view by tapping the "Live" soft key on the SmartOTDR. This allows for real-time observation of the fiber end face, which can be useful for further manual assessment or for verifying cleaning efforts.
While the P5000i Microscope itself is a robust device, its effective operation relies heavily on proper maintenance, particularly regarding fiber cleaning:
Cleaning Protocol: The quick card emphasizes the importance of cleaning fiber end faces. If an inspection test results in a "FAIL," the immediate action is to clean the fiber end face and re-run the inspection test. This process is repeated until the fiber passes the inspection. The document implicitly highlights that the P5000i is a diagnostic tool, and its results often necessitate cleaning as a corrective action. The "fiber optic cleaning tools" are listed as essential equipment, underscoring the integral role of cleaning in fiber maintenance.
Tip Management: The interchangeable inspection tips are designed for specific fiber types and connectors. Proper handling and selection of these tips are crucial for accurate inspections and to prevent damage to both the tips and the fiber under test. While not explicitly stated as a maintenance feature, the ability to swap tips implies that individual tips can be cleaned or replaced if they become worn or damaged, extending the overall lifespan and utility of the P5000i system.
Software Updates: The mention of FiberChekPRO™ software for loading tip settings suggests that the SmartOTDR's capabilities, and by extension, the P5000i's functionality, can be updated and enhanced through software. This allows for future compatibility with new fiber types or inspection standards, ensuring the device remains relevant and effective over time. Users are directed to a specific URL for downloading FiberChekPRO, indicating a pathway for maintaining the system's software.
In summary, the VIAVI P5000i Microscope is an intuitive and powerful tool that, when paired with the SmartOTDR, provides a comprehensive solution for fiber optic end face inspection. Its user-friendly interface, automated analysis capabilities, and adaptability to various fiber types make it an indispensable asset for ensuring the quality and reliability of fiber optic networks. The emphasis on cleaning and proper tip management highlights the practical aspects of maintaining optimal performance in the field.
| Type | Digital Microscope |
|---|---|
| Camera Resolution | 5 MP |
| Light Source | LED |
| Connectivity | USB |
| Image Capture | Yes |
| Connector Types | USB |
| Data Storage | SD Card |
| Power Source | Rechargeable Battery |