46240.024B
IT
EN
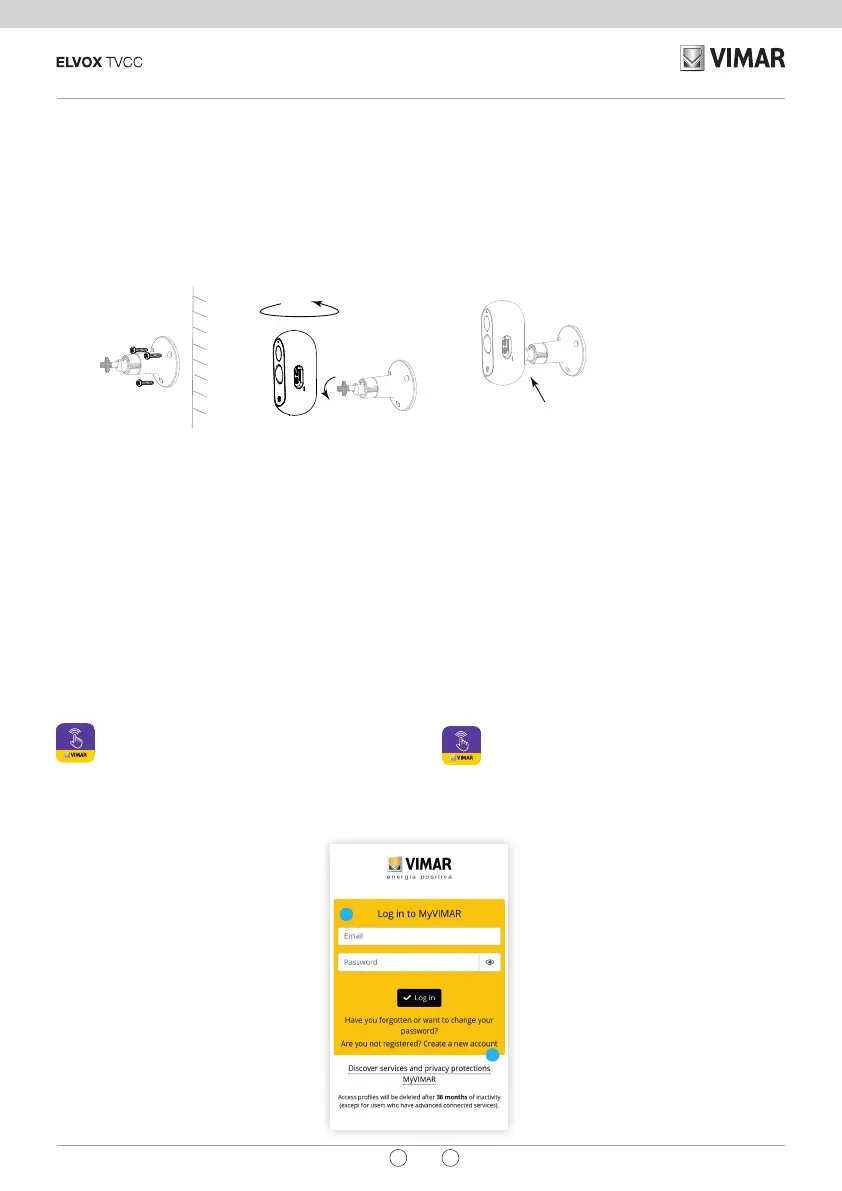
0~90°
0~360°
After ajusting the camera
angle, please tighten the
bracket.
4.2 - Installare l’App sullo smartphone
a- Se si possiede già un account per
MyVIMAR.
Aprire l’App e accedere con le
proprie credenziali.
b- Altrimenti creare un nuovo account,
toccando sull’apposito link “Crea un
nuovo account”.
Eseguire le successive indicazioni
in APP, inserire le credenziali e
procedere con il passo 4.4.
2
3 - Installazione
3.1 - Posizionamento
Utilizzare la staa per ssare la telecamera ad una parete
tramite le viti in dotazione.
4 - Ricarica batteria e configurazione
4.1 - Alimentare la telecamera
1. Collegare il cavo USB sulla telecamera, facendo
attenzione al verso di inserimento.
2. Accendere la telcamera e attendere che il LED di
stato lampeggi, si udirà un feedback parlato (“Avvio
Telecamera” e successivamente “Congura la
telecamera”).
4.3 - Primo accesso
4.2 - Install the App on the smartphone
a- If you already have a account for
MyVIMAR.
Open the App and log in with their
credentials.
b- Otherwise create a new account
by tapping on the appropriate link
"Create a new account ".
Carry out the following directions
in the APP, enter credentials and
proceed with step 4.4.
3 - Installation
3.1 - Positioning
Use the wall bracket to attach the camera to a wall using
the screws in equipment.
4 - Battery charging and configuration
4.1 - Power up the camera
1. Connect the USB cable to the camera by doing pay
attention to the direction of insertion.
2. Turn on the camera and wait for the LED to status
ashes, you will hear spoken feedback (“Camera
ON”and then“ Camera setup ”).
4.3 - First access
ATTENZIONE: Batterie ricaricabili non sostituibili al Litio
2 x 3,6 V / 2600 mAh.
ATTENTION: Rechargeable Lithium batteries, non-
replaceable 2 x 3.6 V / 2600 mAh.
Scaricare e installare l’App Vimar "VIEW
Product” sul proprio smartphone cercandola
direttamente nel App Store di riferimento.
Download and install the Vimar "VIEW Product"
App on your smartphone by searching for it
directly in the App Reference store.
Note di installazione: per evitare che le immagini risultino
sovraesposte, evitare l'installazione della telecamera in
condizioni di controluce o luce eccessiva.
Installation Notes: To prevent overexposed images,
avoid installing the camera under backlight or excessive
light conditions.
a
b
After ajusting the camera angle,
please tighten the bracket.
Dopo aver regolato l'angolazione
della telecamera, stringere la staffa.
0~90°
0~360°
After ajusting the camera
angle, please tighten the
bracket.
0~90°
0~360°
After ajusting the camera
angle, please tighten the
bracket.
 Loading...