EasyManua.ls Logo

VintageView Le Rustique - User Manual

VintageView Le Rustique
2 pages
Print Icon
To Next Page IconTo Next Page
Loading...
Wine Master Cellars, LLLP • 10645 E 47th Ave, Denver, CO 80239 • phone: 866.650.1500 • fax: 866.650.1501 • VintageView.com
1. - Hold
either the neck or base strip of the rack in place against the
wall a minimum of 2-1/4 inches away from any corners or
protrusions. Ensure that the rack is vertical using a level and
mark the 4 hole locations with a pencil and set the strip aside.
2. Mark the hole locations for the second strip - Using the
Upper Cross Rail as a guide, align a mounting hole with one
of the 4 marked hole locations from Step 1 and, using a level,
make sure that the Cross Rail is level at each position. Mark
the hole location for the second strip at the opposite end of the
Cross Rail.
Required tools: Phillips Head Screw Driver
Level
Pencil
Tape Measure
Included Parts: 1 Base Strip 1 Lower Cross Rail
1 Neck Strip 1 Upper Cross Rail
2 Decorative Scrolls 8 Spiral Anchors with Screws
3. Install the anchors and secure the rack - Using a Phillips
Head Screw Driver, screw the 8 spiral anchors into the wall at the
behind the Base Strip, and align the mounting hole on the Upper
Cross Rail with the SECOND hole from the top on the Base Strip.
Fasten the Upper Cross Rail and Base Strip to the wall, making
sure to screw it into the SECOND anchor from the top. With
the top of the rack secured, position the Lower Cross Rail (the
one with the slight bend at both ends) even with the bottom of
the rack and secure it in place with a screw. Carefully, slide the
Neck Strip in place, over the Upper Cross Rail and behind the
Lower Cross Rail then secure in place with 3 screws, as shown.
4. Install the decorative scrolls - Note: If stacking
more than one rack, refer to Option 1 on the reverse of
this page. Slide a Decorative Scroll into place, at the top of
.nwohs sa ,wercs a htiw ecalp ni eruces dna pirtS esaB eht
(The Upper Cross rail screw may need to be loosened to
perform this step so be sure to re-tighten the screw fully).
Repeat the process with the second scroll on the Neck Strip.
For product warranty information, please visit: VintageView.com/support/warranty
We’re here to help, call us at 866-650-1500 with any questions.
WINE CELLAR
INTERNATIONAL
Exclusive dealer of
Question and Answer IconNeed help?

Do you have a question about the VintageView Le Rustique and is the answer not in the manual?

Summary

Le Rustique (LR1) Installation Instructions

Marking First Strip Hole Locations

Marking hole locations for the first rack strip on the wall, ensuring vertical alignment.

Marking Second Strip Hole Locations

Marking hole locations for the second rack strip using a level for accurate placement.

Installing Anchors and Securing Rack

Installing wall anchors and securing the wine rack using screws and components.

Installing Decorative Scrolls

Attaching decorative scrolls to the rack, ensuring proper alignment and fastening.

Completing the Installation

Loading Wine and Final Check

Final step to complete the installation, load wine, and enjoy the assembled rack.

Warranty Information

Overview

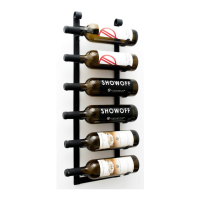
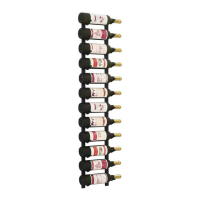
This document provides installation instructions and warranty information for the Le Rustique (LR1) wine rack system, an exclusive product of VintageView, distributed by Wine Master Cellars, LLLP.

Function Description

The Le Rustique (LR1) is a wine storage system designed to hold wine bottles in a horizontal orientation, allowing for easy visibility of labels. It is intended for wall-mounting and can be used as a standalone unit or stacked with multiple units to create a larger storage solution. The system utilizes a minimalist design with metal strips and cross rails to securely cradle wine bottles.

Important Technical Specifications

The Le Rustique (LR1) system includes the following parts:

  • 1 Base Strip
  • 1 Neck Strip
  • 2 Decorative Scrolls
  • 1 Lower Cross Rail
  • 1 Upper Cross Rail
  • 8 Spiral Anchors with Screws

The installation requires common tools such as a Phillips Head Screw Driver, Level, Pencil, and Tape Measure. The rack needs to be installed a minimum of 2-1/4 inches away from any corners or protrusions to ensure proper fit and access.

Usage Features

The installation process is divided into several steps:

  1. Marking Hole Locations for the First Strip:

    • Hold either the neck or base strip against the wall.
    • Ensure it is at least 2-1/4 inches from corners or protrusions.
    • Use a level to ensure vertical alignment.
    • Mark the four hole locations with a pencil.
  2. Marking Hole Locations for the Second Strip:

    • Use the Upper Cross Rail as a guide.
    • Align one mounting hole of the Cross Rail with one of the previously marked holes from Step 1.
    • Use a level to ensure the Cross Rail is level.
    • Mark the hole location for the second strip at the opposite end of the Cross Rail.
  3. Installing Anchors and Securing the Rack:

    • Screw the 8 spiral anchors into the wall at the marked locations using a Phillips Head Screw Driver.
    • Place the Upper Cross Rail (flat) behind the Base Strip.
    • Align the mounting hole on the Upper Cross Rail with the second hole from the top on the Base Strip.
    • Fasten the Upper Cross Rail and Base Strip to the wall, screwing into the second anchor from the top.
    • Position the Lower Cross Rail (with a slight bend) even with the bottom of the rack and secure it with a screw.
    • Slide the Neck Strip into place, over the Upper Cross Rail and behind the Lower Cross Rail.
    • Secure the Neck Strip with three screws.
  4. Installing Decorative Scrolls:

    • Slide a Decorative Scroll into place at the top of the Base Strip and secure it with a screw.
    • (Note: The Upper Cross Rail screw might need to be loosened and then re-tightened for this step).
    • Repeat the process with the second scroll on the Neck Strip.

Stacking Multiple Units (Option 1):

  • If stacking multiple units, do not install the decorative scrolls on the lower units.
  • Instead, slide the bottoms of the upper racks into the gap behind the top of the lower rack.
  • For the upper units in a stacked configuration, the Lower Cross Rail is not used and can be discarded.

Maintenance Features

The product is designed for durability under normal and reasonable use. The warranty covers defects in workmanship and materials for the lifetime of the product.

Warranty Information:

  • Coverage: Wine Master Cellars, LLLP warrants to the original consumer-purchaser that the product is free from defects in workmanship and materials under normal and reasonable use for its lifetime.
  • Remedy: Wine Master Cellars, LLLP will, at its option, refinish or replace any defective product or part.
  • Exclusions: The warranty excludes installation charges, shipping costs, and the cost of removal and reinstallation. The purchaser may be required to return defective part(s) for inspection (freight or postage prepaid).
  • Limitations: The warranty does not cover:
    • Cost of inconvenience or property damage due to product failure.
    • Damage due to Divine Act, third-party acts beyond Wine Master Cellars' control.
    • Misuse, abuse, accident, or damage from transportation.
    • This warranty is exclusive and in lieu of all other obligations, liabilities, or warranties, including any warranty of merchantability or fitness for a particular purpose.
    • Wine Master Cellars, LLLP is not liable for incidental or consequential damages, or any other direct or indirect damage, loss, cost, expense, or fee.
    • Neither the distributor nor retail establishment has authority to make additional warranties or promises.
    • Maximum liability will not exceed the product's purchase price.
  • Governing Law: All matters related to the sale and warranty are governed by the laws of Colorado. Any claims must be filed within six months after the claim arose, with all statutes of limitations to the contrary waived.
  • State-Specific Rights: Some states may not allow the exclusion or limitation of incidental or consequential damages, so the above limitations may not apply to all consumers. The warranty provides specific legal rights, and consumers may have other rights that vary by state.

For product warranty information or assistance, customers are directed to visit VintageView.com/support/warranty or call 866-650-1500.

VintageView Le Rustique Specifications

General IconGeneral
BrandVintageView
ModelLe Rustique
CategoryRacks & Stands
LanguageEnglish

Related product manuals