EasyManua.ls Logo

VintageView W Series - User Manual

VintageView W Series
2 pages
Print Icon
To Next Page IconTo Next Page
Loading...
W Series
Installation Instructions for Magnum/Champagne bottles (WS-MAG)
1 Base strip
1 Neck strip
6 mounting hole caps
2 Plastic Couplers
Phillips head screw driver
Level
Pencil
Parts List Required Tools
>23/4"
Installation Notes:
Concrete, Brick or Stucco: 3/16” x 1 ¼” masonry screw or #8 x 1 ¼ inch screw with appropriate size ex-
panding concrete anchor - not included
VintageView Floor-to-Ceiling Frame (FCF-MAG or FCF-HD): Each FCF comes with self-drilling screws to attach
WS-MAG series racks to the frames
Before you begin, choose the direction the bottle necks should point. Depending on which direction you
choose note that the base strip should be lower than the neck strip.
Figure A Figure B
1. Lay out the wall – Starting at least 3 ¼ in (83 mm) from adjacent wall or other obstructions, mark the
centerline of the rst strip. From there, measure 8 ½ (216mm) to the centerline between the neck and base strip
then mark locations.
2. Mark the hole location for the strip - Hold either the neck or base strip of the rack in place against
the wall, centered on the rst mark the appropriate distance above the oor. Ensure that the rack is plumb using
a level and mark the hole locations with a pencil then set the strip aside.
Pro Tip: If installing multiple columns, mark the centerline for the next strip 6 ½ inches (139.7mm) from the second mark
and mark again 8 ½ inches (190.5mm) from that mark for the distance between the neck and the base strips of the second
column. To lay out additional columns, mark the wall, alternating between 6 ½ and 8 ½ inches.
Note: The dimensions above are recommended for with 1.5L (Magnum) bottles only. If using the racks to store 750L
Champagne style bottles, the rst mark should be at least 3 ¼ in (83mm) from adjacent walls or other obstructions, then 7
½ in (190.5mm) between centerlines of the base and neck strip, with 6 ½ in (165mm) between centerlines of the neck and
base strips of the next rack if installing multiple columns.
4 Spiral drywall anchors
6 screws
2 toggle bolts
Tape Measure
Drill

Other manuals for VintageView W Series

Question and Answer IconNeed help?

Do you have a question about the VintageView W Series and is the answer not in the manual?

Summary

Installation Steps

Lay Out the Wall

Mark the centerline of the first strip starting 3 1/2 inches from adjacent walls, then mark 8 1/2 inches for the next location.

Mark Hole Location for Strip

Hold strip against wall, centered on mark, ensure plumb, then mark hole locations.

Install Anchors for Drywall

Drill pilot holes, screw in drywall anchors for lower holes, drill larger hole for toggle bolt at top.

Install Anchors for Wood

Use extra screw to directly fasten the strip into the wall for wood installations.

Hang the First Strip

Secure strip with toggle bolt at top and screws at bottom, ensuring it is level.

Hang the Second Strip

Repeat previous steps, centering horizontally and ensuring tops are even with the first strip.

Install Mounting Hole Caps

Press mounting hole caps into the 1/2 inch holes on the face of the rack.

Add Wine

Load the rack with Magnum wine bottles.

Overview

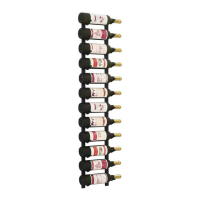
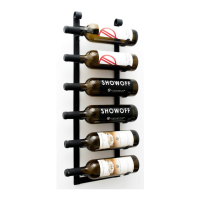
The VintageView W Series WS-MAG is an installation kit designed for mounting wine racks specifically for Magnum/Champagne bottles. This system allows for the creation of a wall-mounted wine storage solution, with flexibility in orientation and expandability for multiple columns.

Function Description

The primary function of the WS-MAG system is to securely mount wine racks to a wall, accommodating larger bottle sizes such as 1.5L Magnum bottles or 750ml Champagne-style bottles. The system consists of individual strips (base and neck) that are attached to the wall, creating a series of cradles for bottles to rest horizontally. Users can choose the direction the bottle necks should point, with the base strip always positioned lower than the neck strip for proper bottle orientation. The design allows for single or multiple columns of racks, providing a scalable storage solution.

Important Technical Specifications

Parts List:

  • 1 Base strip: Forms the lower support for the bottles.
  • 1 Neck strip: Forms the upper support for the bottle necks.
  • 4 Spiral drywall anchors: Used for securing the strips to drywall.
  • 6 screws: For general fastening, particularly for wood installations or the lower mounting points in drywall.
  • 6 mounting hole caps: To cover visible mounting holes for a clean finish.
  • 2 toggle bolts: Used for the top mounting point in drywall, providing strong anchorage.
  • 2 Plastic Couplers: For aligning and connecting multiple racks when stacking.

Required Tools:

  • Phillips head screwdriver
  • Level
  • Pencil
  • Tape Measure
  • Drill

Installation Dimensions (for 1.5L Magnum bottles):

  • First strip placement: At least 3 1/4 inches (83 mm) from adjacent walls or obstructions.
  • Distance between neck and base strip centerlines: 8 1/2 inches (216 mm).
  • Distance between centerlines of adjacent columns (if installing multiple): Alternating between 6 1/2 inches (139.7 mm) and 8 1/2 inches (190.5 mm).

Installation Dimensions (for 750ml Champagne-style bottles):

  • First strip placement: At least 3 1/4 inches (83 mm) from adjacent walls or obstructions.
  • Distance between neck and base strip centerlines: 7 1/2 inches (190.5 mm).
  • Distance between centerlines of adjacent columns (if installing multiple): 6 1/2 inches (165 mm).

Drill Bit Sizes:

  • Drywall pilot holes (for studs): 1/16 inch (1.5 mm).
  • Drywall hole for Toggle Bolt (top mounting point): 13/32 inch (10.3 mm).

Compatibility:

  • Designed for 1.5L (Magnum) bottles.
  • Can also store 750ml Champagne-style bottles with adjusted spacing.
  • Compatible with VintageView Floor-to-Ceiling Frame (FCF-MAG or FCF-HD) using self-drilling screws (provided with FCF).
  • Can be installed on Concrete, Brick, or Stucco walls using 3/16" x 1 1/2" masonry screws or #8 x 1 1/2" screws with appropriate expanding concrete anchors (not included).

Usage Features

Flexible Orientation: Users can choose the direction the bottle necks point, allowing for customization based on aesthetic preference or room layout. Scalable Design: The system supports the installation of multiple columns of racks, enabling users to expand their wine storage capacity as needed. The "Pro Tip" provides specific measurements for laying out additional columns, ensuring proper spacing and alignment. Versatile Wall Compatibility: The instructions detail installation methods for various wall types, including drywall, wood, concrete, brick, and stucco, making the system adaptable to different environments. Stackable Racks: VintageView W Series racks are designed to stack one on top of the other. This feature, combined with the supplied plastic couplers, allows for vertical expansion of the storage system, maximizing wall space. Clean Aesthetic: The inclusion of mounting hole caps ensures that visible mounting hardware is concealed, contributing to a polished and professional appearance once installed.

Maintenance Features

The manual does not explicitly detail maintenance features for the WS-MAG system itself, as it is primarily an installation kit for a static storage solution. However, the robust installation methods (e.g., toggle bolts for drywall, masonry screws for concrete) suggest a durable and stable setup that should require minimal ongoing maintenance once properly installed. The use of mounting hole caps also helps protect the mounting points from dust or minor wear, contributing to the longevity of the aesthetic. The "Add Wine" step humorously implies that the primary "maintenance" involves keeping the rack stocked with "only the good stuff."

VintageView W Series Specifications

General IconGeneral
BrandVintageView
ModelW Series
CategoryRacks & Stands
LanguageEnglish

Related product manuals