Quick Reference
Install
Guide
Remote Start
with
Keyless
Entry
4203-series
1-button
remote-
2-way
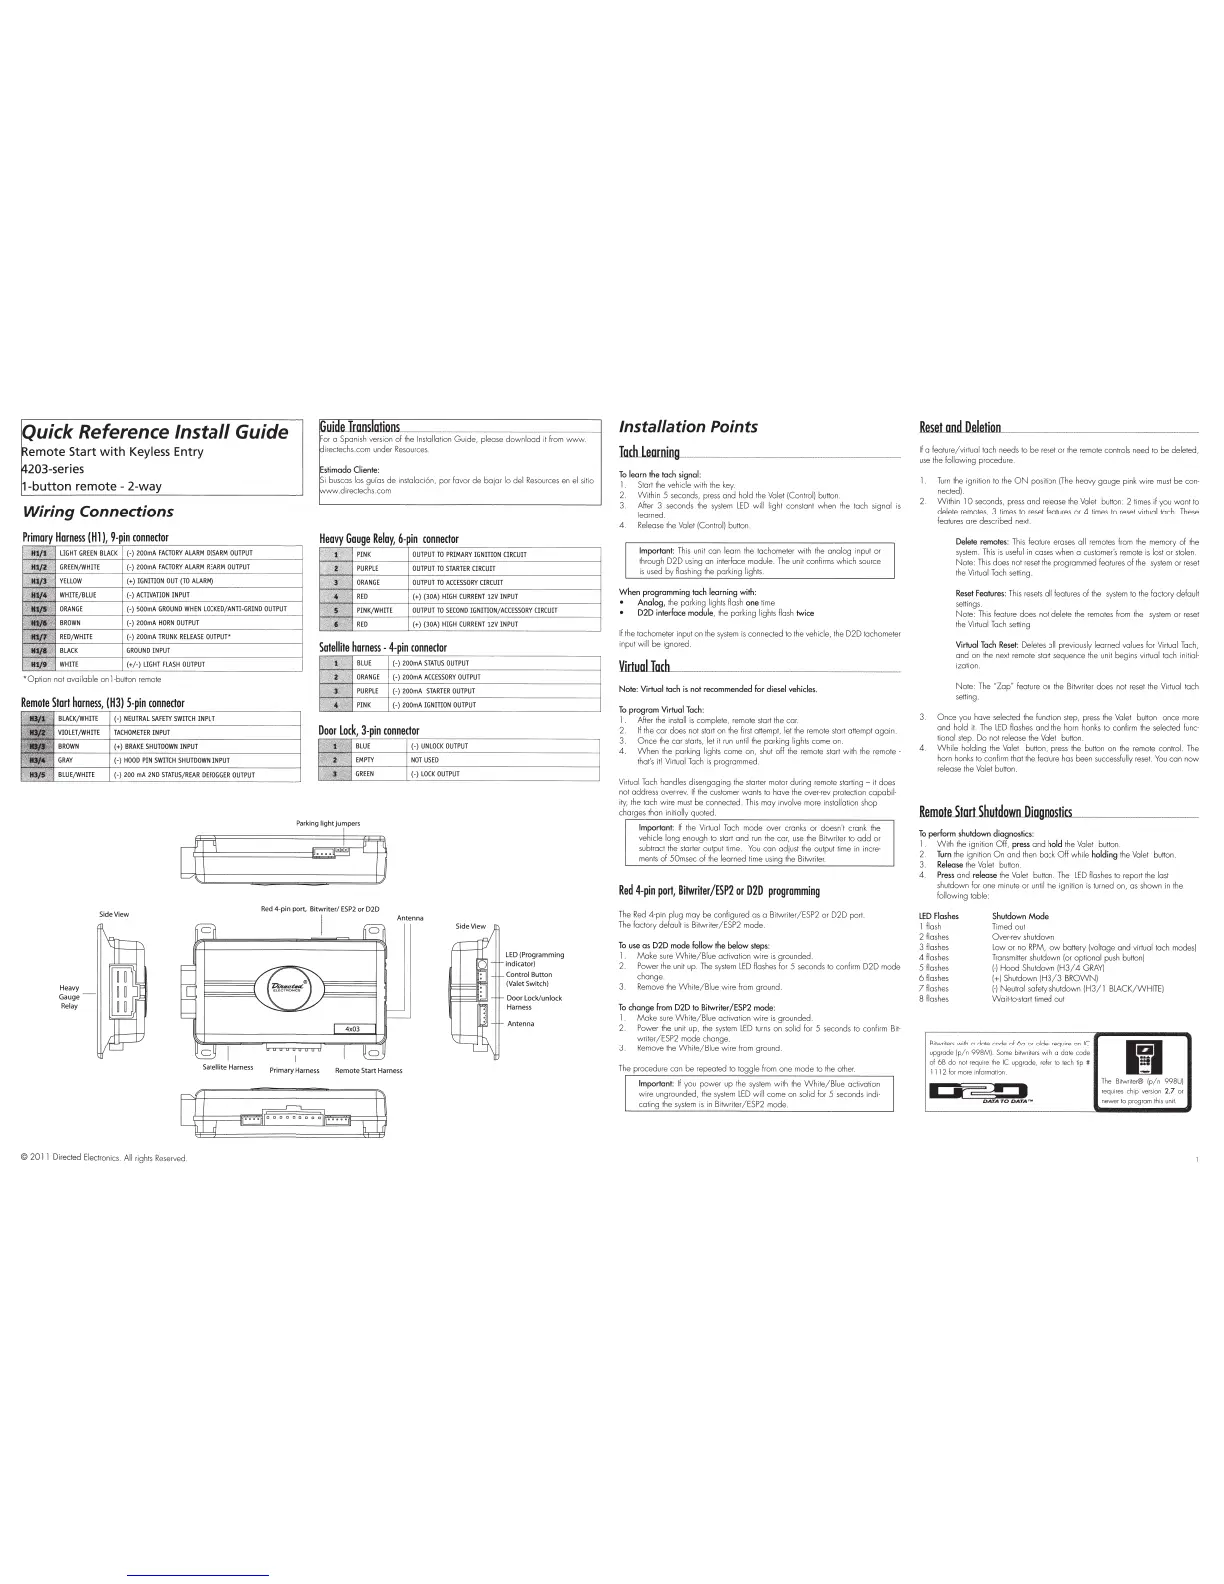
Wiring
Connections
H
ea
vy
Gauge
Relay
Side
View
ions
__________
__
______
______
_
or
a Spanish version
of
the
I
ns
tallation
Guide,
please
down
l
oad
it from
W'WW
ir
ectechs.com under
Resou
rces.
i buscas los guios de
ins
talaci6n,
po
r favor
de
bojor lo del
Re
sources en
el
sitio
direclechs.com
Gouge
Reloy,
6-pin
connector
PINK
OUTPUT
TO
PRIMARY
I
GNITION
CIRCUIT
PUR
PL
E
OUTPUT
TO
STARTER
CI
RCUIT
ORANGE
OUTPUT
TO
ACCESSORY
C
IRCUIT
REO
(+)
(
30A
)
HIG
H
CURRENT
12V
INP
UT
PINK/WHITE
OU
T
PU
T
TO
SECO
ND
IG
NITION
/A
CC
ESSOR
Y
CIRCUIT
REO
(+
) (
30A
)
HIGH
CURRENT
lZV
INPUT
Satellite
harness
-
4-pin
connector
BLUE
(-)
200mA
STA
T
US
OUTPUT
ORANGE
(-)
200m
A
ACCESSORY
OUTPU
T
P
UR
PLE
(-)
200m
A
STARTER
OUTPUT
PINK
(-)
200mA
IGNITION
OUTPUT
Door
Lock,
3-pin
connector
(-)
UNLOCK
OU
TPU
T
NOT
US
ED
(-)
LOCK
OUTPUT
Antenna
J
Side
View
LED
(Programming
indicator)
Control B
utt
on
(Valet Switch)
Door
Lo
ck/unlo
ck
H
arness
Antenna
Satellite
Harness
Primary
Harness
Remo
te Start H
arness
©
201
1 Directed Electronics. All rights
Rese
rv
ed
Installation Points
Iodllearning_
__
_
__
___
_
To
learn
the tach signal:
1 Sta
rt
the
vehicle w i
th
the
key.
2.
With
in 5 seconds, press and hold the Valet !Control) button.
3. Aher 3 seconds the
system
LED
w
il
l light constant when the
ta
ch
signal
is
lea
rn
ed
4
Re
lease
the
Valet IConl
ro
l)
bullon
Important
: T
his
unit can learn the tachometer with
the
analog
in
put
or
through
D2D
using on interface module.
The
unit confirms which source
is
us
ed
by
flash
in
g
the
parking lights.
When
programming
tach
learning
with
:
Analog,
the
parking lig
hts
flmh
one
lime
020
interface
module
, the
pa
rk
ing
li
ghts
fl
ash twice
If
the
tacho
me
ter input on
the
system
is
connected to the vehicle, the
D2D
tachometer
input w ill
be
ignored.
Virtual
loch
Note:
Virtual
toch
is
not
recommended
fo
r diesel vehicles.
To
program
Virtual Tach:
1 After the
in
sta
ll
is
complete, remote start
the
car.
2.
If the car does
no
t start o n the first attempt, let the remo
te
start attempt
again.
3.
Once
the car starts, let it
run
until the parking lights come on.
4.
W h
en
the parking lights come on,
shut
off
the
remote start w
it
h the remote -
that's it! Virtual
Tach
is
programmed.
Virtual
Tach
handl
es
disengaging the starter motor during remote starti
ng-
it
does
not address
ove
r-
rev.
If the
cus
tomer wants
to
have
the
over-rev protection
capob
il·
i
ty,
the
tach
wire
mus
t
be
connected.
Th
is may involve
mo
re installation shop
cha
rges than initially quoted
Important
:
If
the Virtual
Ta
ch m
ode
over cranks or doesn't crank
th
e
vehicle long enough to start
and
run
the cor,
use
the
Bi
twriter
to
odd
or
subtract
the
starter output time.
You
can adju::.t the output
ti
me
in
incre-
ments
of
50msec
of
the learned time using
the
Bi
twri
te
r.
Red
4-pin
port,
Bitwriter/ESP2
or
020
programming
Th
e
Re
d 4-pin plug may
be
co
nfigured as a B
itw
riter/ESP2 or
D2D
po
rt
The
factory default
is
Bitwr
it
er/ESP2
mode
To
use
os
020
mode Follow the
below
steps:
1
Make
sure
Wh
ite
/B
lue activation
wire
is
grounded.
2 P
ower
the
unit up.
The
sys
t
em
lED flashes for 5 seconds
to
confi
rm
D2D
mo
de
change
3.
Remove
the
White/B
lue wi
re
from ground
To
change
from
D2D
to
Bitwriter
/ ES
P2
mode:
1.
Make
su
re
Wh
i
te/Bl
ue activation
wire
is
gr
oun
de
d
2.
Po
wer
the
un
it
up, the system L
ED
t
urns
on
solid f
or
5 seconds to confirm Bit-
writer/ESP2 mode change
Remove
the
White/B
lue w ire from ground.
The procedu
re
can
be
repeated
to
t
ogg
le
fr
om
one
mo
de
to the other
Important
: If you
power
up the system with
the
Wh
it
e/Blue
ac
ti
vation
wire
ungrounded, the
sys
tem
LED
wil
l come on solid for 5 seconds indi-
cating the system
is
in
Bitwriter/ESP2 mode.
ResetamlDelelion
__
If a feature/virtual
ta
ch
needs to be reset
or
the remote con trols need to
be
deleted,
use
the
following procedure
Turn
the
i
gn
ition to the
ON
position
[T
he heavy
gauge
pink w i
re
must
be
con-
nected).
Within
10 seconds, p
re
ss
and
re
lease the
Va
let button: 2 li
mes
if
you
wa
nt
to
delete remotes, 3 times to reset features or 4
tim
es
to reset virtual tach. These
featur
e:;
are described next
Delete remotes: This feature erases a
ll
r
em
otes from
the
memory
of
the
system.
This
is
usefu
l
in
cases when a customer's remote
is
lost or stolen.
No
te:
This
does not
re
set
the
prog
ra
mmed features of the system
or
reset
the Virtual Tach setting.
Reset
Features:
Th
is
resets
all feat
ures
of
the
sys
tem to the factory
de
fault
sett
ings.
No
te:
Th
is feature
does
no
t delete the remotes
fr
om the system
or
reset
the
Virtual
Tach
setting
Virtual
Tach Reset; Delet
es
all previously learned values
lor
Virtual Tach,
and
on
the ne
xt
remote start sequence the un
it
begi
ns
virtual tach
in
itial-
i
za
tion .
Note:
The
"Z
ap
n feature
on
the Bitwriter does not reset
the
Virtual tach
setting.
3.
Once
you have selected
the
function step, press
the
Va
let button once more
and
hold it.
The
L
ED
flashes
and
the
horn honks to confirm the selected
func-
tional step.
Do
not
re
lease the Valet button.
4 .
Wh
il
e holding the Valet button,
pre::.s
the button on
the
remote contro
l.
The
horn honks to confi
rm
that
th
e feature has been ::.uccessfully rese
t.
You
can
now
re
lease
the
Va
let button.
Remote
Start
Slrutdown.lliognost....,
·
'--------
To
perform
shutdown diagnostics:
1
With
the ignition Off, press
and
hold
the
Val
et button.
2 Turn
the
igni
ti
on
On
and
then
bock
O ff while
holding
the
Valet button.
3 Release the
Va
let
bu
tton
4 .
Press
and
release
the
Valet button. The lED fl
a::.hes
to
re
port the last
shutdown lor one mi
nu
te
or
until the ignition is t
urn
ed on, as shown in the
fol
lowing
table:
LEDFiosh"'
I
fla
sh
2 flashes
3 flashes
4 flashes
5 flashes
6flashes
7flash
es
8 flashes
Shutdown
Mode
Timed out
Over-r
ev
shutdow n
low
or
no
RPM,
low
battery (voltage
and
virtual tach modes)
Transmitter shutdown (or
op
tional push button)
1-1
Hood
Shutdown
IH3/
4
GRAY)
1+1
Shutdown
IH3/3
BROWN)
1
-1
Neu
t
col
safety
shutdown
IH3/
I
BLACK/WHITE
)
Wait-
to-start
ti
med
ou
t
Bitwri
iers
with a date code of 6o or older
require
on
IC
upgrade
(p/n
998MI.
Some
bitwr
ite
rs
wi
th
a dote code
of
6B
do
not
req
u
ire
t
he
IC upgrade,
refe
r
to
tech
ti
p #
11
12
lo
r
mo
re i
nlormoli·:m
I
I'
.
..--.--:::a
•
The Bitwr
it
er® (
p/n
998UI
requ
ir
es
chip
ve
rsi
on
2.7
or
ne
wer
to
progr
am
th
is
un
it

 Loading...