2 D-302414 SR-730 PG2 Installation Instructions
2. INSTALLATION
3 41 2
5 6
b
a
7
8
220/110 VAC
9VAC
9VAC
A
B
C
D
E
F
A
A
A
G
H
I
J
1. Open plastic cover screw.
2. Using Philips screwdriver, remove screw and remove cover.
3. Optional step: Hang back unit with a screw on mounting
surface to make the next step (drilling marking) easier.
4. Mark for drilling.
5. Drill 5 holes.
6. Fasten with 5 screws.
7. Release catch (A) and open battery cover (B).
8. Connect battery / optional battery and 9VAC power to the
proper connectors and set the optional jumpers as desired.
A. Mounting surface.
B. For tamper.
C. Self-Test button.
D. Enroll button.
E. Primary battery.
F. Secondary battery.
G. Battery connector.
H. Optional second battery and its connector.
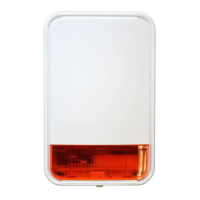
I. Siren rear side.
J. When external power is used, set the AC Enable (ON) /
Disable (OFF) jumper to Enable position (see step 8).
Notes:
1. There are SR-730 PG2 model variations that are supplied with
battery only, or, with battery and AC adaptor.
2. For UL Listed product, one battery must be used.
Figure 2: Installation
WARNING: To comply with FCC and IC RF exposure
compliance requirements, the siren should be located in a
distance of at least 20 cm from all persons during normal
operation. The antennas used for this product must not be co-
located or operated in conjunction with any other antenna or
transmitter
CAUTION! Risk of explosion if battery is replaced by an incorrect
type. Dispose of used battery according to manufacturer's
instructions..
3. ENROLLMENT
Refer to the control panel Installer Guide for the device enrollment procedure.
4. SR-730 PG2 DEVICE SETTINGS
This section describes how to configure the parameters of the siren from the control panel.
To Modify the Siren Device Settings
Refer to the control panel Installer Guide and perform the procedure for Adding A Wireless Device (section 4.5.2), or, Modifying a Device
(section 4.5.5). Then continue below to modify the device settings.
1.
Here you determine whether or not to activate the strobe alarm, and if to activate whether
to activate the strobe until the alarm system is disarmed, or, for the programmed period of
time (see section "Siren Configuration" in the control panel Installer Guide).
2.
3.
or
Select between "Timer limited", "Disabled" and "Until Disarmed".
4.