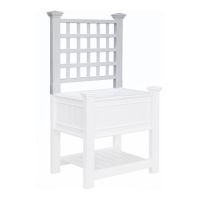
The provided manual describes the assembly and installation of The Raised Planter Trellis, an accessory designed to mount onto a 24" x 36" White Raised Planter Box (sold separately). This trellis enhances the functionality and aesthetic appeal of the planter box by providing support for climbing plants.
Function Description
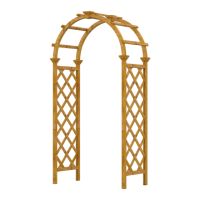
The Raised Planter Trellis serves as a decorative and functional support structure for plants that require vertical growth assistance, such as vines, climbing flowers, or certain vegetables. By integrating with a raised planter box, it allows for a compact gardening solution, ideal for patios, decks, or smaller outdoor spaces. The trellis helps maximize growing space and promotes healthier plant growth by allowing better air circulation and sunlight exposure. Its design suggests an aesthetic that complements outdoor garden settings, likely made from durable, weather-resistant materials given its intended use.
Important Technical Specifications
The trellis components are precisely dimensioned to ensure proper assembly and a secure fit with the compatible planter box.
Dimensions:
- Overall Trellis Dimensions:
- Width: 36 inches
- Height: 32 inches
- Depth (from front to back of posts): 2 inches (This refers to the thickness of the posts and the overall depth of the assembled trellis structure, not the planting depth).
- The horizontal rails have a depth of 4.25 inches, which likely refers to the projection from the main plane of the trellis, possibly indicating the spacing for the vertical spindles or the overall thickness of the lattice structure.
Components List:
The kit includes the following parts, with specific dimensions provided for the structural elements:
- Posts (2): These are the main vertical supports for the trellis.
- Top and Bottom Rails (2): Dimensions: 1.5" x 1.5" x 35.75". These form the horizontal framework at the top and bottom of the lattice.
- Horizontal Spindles (3): Dimensions: 1.5" x .875" x 31". These are the intermediate horizontal elements within the lattice structure.
- Vertical Spindles (5): Dimensions: 1.5" x .25" x 21". These are the vertical elements that create the grid pattern of the trellis.
- 1" Self-Auguring Stainless Steel Screw (4): These screws are used for securing the trellis to the planter box. The self-auguring feature implies they are designed to drill their own pilot hole, simplifying installation. Stainless steel ensures resistance to rust and corrosion, crucial for outdoor use.
Compatibility:
- The trellis is specifically designed to mount onto a 24" x 36" White Raised Planter Box, which is sold separately. This indicates a modular system where the trellis is an add-on accessory.
Usage Features
The assembly process is straightforward, designed for ease of installation by the user.
Assembly Steps (STEP ONE):
- Lattice Assembly: The five vertical spindles are inserted into the horizontal spindles. The spacing of the horizontal rails must match that of the posts, ensuring proper alignment.
- Rail Insertion: The top and bottom rails are aligned and inserted into the assembled lattice.
- Lattice into Posts: The fully assembled lattice structure is then inserted into routed holes on the two posts.
- Locking Tabs: A key feature is the presence of locking tabs at the ends of the horizontal rails. These tabs, once inserted and pushed into the routed holes, lock the components into place, providing a secure and stable lattice structure without the need for additional fasteners at this stage. This "snap-in" or "lock-in" design simplifies assembly and enhances structural integrity.
Installation Steps (STEP TWO):
- Mounting to Planter Box: The assembled trellis is placed onto the 24" x 36" White Raised Planter Box.
- Post Caps: The post caps, presumably from the planter box, are then placed onto the top of the trellis posts, providing a finished look and potentially protecting the post tops from weather elements.
- Securing: The trellis is secured to the planter box using the four provided 1" self-auguring stainless steel screws. The manual indicates specific locations for these screws, ensuring a stable attachment.
Tools Required:
- Cordless Drill: This is the only tool explicitly listed, primarily for driving the self-auguring screws during the final securing step.
General Information for Assembly:
- Read Instructions: Users are advised to read the instructions carefully before starting.
- Non-Abrasive Surface: Components should be assembled on a non-abrasive surface (e.g., the shipping box) to prevent scratching. This suggests that the material, likely a type of plastic or composite, can be susceptible to surface damage.
- Workspace: An area of approximately 5' x 8' is recommended for unobstructed assembly, indicating the overall footprint required for comfortable work.
- No Excessive Force: Users should not need to use excessive force during assembly, implying that parts are designed to fit together smoothly when correctly aligned.
Maintenance Features
While the manual does not explicitly detail maintenance instructions, several aspects suggest inherent maintenance considerations:
- Material Durability: The use of "White" material (likely PVC, vinyl, or a similar composite) and stainless steel screws points to a design intended for outdoor longevity and minimal maintenance. These materials are generally resistant to rot, rust, and insect damage, unlike wood.
- Stainless Steel Screws: The 1" self-auguring stainless steel screws are specifically chosen for their corrosion resistance, which is vital for outdoor applications where exposure to moisture is constant. This reduces the likelihood of rust stains or structural weakening over time due to fastener degradation.
- "White" Finish: A white finish typically implies UV resistance to prevent yellowing or fading from sun exposure. It also suggests that the material is easy to clean, likely requiring only soap and water to maintain its appearance.
- Modular Design: Being an accessory for a separate planter box, the trellis can potentially be removed or replaced independently if damaged or if the user wishes to change their garden setup, simplifying maintenance or upgrades.
Important Pre-Assembly Check:
- Check Inside Posts: Users are instructed to "CHECK THE INSIDE OF YOUR POSTS FOR ALL MATERIALS." This is a crucial step to ensure all small components are accounted for before starting assembly, preventing delays.
- Customer Service: In case of missing or defective parts, a customer service number (1 800 282 9346, Mon-Fri 8:00 AM to 5:00 PM EST) is provided, indicating support for product issues. This is a key maintenance-related feature, as it allows for easy replacement of components rather than requiring a full product return.
In summary, The Raised Planter Trellis is a well-designed, user-friendly accessory for a specific raised planter box, offering a durable and aesthetically pleasing solution for vertical gardening with minimal assembly effort and long-term, low-maintenance performance.