4
EN
1. PLEASE READ THESE INSTRUCTIONS CAREFULLY AND COMPLETELY BEFORE ASSEMBLING YOUR GREENHOUSE.
2. Sharp edges and corners can cause injury. Always wear protective glasses, gloves, shoes and headgear when handling the aluminium proles, glass and
polycarbonate sheets. Broken glass is a safety hazard – always clear up immediately and dispose of with care.
3. The product you have purchased is intended only for growing plants and should only be used for this purpose. When used for other purposes we will take
no responsibility.
4. It is recommended that this greenhouse is assembled by two people.
5. Should you encounter difculties constructing this house, or in tting the glass or polycarbonate sheets, please contact your retailer
– do not use force!
6. The greenhouse must always be anchored.
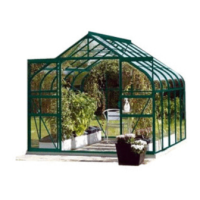
SITE SELECTION
Always try to select a sunny location, sheltered
from the wind as much as possible.
IMPORTANT
Before assembling your new greenhouse,
please check that all parts in the provided list
are included. Please take each bundle out of
the packaging in order to identify the parts
better.
It is important that the opened bundles do not
get mixed with one another.
If something is missing please contact your
retailer.
Nuts (1002) - Max. tightening torque 3Nm.
NECESSARY TOOLS
Screw drivers (Normal and Crosshead PH2),
10 mm socket spanner or wrench, 10 mm
combination spanner, knife, measuring stick,
spirit level, Accu-drill with adjustable torque.
MAINTENANCE
The greenhouse should be thoroughly washed
with a gentle detergent occasionally. Please
check that the detergent used does not react
aggressively with aluminium or the glass xing
clips.
Ensure that the upper and lower door tracks
are cleaned regularly to avoid a build up of
debris.
0. BASE
Important! The base must be exactly square
and level. A zinc-coated steel base is available
as an accessory for all greenhouse models.
(Attention! Only when the greenhouse has to
be located in a very windy and unprotected
location: Drill through both the prole at the
base of the greenhouse and the steel base,
and connect them with nuts and bolts.)
If you would rather construct your own stone
or concrete foundation, please follow the
dimensions specied in diagram 0. Treated
wooden beams at least 18 mm high and not
more then 32 mm wide should be positioned
between the stone/concrete foundation and
the aluminium frame, and connected to the
foundation with 50 mm long bolts (not pro-
vided).
Foundations must extend down below the frost
level.
Diagrams in a single frame show the view
from inside the greenhouse. Those
enclosed in a double frame show the view
from outside the greenhouse.
1. FRONT
Lay all of the parts on the oor and connect
them loosely.
Loosely connect the corner plates (1092) on
the upper corners.
2. ASSEMBLY
Connect the gable end bars (4080 / 4081)
between the eaves door track (4084 / 4085)
(2.1) and the vertical wall bars (4082 / 4083)
(2.3). Now connect the sill bars (4022) (2.4 &
2.5) and then the ridge bar (4050 / 4051) (2.3).
Loosely connect the corner plates (1092)
above the eaves (2.1).
Connect the roof glazing bar(s) (4055)
between the eaves (2.2) and the ridge bar.
Please use the washers (7395) at all
connection points to eaves door track
(4084/4085) (2.1 & 2.2).
It is necessary to include one extra bolt in the
glazing bar(s) (4055) at this point, to later
connect the roof vent.
3. ASSEMBLY ON WALL
Now position your greenhouse on the pre-
pared base/foundation and connect loosely.
Adjust the greenhouse until it is completely
square and tighten all bolts.
Please do not over tighten. (max. 3Nm)
Ensure that the sides are perfectly vertical.
Note the pre-drilled holes in the vertical wall
bars (4082 / 4083) and the ridge bar (4050 /
4051) and mark them on the wall.
Remove the frame from the base.
Drill 6 mm holes in the wall as marked and
place 6mm wall plugs in the wall.
Replace the frame on the base and connect it
to the wall using screws (3.1) & (3.2).
(The wall plugs, screws and drill are not
included).
Finally connect the frame to the base.
4. DOOR
Attention: Do not stand the assembled door
on the door gliders (1014) to avoid damaging
them.”
Push the door gliders (1014) onto both ends of
door bar (1360) (4.1).
Assemble the door as shown in diagram 4.
Connect door rollers (1015) to the door bar
(1362) using bolt (1304), washer (1009) and
nut (1007) (4.4). Bolt door bar (1362) to upper
bar (1359) (4.3) and slide door seals (4021)
into the outside side bars (4158) (4.5).
Slide bolts (1500) into the bottom of the bolt
channel holding brush seals (4021) and x it in
place using nut (1515) (4.6).
The door rollers can now slide into door runner
bar (4084 / 4085) (4.7). Please ensure that the
door gliders are also running on the bottom
track (4046 / 4047) (4.8). Once the door is
correctly in place, connect nuts and bolts into
both ends of door runner bar (4084 / 4085), as
door stoppers (4.9).
Adjust the door so that it moves freely.
003.01.2007
 Loading...