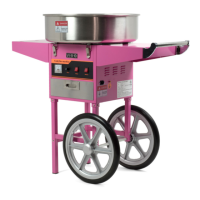
This document describes the Pink Electric Commercial Cotton Candy Machine, model CANDY-V002, an appliance designed for making cotton candy.
Function Description
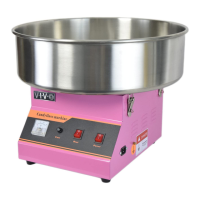
The machine operates by heating sugar to create cotton candy floss. It is intended for commercial use, as indicated by its "Commercial" designation. The core function involves a heating head that spins to produce the floss, which is then collected in a stainless steel pan.
Important Technical Specifications
- Model: CANDY-V002
- Dimensions: 520 x 520 x 415mm
- Heating Power: 1000 W
- Motor Power: 80 W
- Electric Voltage: 110 V
- Frequency: 60 Hz
- Yield: 1 per 30 seconds (meaning it can produce one serving of cotton candy every 30 seconds)
- Fuse: 15A 250V (F15)
- Electrical Components: Includes an 80W AC motor, a tubular fuse, a temperature limiter, a 0-300V AC voltage meter, and a 1000W heating plate.
Usage Features
Preparation:
- Initial Cleaning: Before first use, the heating head and stainless steel pan should be cleaned with warm, soapy water. Detergent-type cleaners are explicitly not recommended. After cleaning, the machine should be turned on to clear any remaining water from the head, and the pan must be completely dried.
- Placement: The machine must be placed on a dry, flat, and stable surface.
- Assembly: All parts must be properly installed before plugging in the machine.
Assembly Steps:
The manual provides detailed assembly instructions for the cart and machine components:
- Step 1 (Cart Frame): Involves assembling the Wheel Leg (B), Post Legs (C), and Frame Supports (D) using M5x30 screws and a Phillips screwdriver.
- Step 2 (Wheels): Mount Wheels (E) to the assembled cart using M12x70 Screws (S-A) and Washers (S-B). Tighten with a Socket Wrench (T-A) and attach Wheel Covers (F).
- Step 3 (Machine to Cart): Place the Candy Machine (A) onto the assembled cart and secure it with M5x8 Screws (S-D) using a Phillips screwdriver.
- Step 4 (Handle and Shelf): Secure the Handle (H) to Handle Brackets (G), and attach the Shelf (I) using M5x10 Bolts (S-E), M5 Nuts (S-F), and a Phillips screwdriver.
- Step 5 (Additional Shelves): Attach the Shelf (I) and Cone Shelf (J) to the Candy Machine (A) using M4x12 Screws (S-C) and a Phillips screwdriver. The manual notes that the Cone Shelf assembly is similar to the Shelf assembly and can be placed on either side of the machine.
- Step 6 (Bowl and Power): Place the Bowl (K) on top of the Candy Machine (A) and secure all four latches. Finally, connect the Power Cable (L) to the Candy Machine (A).
Safety Information:
- Professional Servicing: Servicing should be done by professional service personnel to minimize product damage and safety issues.
- Supervision of Minors: All minors must be supervised when the machine is in operation.
- User Capability: The appliance is not intended for use by persons with reduced physical, sensory, or mental capabilities, or lack of experience/knowledge, unless supervised or trained.
- Grounding: The machine must be plugged into an electrical outlet with a ground line.
- Damaged Components: Do not use if the cable, electrical outlet, or plug is broken.
- Electric Shock Prevention: Do not touch wet plugs or cables. Keep cables away from heat. Do not immerse the cable, electrical plug, or machine in water or other liquids.
- Burn Prevention:
- Do not touch the surface of the heating head while the machine is on.
- Do not place hands into the pan to remove sugar while the machine is on.
- Do not move the machine while it is on.
- Allow the machine to cool before moving it or removing excess sugar.
Maintenance Features
Cleaning:
- Regular Cleaning: Cleaning is required every 20 minutes of use for proper function. Failure to do so may cause burning of floss and will void the spinner head warranty.
- Post-Use Cleaning: After making candy floss, keep the machine hot and running while slowly pouring a small amount of water into the center of the heating head. This will create steam to clean the head.
- Water Caution: Use water with caution as it will immediately become steam.
- Head Cleaning: Continue spinning water until the color inside the head returns to bare aluminum. Allow the machine to cool, then wipe the head with a damp cloth to remove excess sugar.
- Pan Cleaning: The stainless steel pan can be cleaned with warm, soapy water.
- Deep Head Cleaning: If the inside of the head needs deeper cleaning, remove the four screws on top, then remove the top plate. If screws are difficult to remove, turn on the machine and heater for 15-20 seconds to loosen them. Allow the machine to heat for one minute before making more candy floss to aid in minimal cleaning.
Removing Burnt Sugar:
- It is normal for a small amount of sugar to burn inside the machine, even with periodic cleaning. This will not harm the machine or the candy floss.
- To remove burnt sugar, remove the top plate from the heating head and allow the machine to soak in vinegar. Scrub clean with an abrasive cleaning pad (e.g., Scotch-Brite pad) for stubborn burns.
Changing the Belt:
- A Spare Belt (N) is included in the package.
- To access the belt, remove the shields from underneath the heating head (each held by three screws) and the top cover (held by a screw on each side).
Troubleshooting:
The manual includes a troubleshooting guide for common issues:
- Heating head spins but does not heat up: Check for cut/frayed wires underneath the heating head. If wires are intact, the temperature sensor may be faulty.
- Machine has no power: Ensure the bowl is securely latched (all four latches activate the safety switch). If the safety switch is pressed and switches are on, check if the red light is illuminating. If issues persist, contact support.
- Electric cord for machine is lost: A standard 20 AMP cord used for computers/printers can be used. The machine is designed for US 110V power.
- Machine constantly vibrates: The head/spinner may be off balance. Contact support for a part replacement.
- Heating head not turning, motor running: Check if the belt inside the machine has come loose. Reinstall the belt and adjust tension by loosening the four motor screws and repositioning the motor slightly. Replace the belt if broken.
Warranty:
The product comes with a ONE YEAR warranty and a 30 Day Return Policy. Improper cleaning instructions will void the warranty.