EasyManua.ls Logo

Volkswagen RCN210 - User Manual

Volkswagen RCN210
3 pages
Print Icon
To Next Page IconTo Next Page
Loading...
VOLKSWAGEN RCN210 RADIO INSTALLATION
On some VW models this radio can work straight after installation, but mostly it requires connection to INFO CAN lines those
could be reached, at the easiest, from A/C control panel unit. Without that connection, radio will run but will not work properly
or completely (no lighting, no power off after ignition off, no Bluetooth etc...) This manual describes and shows how radio needs
to be installed. The installation in manual is carried out on VW CADDY 2008. On other VW vehicles, installation proccess will be
analogical and similar.
Remove plastic trim around the radio and heating/ac control panel. Locate torx screws fastening the radio and a/c panel, loose
them to remove both parts.
Remove radio connector and antenna connector from original radio. Use supplied wiring adapter to connect RCN210 radio with
your original plug. Do not forget to plug antenna cable.
Question and Answer IconNeed help?

Do you have a question about the Volkswagen RCN210 and is the answer not in the manual?

Summary

Volkswagen RCN210 Radio Installation Guide

Removing Dashboard Trim and Radio Unit

Remove plastic trim around radio and heating/AC control panel, then loosen screws to remove both parts.

Connecting Radio and Antenna Cables

Remove original connectors, use adapter for RCN210, and connect antenna cable.

Identifying and Connecting INFO-CAN Wires

Locate and connect INFO-CAN wires (orange/green, orange/brown) using snap-lock connectors for full functionality.

Testing and Reassembly

Test radio functions like backlight and Bluetooth, then reassemble the dashboard components.

Operating and Pairing the RCN210 Radio

Bluetooth Phone Pairing Procedure

Pair your phone by enabling PHONE function on radio and phone, confirming pairing and inputting code if needed.

Bluetooth Audio Streaming

Play music from your paired phone via BT AUDIO streaming.

Overview

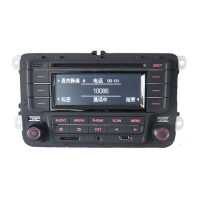
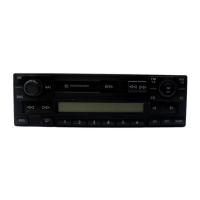
This document provides a detailed guide for installing the Volkswagen RCN210 radio, primarily focusing on its integration into a VW Caddy 2008 model, with the understanding that the process is analogous for other VW vehicles. The RCN210 radio offers a range of functionalities, including standard radio operation, media playback, phone connectivity via Bluetooth, and USB input.

Function Description

The RCN210 radio serves as a central entertainment and communication hub for your vehicle. Its core functions include:

  • Radio Tuner: Allows access to FM radio stations, with features for scanning and saving preferred frequencies.
  • Media Playback: Supports various media sources, enabling you to play audio content.
  • Phone Connectivity (Bluetooth): Facilitates hands-free calling and audio streaming from a paired smartphone. This feature is crucial for safe driving and requires proper connection to the vehicle's INFO CAN lines for full functionality, including automatic power-off and backlight operation.
  • USB Input: Provides an additional option for playing audio files from a USB device.

Usage Features

The RCN210 radio is designed for user-friendly operation, offering intuitive controls for its various features.

  • Basic Operation: The radio's functions are easily accessible through dedicated buttons for "RADIO," "MEDIA," "PHONE," "SCAN," and "MENU."
  • Phone Pairing: To utilize the hands-free calling and Bluetooth audio streaming features, you must first pair your smartphone with the radio. This process involves:
    1. Activating the "PHONE" function on the radio.
    2. Enabling Bluetooth on your smartphone.
    3. Searching for new devices on your phone; the radio will appear as "VW RADIO."
    4. Selecting "VW RADIO" on your phone and confirming the pairing on both devices if prompted. A PIN code may be requested during this process.
    5. Once paired, the phone will automatically connect to the radio when both devices have Bluetooth enabled and the radio is powered on.
  • Bluetooth Audio Streaming: After successful pairing, you can stream music directly from your smartphone to the radio, enhancing your in-car entertainment experience.
  • Display and Interface: The radio features a clear display that shows station information, track details, and phone call status. The interface is designed to be straightforward, allowing for easy navigation through menus and settings.
  • Backlight and Power Management: When properly connected to the INFO CAN lines, the radio's backlight will illuminate when the vehicle's lights are switched on, and the radio will power off automatically after the ignition is turned off, conserving battery life. Without this connection, these features may not function correctly.

Maintenance Features

While the document primarily focuses on installation, proper installation itself contributes to the long-term maintenance and reliable operation of the RCN210 radio.

  • Correct Wiring: Ensuring all connections, especially to the INFO CAN lines, are correctly made using the supplied wiring adapter and snap-lock connectors is vital. Incorrect wiring can lead to malfunctions or damage to the radio or vehicle's electrical system.
  • Secure Fastening: The radio and the A/C control panel must be securely fastened using the original torx screws after installation. This prevents vibrations and ensures the components remain in place during vehicle operation.
  • Cable Management: Proper management of cables, including removing insulation tape to access specific wires and ensuring all connections are tight, helps prevent short circuits and ensures a clean, professional installation.
  • Testing Functionality: After making the necessary connections but before fully reassembling the dashboard, it is recommended to test the radio's functions, such as backlight operation with the vehicle's lights, and Bluetooth pairing. This allows for troubleshooting any issues before final assembly, saving time and effort.
  • Cleanliness: During installation, keeping the work area clean and free of debris helps prevent foreign objects from entering the vehicle's electronics or the radio itself.

The installation process involves several key steps:

  1. Disassembly: Remove the plastic trim surrounding the radio and heating/AC control panel. Loosen and remove the torx screws fastening both the radio and the A/C panel.
  2. Cable Disconnection: Disconnect the radio connector and antenna connector from the original radio.
  3. Adapter Connection: Use the supplied wiring adapter to connect the RCN210 radio with your vehicle's original plug. Remember to plug in the antenna cable.
  4. CAN Line Connection: This is a critical step for full functionality. Unscrew and pull off the climate/heating control panel to locate the connector with INFO CAN lines. These are typically orange with a green strip and orange with a brown strip.
  5. Wire Access: Remove the connector from the climate control panel and carefully remove insulation tape from the harness to access the orange/green and orange/brown wires.
  6. Snap-Lock Connection: Use quick snap-lock connectors to join the corresponding orange/green and orange/brown wires from the radio-adapter-cable with the existing wires running to the climate control panel. Ensure the metal blade inside the connector cuts through the insulation for a proper connection.
  7. Functionality Test: Before reassembling, test the radio's functions: check if the backlight turns on with the vehicle's lights and attempt to pair a phone via Bluetooth.
  8. Reassembly: Once all functions are confirmed to be working correctly, reassemble the dashboard components in reverse order of disassembly.

By following these instructions, users can successfully install the RCN210 radio and enjoy its comprehensive features, enhancing their driving experience with modern connectivity and entertainment options.

Volkswagen RCN210 Specifications

General IconGeneral
BrandVolkswagen
ModelRCN210
CategoryCar Receiver
Radio TypeAM/FM
CD PlayerYes
MP3 PlaybackYes
Auxiliary InputYes
USB PortYes
BluetoothNo
Display TypeLCD
CompatibilityVolkswagen vehicles
SD CardYes

Related product manuals