5
While the arm is in its rest, loosen the screws that hold the cartridge just enough that
the cartridge can be moved back and forth.
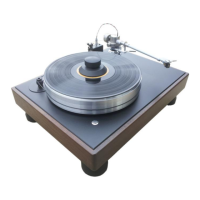
Carefully swing the arm over the grid at the far end of the jig and place the stylus as
close to the dot in the center of the grid as possible. Using a lighted magnifier will
make this job very easy.
BE VERY CAREFUL NOT TO DAMAGE THE CARTRIDGE'S STYLUS:
Move the cartridge so that the stylus rests on the dot. Now, viewing the cartridge from
above, line it up so that its sides are symmetrically positioned between the lines of the
grid. If the cartridge has parallel sides, these should be made parallel to the grid lines.
Also make sure that the cartridge is centered between the sets of lines. If you can see
the cantilever clearly you can align the cantilever to the alignment grid. This is difficult
and may produce no increase in sound quality.
Double check the adjustments made above. The cartridge needs to be both centered
and "square" between the gird lines and have the stylus resting on the dot.
Place the arm back in its rest.
Without letting the cartridge move, tighten the screws holding the cartridge to the arm
head. Make it tight, but don't over do it and strip the threads or distort the cartridge
body.