4
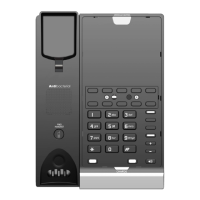
Installation
The telephone base can be adapted to desktop use or mount on a standard telephone wall plate.
Installation option - desktop position
Turn the telephone base over with the bottom side facing up. Connect the Cat-5 network cable into the RJ-45 LAN port on the
telephone base and route through the channel as shown below.
Insert the tabs of the mounting bracket into the upper grooves at the bottom of the telephone base as shown below.
Plug the other end of the Cat-5 network cable into the network wall jack with Power over Ethernet (PoE). Then connect the
coiled handset cord to the telephone base.
Once installed, the telephone begins a four-step initialization and system registration process.
For CTM-S2312: (1) LED 1 and LED 2 turn on and then go off. (2) LED 1 flashes. (3) The LED 1 stops flashing and then the
LED 2 flashes. (4) LED 1, LED 2, and LED 3 illuminate for 500ms when initialization and system registration are successful.
For CTM-S2322: (1) LED 1 and LED 2 turn on and then go off. (2) LED 1 flashes. (3) The LED 1 stops flashing and then the
LED 2 flashes. (4) LED 1, LED 2, and LED 3 illuminate for 500ms when initialization and system registration are successful.
If the system registration fails, LED 2 will blink twice every second. To reset, disconnect the Cat-5 network cable from the
network wall jack with Power over Ethernet (PoE) and then reconnect.
1.
2.
3.
4.
•
•
CAUTION:
Use only the supplied Cat-5 network cable. Cat-5 network cable is not designed for use in any other IT devices. Misuse of Cat-5 network cable on
your other IT devices shall be prohibited. To order a replacement, contact your local distributor.
Network wall jack with Power
over Ethernet (PoE)
RJ-45 LAN port