23
Installation
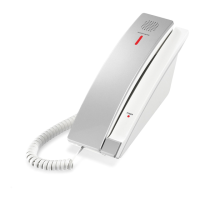
SIP classic charging base - C3300
Installation
Charging base installation
6JGEJCTIKPIDCUGECPDGCFCRVGFVQFGUMVQRWUGQTOQWPVQPCUVCPFCTFVGNGRJQPGYCNNRNCVG
Installation option - desktop position:
6WTPVJGEJCTIKPIDCUGQXGTYKVJVJGDQVVQOUKFGHCEKPIWRConnect the Cat-5 network cable into the 4,.#0RQTVQPVJG
EJCTIKPIDCUG
2QUKVKQPVJGOQWPVKPIDTCEMGVCUUJQYP+PUGTVVJGVCDUKPVQVJGWRRGTITQQXGUCPFVKIJVGPVJGUETGYVQCHſZVJGOQWPVKPI
DTCEMGVKPRNCEG
Plug the other end of the Cat-5 network cable into the network wall jack (with PoE)
Installation option - converting from desktop to wall mount position:
7PRNWIVJG%CVPGVYQTMECDNGHTQOVJGPGVYQTMYCNNLCEM
5GVCUKFGVJGEQTFNGUUJCPFUGV1PVJGVGNGRJQPGDCUGETCFNGRNCEGCEQKPKPVJGRTQXKFGFUNKVQHVJGYCNNOQWPVENKRCPFTQVCVG
CJCNHVWTPFGITGGU+VNQEMUKPVQRNCEGYKVJVJGRTQVTWFKPIGFIGRQKPVKPIVQYCTFUVJGWRRGTGFIGQHVJGEJCTIKPIDCUG6JKU
RTQVTWFKPIGFIGJQNFUVJGEQTFNGUUJCPFUGVYJGPVJGRJQPGKUOQWPVGFQPVJGYCNN
.QQUGPVJGUETGYHTQOVJGOQWPVKPIDTCEMGVCPFTGOQXGVJGOQWPVKPIDTCEMGVHTQOVJGWRRGTITQQXGU
Turn the mounting bracket upside down so that the mounting eyelet on the bracket is facing in the same direction as the other
OQWPVKPIG[GNGVQPVJGDQVVQOUKFGQHVJGEJCTIKPIDCUG+PUGTVVJGVCDUKPVQVJGNQYGTITQQXGUCPFVKIJVGPVJGUETGYVQCHſZVJG
OQWPVKPIDTCEMGVKPRNCEG
Mount the charging base on the wall by positioning the eyelets on the charging base and the mounting bracket against the
OQWPVKPIUVWFUQHVJGYCNNRNCVG6JGPUNKFGVJGEJCTIKPIDCUGFQYPQPDQVJOQWPVKPIUVWFUWPVKNKVNQEMUKPVQRNCEG
Plug the Cat-5 network cable back into the network wall jack (with PoE) Then place the cordless handset on the
VGNGRJQPGDCUGETCFNG
4,.#0RQTV
Protruding edge
Eyelets