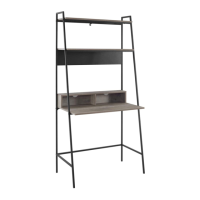
This document outlines the assembly instructions for the D36ARLO furniture item, which appears to be a multi-tiered shelving unit combined with a desk. The overall design suggests a functional piece suitable for various home or office environments, offering both storage and a workspace.
Function Description
The D36ARLO unit serves as a versatile furniture piece, integrating a desk with multiple shelves. Its primary function is to provide organized storage and a dedicated work surface within a compact footprint. The tiered shelving allows for the display of books, decorative items, or storage of office supplies, while the integrated desk offers a space for working, studying, or using a computer. The design suggests it can be used as a standalone desk with integrated storage, or as part of a larger room arrangement to maximize vertical space. The inclusion of a wall anchor indicates a safety feature to prevent tipping, reinforcing its stability and suitability for households with children or in areas prone to seismic activity.
Usage Features
The assembly process for the D36ARLO unit is detailed across 17 steps, emphasizing a methodical approach to construction. Key usage features become apparent through the assembly instructions:
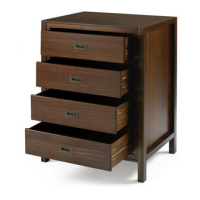
- Multi-tiered Storage: The unit features several shelves of varying heights and depths, providing flexible storage options. The top shelves appear to be shallower, suitable for lighter items or display, while the lower shelves and desk area offer more substantial space.
- Integrated Desk: A dedicated desk surface is incorporated into the unit, providing a functional workspace. This integration is space-saving, making the D36ARLO ideal for smaller rooms or apartments where maximizing utility is crucial.
- Dowel and Cam Lock Construction: The use of wooden dowels (J), cam bolts (L), and cam locks (K) is a common and effective method for assembling flat-pack furniture. Dowels provide alignment and initial stability, while cam locks offer a strong, concealed connection, resulting in a clean aesthetic. The instructions specify applying glue (T) with dowels for enhanced durability, indicating a focus on long-term stability.
- Bolt and Screw Fasteners: Various bolts (A, B, H) and screws (F, N, S) are used throughout the assembly, secured with a hex key (C) and a Phillips head screwdriver. This combination of fasteners ensures robust connections for different components, from structural frames to smaller attachments like plastic wedges and plates.
- Plastic Wedges and Plates: The inclusion of plastic wedges (R) and plates (P, Q) suggests specific functional or aesthetic purposes. Plastic wedges are often used to reinforce joints or provide additional support, while plates can serve as decorative elements, structural reinforcements, or to cover exposed hardware.
- Wall Anchoring System: A crucial safety feature is the wall anchoring system, comprising a wall anchor (G), washer (D), and screw (F). This system is designed to secure the unit to a wall, preventing accidental tipping. The instructions provide clear guidance on measuring, drilling, and inserting the wall anchor, highlighting its importance for stability, especially for tall, narrow furniture. The note about using the correct wall anchor for different wall materials indicates an awareness of diverse household construction and user safety.
- Sticker Covers: Stickers (M) are provided to cover exposed hardware holes, contributing to a cleaner, more finished appearance. This small detail enhances the overall aesthetic quality of the assembled unit.
- Two-Person Assembly Recommendation: The general assembly guidelines recommend two people for ease of assembly. This suggests that some components may be large or awkward to handle alone, and having an extra pair of hands can significantly simplify the process and prevent damage.
- No Power Tools for Assembly: The explicit instruction not to use power tools for assembly is a common recommendation for flat-pack furniture. This is to prevent overtightening screws and bolts, which can strip threads, damage wood, or compromise the structural integrity of the unit. Manual tightening ensures a secure fit without risking material damage.
- Glue for Dowels: The instructions for applying glue to dowels, both when inserting them into holes and when attaching parts, underscore the importance of strong, lasting connections. Wiping away excess glue immediately helps maintain a clean finish.
Maintenance Features
While the manual primarily focuses on assembly, certain aspects imply considerations for maintenance and longevity:
- Durable Construction Materials: The use of wooden dowels, various metal fasteners, and presumably engineered wood panels (common for this type of furniture) suggests a design intended for reasonable durability under normal use.
- Secure Fasteners: The combination of bolts, screws, and cam locks, along with the recommendation for glue, aims to create a sturdy structure that should withstand daily use without quickly becoming loose or wobbly. Proper assembly, as guided by the manual, is the first step in ensuring long-term stability and minimizing the need for frequent maintenance.
- Wall Anchoring for Safety and Stability: The wall anchoring system is not only a safety feature but also a maintenance-reducing one. By preventing tipping, it protects the furniture from damage that could occur from falling, thereby extending its lifespan and reducing the need for repairs.
- Concealed Hardware: The use of cam locks and sticker covers for hardware contributes to a clean look and also protects the fasteners from dust and minor impacts, which can contribute to their longevity.
- Regular Inspection (Implied): Although not explicitly stated as a maintenance step, the nature of assembled furniture implies that periodic checks of fasteners for tightness and overall structural integrity would be beneficial to ensure continued safety and stability. Loose screws or bolts can be retightened to prevent further wear or damage.
- Cleaning: While not detailed in the assembly instructions, the materials typically used for such furniture (e.g., laminated particleboard, metal frames) are generally easy to clean with a damp cloth, requiring minimal specialized care.
In summary, the D36ARLO is a practical and space-efficient furniture piece designed for both storage and work. Its assembly process, though requiring attention to detail and potentially two people, is straightforward with clear instructions and a variety of fasteners to ensure a robust and stable final product. The emphasis on safety through wall anchoring and the use of glue for dowels highlights a focus on both user well-being and the longevity of the unit.