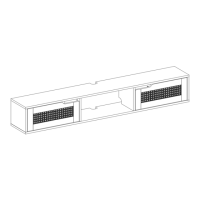
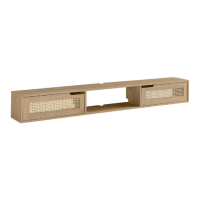
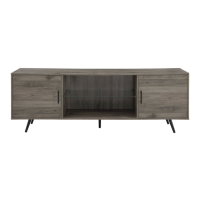
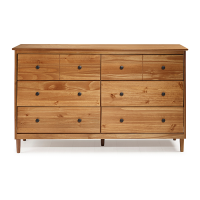
This document provides assembly instructions for the HANB5B furniture item, which appears to be a six-drawer dresser or chest of drawers. The assembly process involves multiple steps, requiring two people and basic tools like a Phillips head screwdriver and a hammer (not included). Power tools are explicitly discouraged for assembly.
Function Description:
The HANB5B is a multi-drawer storage unit designed for organizing and storing various items. It features six drawers, likely arranged in two columns of three, providing ample storage space. A key safety feature is the inclusion of an anti-tip device, which is strongly recommended for permanent wall fixation to prevent furniture tipover, especially in households with children. The design incorporates adjustable feet for leveling the unit on uneven surfaces. One of the side drawers is specifically designated to be mounted in the highest position and includes a warning label regarding furniture tipover.
Important Technical Specifications:
Parts List:
The main components of the dresser include:
- Panels: Top Panel (1), Right Side Panel (1), Left Side Panel (1), Bottom Panel (1), Back Panel (1), Bottom Back Panel (1), Division (1).
- Drawer Components (for 6 drawers): Drawer Front (6), Right Drawer Side (6), Left Drawer Side (6), Drawer Back (6), Drawer Bottom (6).
- Spacers: (6).
Hardware List:
The assembly requires a variety of hardware, including:
- Fasteners:
- Wooden Dowels (A): Ø8x30mm, 61 pcs
- Cam Bolts (B): Ø6x31mm, 22 pcs
- Cam Locks (C): Ø15x10mm, 22 pcs
- Screws (D): Ø3.5x14mm, 68 pcs
- Screws (F): Ø4x40mm, 18 pcs
- Screws (G): Ø7x50mm, 10 pcs
- Screws (M): Ø6x8mm, 12 pcs
- Screws (N): Ø6x20mm, 12 pcs
- Screws (O1): Ø3.5x14mm, 1 pc (for anti-tip)
- Screws (O2): Ø4.5x35mm, 1 pc (for anti-tip)
- Support & Leveling:
- Adjustable Foot (E): Ø22x17mm, 1 pc
- Support (H): 14x14mm, 32 pcs
- Foot (K1): 150mm, 4 pcs
- Center Foot (K2): 139mm, 1 pc
- Plastic Bushing (P): Ø10x13mm, 1 pc
- Drawer Slides:
- Slide (L1): 330mm, 6 pcs
- Slide (L2): 330mm, 6 pcs
- Slide (R1): 330mm, 6 pcs
- Slide (R2): 330mm, 6 pcs
- Anti-Tip Device:
- Washer (O3): Ø10mm, 2 pcs
- Wall Anchor (O4): Ø6mm, 1 pc
- Strap (O5): 200x20mm, 1 pc
- Miscellaneous:
- Sticker (I): Ø19mm, 12 pcs (for covering holes)
- Hex Key (J): 21x47x4mm, 1 pc
Usage Features:
- Storage Capacity: The dresser offers six drawers, providing significant storage for clothing, accessories, or other household items.
- Anti-Tip Safety: A crucial safety feature is the anti-tip device, which must be installed to prevent the furniture from tipping over, especially if children are present. The heaviest items should be placed in the lowest drawers to further reduce this risk. Only one drawer should be opened at a time.
- Leveling: The adjustable foot (E) and center foot (K2) allow for leveling the dresser on uneven floor surfaces, ensuring stability.
- Drawer Operation: The drawers utilize slides (L1, L2, R1, R2) for smooth opening and closing.
- Aesthetics: Stickers (I) are provided to cover visible holes, contributing to a cleaner finished appearance.
Maintenance Features:
- Cleaning: The assembly instructions emphasize assembling the unit on a clean, soft surface to prevent damage during construction, suggesting that the finished product should also be cleaned with care.
- Hardware Inspection: While not explicitly stated as a maintenance feature, the detailed hardware list implies that replacement parts might be available if any components are lost or damaged over time. The manufacturer's website (www.walkeredison.com) is provided for current instructions, assembly tips, and to report damage or request parts, indicating support for potential maintenance needs.
- Anti-Tip Device Check: Regular checks of the anti-tip device's securement to both the furniture and the wall would be a critical maintenance task to ensure ongoing safety.
- Drawer Slide Functionality: Over time, drawer slides may require lubrication or adjustment to maintain smooth operation.
- Foot Adjustment: Periodically checking and readjusting the adjustable feet may be necessary to maintain stability, especially if the furniture is moved or the floor settles.
Assembly Process Overview:
The assembly is broken down into 21 steps:
- Step 1: Inserting wooden dowels (A) and cam bolts (B) into various panels (2, 3, 10).
- Step 2: Inserting plastic bush (P) into the central foot (K2) and then the adjustable foot (E) into the bush.
- Step 3: Attaching feet (K1, K2) to the bottom panel (4) using screws (G) and the hex key (J).
- Step 4: Attaching slides (R1) and spacers (13) to the right side panel (2) using screws (D, N).
- Step 5: Attaching slides (L1) and spacers (13) to the left side panel (3) using screws (D, N).
- Step 6: Inserting cam bolts (B) into the top panel (1).
- Step 7: Attaching slides (L1, R1) to the division panel (10) using screws (D, M). Special attention is drawn to the "painted part" and ensuring L1 sliders are on the side with cam lock holes.
- Step 8: Securing the bottom back panel (12) into the left side panel (3) using cam locks (C).
- Step 9: Securing the bottom back panel (12) into the right side panel (2) using cam locks (C).
- Step 10: Securing the bottom panel (4) into the side panels (2, 3) using screws (F).
- Step 11: Securing the division panel (10) into the bottom panel (4) using screws (F).
- Step 12: Sliding the back panel (11) into the side panels (2, 3, 12) with the painted side facing outwards. The back panel also contains the manufacturer's label.
- Step 13: Securing the top panel (1) into the side panels (2, 3, 10) using cam locks (C).
- Step 14: Inserting wooden dowels (A) into drawer sides (6, 7, 8) and cam bolts (B) into drawer fronts (5).
- Step 15: Securing drawer sides (6, 7) into drawer backs (8) using screws (F) and sliding the drawer bottom (9) into grooves. This step is repeated for all six drawers.
- Step 16: Securing drawer fronts (5) into drawer sides (6, 7) using cam locks (C). This step is repeated for all six drawers.
- Step 17: Attaching slides (L2, R2) to drawer sides (6, 7) using screws (D). This step is repeated for all six drawers.
- Step 18: Attaching supports (H) to drawer fronts (5) and drawer backs (8) using screws (D). This step is repeated for all six drawers.
- Step 19: Attaching supports (H) to the top panel (1), side panels (2, 3), back panel (11), and bottom back panel (12) using screws (D).
- Step 20: Placing stickers (I) over holes as indicated in the diagram. This step also reiterates the warning about the side drawer with the warning label being mounted in the highest drawer.
- Step 21: Adjusting the foot (K2) to level the unit with the floor.
- Final Step (Anti-Tip Installation): The final page details the installation of the anti-tip device, which involves attaching a strap (O5) to the top panel (05) with a screw (O1) and washer (O3), drilling a hole in the wall, inserting a wall anchor (O4), and then securing the strap to the wall with a screw (O2) and washer (O3).