Do you have a question about the W&H Assistina One and is the answer not in the manual?
Symbol indicating risk of injury.
Symbol indicating potential damage.
Symbol for general explanations without risk.
CE mark indicating conformity.
Symbol for proper waste disposal.
Symbol indicating to consult instructions for use.
Symbol indicating date of manufacture.
CE mark indicating conformity.
Symbol identifying a medical device.
Symbol for product information and UDI.
Symbol indicating the manufacturer.
Symbols for handling like 'This way up', 'Fragile', 'Keep dry'.
Symbols for temperature and humidity limits.
Symbols like RESY and Rx Only.
Importance of reading instructions for safe operation.
Reminder to observe safety notes.
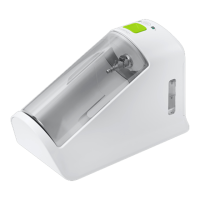
Unit for cleaning and lubricating dental instruments.
Target users are dentists and assistants.
Manufacturer's responsibility depends on correct usage.
Consequences of improper use and unauthorized modifications.
Reporting serious incidents to manufacturer and authorities.
Remove inserts from packaging.
Lift out the device and swivel window.
Remove hose, adaptor, and set from box.
General safety instructions for setup and use.
Information on handling process fluids, including contact guidance.
Lists approved process fluids: Activefluid and Service Oil F1.
Notes on cartridge handling and sharp spike.
Identifies components on the front panel.
Describes the Quick ISO adaptor and its parts.
Describes the Quick RM adaptor and its parts.
Identifies components on the rear and underside.
Step-by-step guide for inserting the swivel window.
Procedure for replacing the air filter.
Procedure for inserting and removing cartridges.
Procedure for connecting and disconnecting the air hose.
Steps for performing the initial filling.
Indicators for successful initial filling.
Placing instrument and starting test run; handling malfunctions.
Wear protective gear and refer to instrument instructions.
Procedure for loading instruments using the ISO adaptor.
Procedure for removing instruments using the ISO adaptor.
Procedures for loading and removing instruments with RM adaptor.
Steps for performing the maintenance process.
Procedure for lubricating the chucking system.
Safety precautions during lubrication, including aerosol mist.
Follow laws and clean daily or as needed.
Use specific detergents and wear protective gear.
Steps for preparing and removing the swivel window.
Instructions for manual cleaning of interior, exterior, and swivel window.
Steps to reconnect and start the device after cleaning.
Step-by-step guide for replacing O-rings.
Procedure for replacing the air filter.
Lists Quick RM, Quick ISO adaptors, and lubrication adaptor.
Lists air hose, care set, air filter, and various O-rings.
Contact service partner for malfunctions and return in original packaging.
Details air consumption, pressure, volume, dimensions, weight, capacity.
Specifies temperature and humidity limits for transport, storage, and operation.
Ensure parts are uncontaminated and follow local laws for disposal.
12-month warranty from purchase date for defects.
How to submit warranty claims and exclusions.
Information on finding service partners via website or QR code.
| Brand | W&H |
|---|---|
| Model | Assistina One |
| Category | Medical Equipment |
| Language | English |