4 5
INSTRUCTIONS FOR USE
1. Before using your Waring
®
Commercial Wafe/Wafe Cone
Maker for the rst time, remove any dust from shipping by
wiping the plates with a damp cloth. Remove all protective
paper and wrapping.
2. Plug cord into wall outlet.
Switch the toggle switch to the ON position. The RED
light will illuminate to signal power. Preheat your Waring
®
Commercial Wafe/Wafe Cone Maker on setting #4 or
preferred setting. It will now begin the preheating process.
This should take about 4 minutes. The machine will sound
6 beeps and the GREEN indicator light will go on to signal
the unit is ready for baking. Season the wafe/wafe cone
grids by spraying with cooking spray or brushing with a
avorless oil.
For initial use, it is important that the wafe/wafe cone
maker is preheated before seasoning with cooking spray
or oil.
NOTE: The rst time you use your wafe/wafe cone maker, it
may have a slight odor and may smoke a bit. This is normal, and
common to heating appliances.
3. For Belgian Waffles: Fill measuring scoop with batter
to ll line ¾ or to top of measuring scoop depending on
the recipe. For loose batters, ll to the ¾ mark; for thicker
batters ll to the top) pour batter evenly into the center of
the wafe grids. Use a heat-proof spatula to spread the
batter evenly over the grids. Close the lid and rotate the
unit 180°.
For wafe cones, use 1 heaping tablespoon of thick wafe
cone batter. Drop the batter into the center of the grid and
close. As the grids close, the batter will spread throughout
the grid to form the appropriate shape. When the wafe
cone is completely baked, the wafe cone maker will sound
three beeps.
For best results, do not open wafe/wafe cone maker
during cooking process. Doing so will interfere with the
timing mechanism.
4. When the wafe/wafe cone is completely baked, the wafe
maker will sound 3 beeps. Baking time is determined by
SPECIAL FEATURES
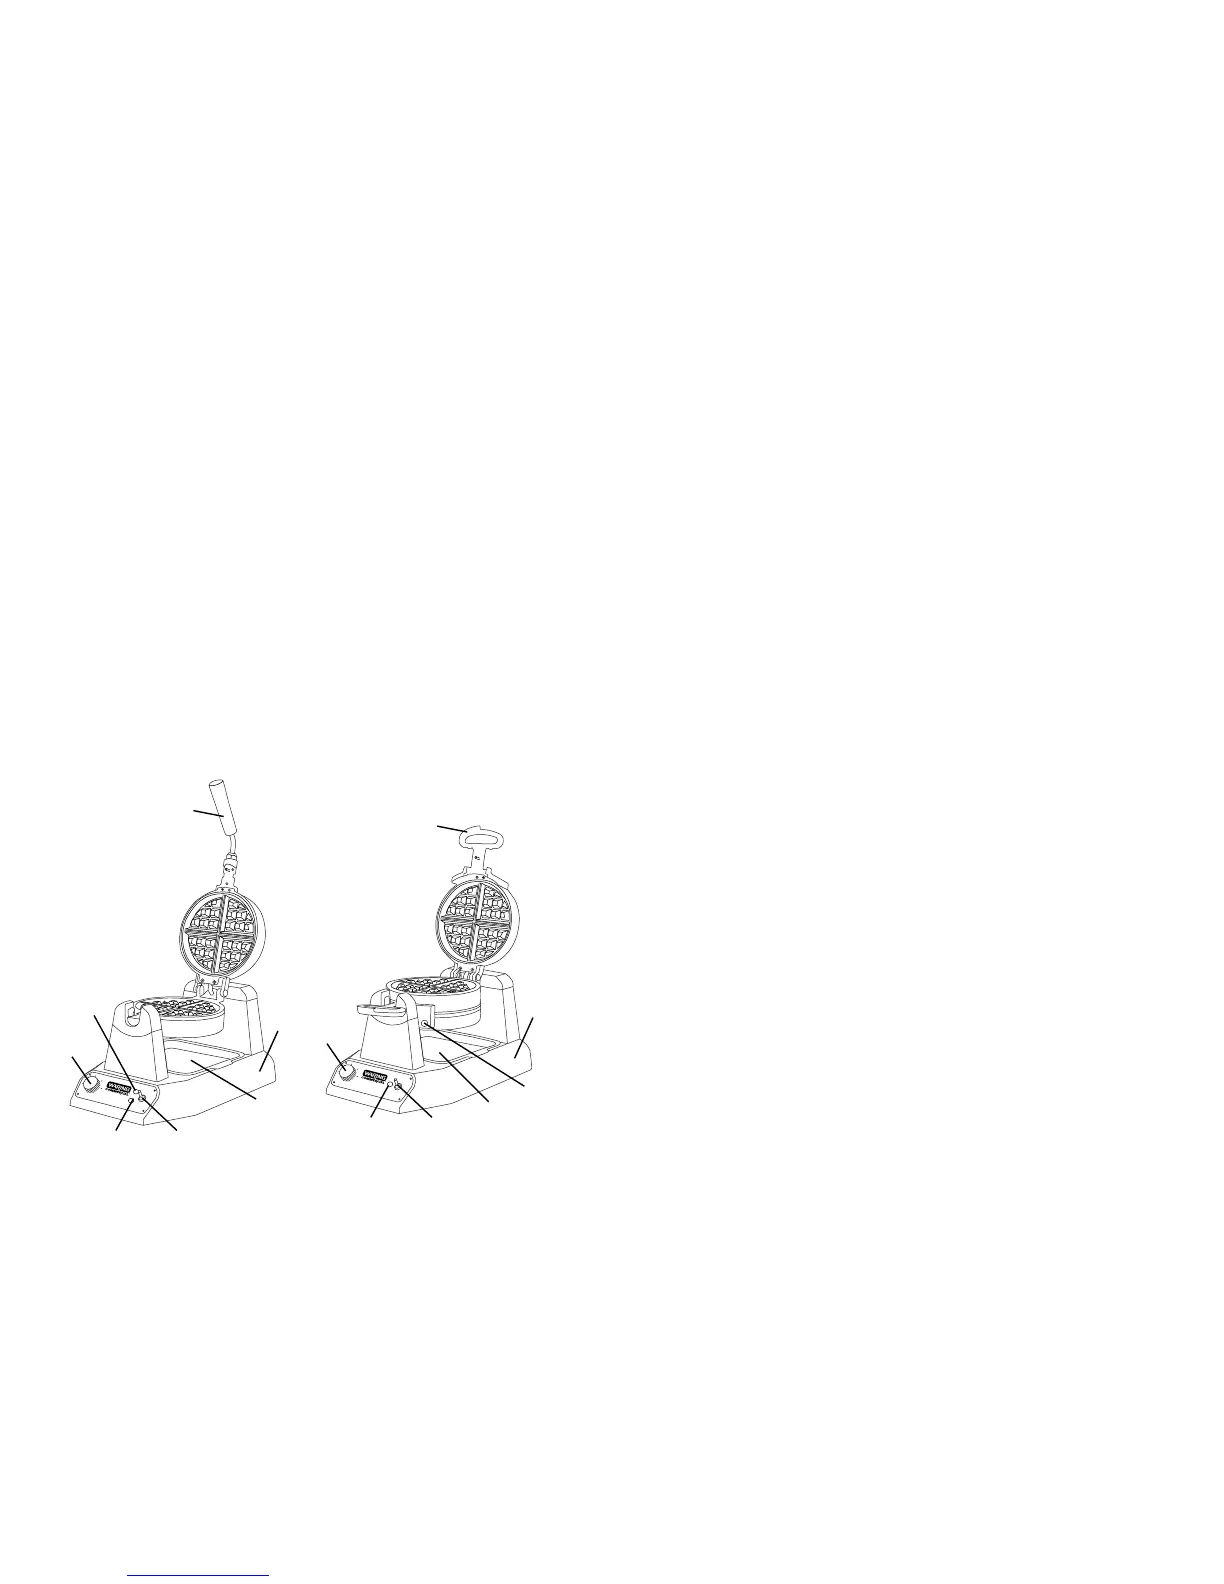
1. Waffle/Waffle Cone Grids
WW180/WWC180 – Single grid
set for making one wafe/wafe
cone at a time
WW200/WWC200 – Double grid
set for making two wafes/wafe
cones at a time (only one set
shows)
2. Browning Control Adjustment
– Adjustable for different batters
and personal preference
3. Power Indicator Light
– Lights red when
wafe maker is on
and heating up
4. Ready Indicator Light
(only 1 shown on
WW200/WWC200)
– Lights green when wafe
maker is ready to bake
5. Power Switch
6. Indicator Beeps (not shown)
– Will beep 6 times when unit is
ready to bake for rst wafe of
every baking session
– Will beep 3 times when wafe
is done
7. Base
8. Handle
9. Measuring Scoop (not shown)
10. Removable Drip Tray
11. Cone Rolling Tool
WWC180
WW180 (not shown)
WWC200
WW200 (not shown)