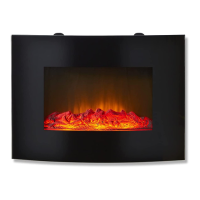
The Warmlite WL45033 is a 2000W wall-mounted surround fireplace suite designed to provide warmth and aesthetic appeal to a home. It functions as an electric heater with flame effects, offering both manual and remote control operation.
Technical Specifications:
- Description: Wall Mounted Surround Fireplace Suite
- Model: WL45033
- Rated Voltage: 220-240V
- Frequency: 50/60Hz
- Power Consumption: 2000W
- Remote Control: Requires 1 x 3V lithium button cell battery.
Safety and Installation:
The appliance is designed for permanent wall mounting at a minimum height of 300mm, with a recommended height of 600mm from the floor to the bottom of the wall fire for optimal viewing of the fuel bed. Installation requires two people due to the weight and to prevent injury or damage. The wall bracket must be fitted horizontally, and the cable routed to the bottom right of the fire.
- 2mm pilot drill bit & 8mm drill bit (8mm drill bit may need to be a masonry bit)
- Philips screwdriver
- Power drill
Installation Steps:
- Use the wall bracket as a template to mark five drill positions on the wall, ensuring they are level.
- Drill holes with a depth of 35mm using the specified drill bits.
- Clean dust and debris from the holes and insert one plug in each hole, ensuring the edge is flush with the surface.
- Hold the bracket in position and fix it in place with screws.
- Carefully lift the appliance, ensuring the top rear ledge engages with the wall bracket and is centrally seated. This step requires two people.
- Gently bring the wall fire down against the wall. Mark the lower fixing brackets' two hole positions, then remove the wall fire.
- Drill the wall and insert wall plugs for the lower fixing brackets.
- Refit the wall fire and fasten the bottom fixing bracket to the wall using the provided screws.
- Remove the front panel, unpack the logs, and place them along the light unit in the desired position.
- Replace the front panel.
Wiring Safety (UK Use Only):
The appliance must be earthed. The mains lead wires are coloured as follows:
- Blue: Neutral [N], connects to terminal marked [N] or black.
- Brown: Live [L], connects to terminal marked [L] or red.
- Green/Yellow: Earth [E], connects to terminal marked [E] or with the earth symbol.
- Neither brown nor blue wires should be connected to the earth terminal.
- Ensure the cord grip is fastened correctly.
- The plug must be fitted with an ASTA approved fuse (conforming to BS 1362) of the same rating as already fitted.
- For non-rewireable plugs, if the fuse needs replacing, use an ASTA approved one of the same rating. If the plug needs removal, disconnect from the mains, cut it off, and dispose of it safely to avoid electric shock.
General Product Safety Precautions:
- Verify the main circuit voltage matches the appliance rating.
- Use on a stable, level, heat-resistant surface.
- DO NOT immerse cords, plugs, or any part of the appliance in water or other liquids.
- DO NOT leave unattended, especially near children or pets.
- Close supervision is necessary when used by or near children (aged 8+ with supervision).
- Children should not play with the appliance.
- Cleaning and user maintenance should not be done by children without supervision.
- Switch off at the wall socket and unplug when not in use or before cleaning.
- If the supply cord or appliance is damaged, stop use immediately and seek professional advice.
- DO NOT let the cord hang over table edges or contact hot surfaces.
- DO NOT use unrecommended accessory attachments.
- DO NOT pull the plug by the cord.
- Use only for its intended household purpose.
- DO NOT carry by the power cord.
- DO NOT use extension cords.
- DO NOT use outdoors.
- DO NOT use in small rooms with persons unable to leave on their own without constant supervision.
- Ensure the heater is on a firm, level surface.
- DO NOT position near curtains, furniture, or combustible materials.
- Never sit or stand on the fire.
- DO NOT cut off the plug and hardwire into a fixed fused spur.
- DO NOT locate immediately below a mains socket outlet.
- DO NOT cover the heater or obstruct its openings.
- DO NOT insert objects through openings.
- Check for accumulated dust periodically.
- DO NOT use in areas with flammable liquids or fumes.
- DO NOT cover the cord under carpeting or with throw rugs. Arrange the cord away from traffic areas.
- DO NOT use where arcing or sparking parts are present, or where gasoline, paint, or flammable liquids are used/stored.
- DO NOT use as a drying rack for clothing or hang decorations on it.
- DO NOT operate on a timer or leave on overnight.
- Unplug when not in use.
- Keep the mains lead away from the hot body of the heater.
- Unplug and allow to cool before moving.
- WARNING: Must be installed correctly to prevent damage or injury.
- DO NOT attempt to dismantle or repair; this should only be done by a qualified service agent.
- In case of fault, stop use and contact Customer Support.
Usage Features (Manual Operation):
- The On/Off switch must be set to 'I' to operate.
- The fire beeps upon power-up.
- Power Switch: Turns the appliance on/off.
- Flame Button: Activates flame effect (without heater). Press once for low brightness, subsequent presses increase brightness, fourth press turns off.
- Function Button: Selects heat settings. Press once for 1000W (Heat 1 display), twice for 2000W (Heat 2 display). Press again to turn off the heater.
Usage Features (Remote Operation):
- Power Button: Turns appliance and flame effects on/off.
- Flame Effect Cycle Button: Cycles through three flame effect settings.
- Time Calibration Settings: If not set, the timer effect starts from 00:00.
- Timer Setting Button: Sets two time periods and temperature.
- Light Brightness Button: Reduces light brightness. Press again to turn off the light.
- Heat Activation Button: Activates 1000W heat (press once), 2000W (press twice). Press again to turn off heating.
- AUTO Button: Open window On/Off.
- TIMER Button: Turns Timer settings On/Off.
Troubleshooting (Safety Cut-Out Device):
The unit has an automatic over-temperature safety cut-out. If activated (e.g., due to blocked air vents), the heater will not operate and will NOT automatically reset.
To Reset:
- Turn off the fire using the on/off switch.
- Unplug from the mains for at least 15 minutes.
- Ensure air vents are clear of obstructions.
- Plug the power cord back in.
- Turn the fire back on.
- If it still fails, check the plug fuse.
- If the fuse is OK and the fire is still not functioning, contact a qualified service person.
CAUTION: Allow the heater to cool completely before handling or cleaning. Do not open the product; there are no user-serviceable parts inside.
Cleaning and Care:
- Always disconnect from the mains supply before cleaning.
- Use a soft, clean duster for general cleaning.
- DO NOT use harsh abrasives or cleaners.
- Allow the product to cool completely before cleaning.
- DO NOT allow water or other liquids into the interior.
- Periodically clean with a vacuum cleaner nozzle over the guards to remove dust/dirt.
- DO NOT use harsh detergents, chemical cleaners, or solvents as they may damage plastic surfaces.
- DO NOT immerse any electrical part (motor units or plugs) in water.
Documentation and Warranty:
The product conforms to 2014/30/EU (Electromagnetic Compatibility), 2014/35/EU (Low Voltage), and 2011/65/EU (Restriction of Hazardous Substances) directives. It comes with a 12-month guarantee from the date of original purchase, covering faulty materials or workmanship. Refund or replacement is at the retailer's discretion.
Warranty Conditions:
- Return with proof of purchase.
- Installed and used according to instructions.
- Used only for domestic purposes.
- Does not cover wear and tear, damage, misuse, or consumable parts.
- RK Wholesale LTD has limited liability for incidental or consequential loss or damage.
- Valid in the UK and Eire only.
An extended 1-year warranty is available upon online registration within 28 days of purchase at www.warmlite.co.
Disposal:
Appliances bearing the crossed-out wheeled bin symbol should not be disposed of with domestic rubbish. Dispose of old electrical and electronic appliances separately. Refer to www.recycle-more.co.uk or www.recyclenow.co.uk (UK) and www.weeeireland.ie (Ireland) for recycling information. All electrical items must be recycled according to the WEEE directive. Take the appliance to your local Civic Amenity site for recycling at the end of its life.