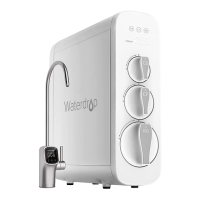
The Waterdrop X Series Reverse Osmosis Water Filtration System is an under-counter reverse osmosis water filtration system designed to provide clean and healthy drinking water. It comes in three models: WD-X12, WD-X14, and WD-X16, differing primarily in their maximum daily capacity.
Function Description:
The system utilizes a multi-stage filtration process, including a pre-sediment and carbon block filter (F2), an activated carbon filter (F1), and a reverse osmosis membrane filter (F3). It also incorporates a UV sterilizer for enhanced water purification. The smart faucet provides real-time information such as TDS levels, filter life indicators, and cup volume selection. The system is designed for connection to a cold water supply and includes a drain saddle for waste water discharge.
Important Technical Specifications:
- Models: WD-X12, WD-X14, WD-X16
- Dimensions (LWH): 18.2" x 6.25" x 16.72" for all models.
- Maximum Daily Capacity:
- WD-X12: 1200 GPD (Gallons Per Day)
- WD-X14: 1400 GPD
- WD-X16: 1600 GPD
- Feed Water Pressure: 14.5-87 psi / 0.1-0.6 MPa
- Feed Water Temperature: 41-100 °F / 5-38 °C
- Feed Water Requirement: Municipal tap water (pre-filtration system recommended for well water)
- Rated Voltage/Current: Input 110-240V AC 3.5A
- Rated Frequency: 50/60HZ
- TDS Rejection Rate: 90%+ (under standard laboratory conditions after full flushing)
- Sound Level: Will not exceed 65 dB (under standard laboratory conditions with feed water pressure between 14.5 psi and 87 psi)
- UV-C Emitter: Contains a UV-C emitter for sterilization.
Usage Features:
- Smart Faucet: The system includes a smart faucet with a display that shows TDS levels, filter life indicators (F1, F2, F3), and allows for cup volume selection (005-064OZ and 999). The faucet knob can be turned clockwise or counterclockwise to adjust volume and pressed to start or stop water output. The faucet's swing arm rotates 120°.
- Automatic Flushing: Upon initial power-up, the system automatically flushes for 35 minutes. During this time, the faucet display shows a countdown. Flushing can be paused or continued by pressing the faucet knob during the 030-001 minute range. Additionally, the system has a circular fresh water flushing function that automatically produces fresh water after 10 minutes of inactivity to ensure water freshness. This function can be turned on or off.
- UV Sterilizer: The UV sterilizer activates when the faucet is turned on and water flows, indicated by the UV light on the display. It stops working when the faucet is off or there is no water flow.
- Energy-saving Mode: This mode is off by default. It can be activated by holding down the F2 and F3 reset keys for 5 seconds within 10 seconds of power-on. The faucet knob light ring will change from white to green, and the machine noise and water flow rate will be reduced. The same action deactivates the mode, returning the light ring to white.
- Quick-Connect Fittings: The system uses quick-connect fittings for easy tubing installation. Tubing should be inserted until it reaches a mark (approx. 0.8”) and then secured with a blue lock clip to prevent leakage.
- Malfunction Display: The smart faucet displays error codes (e.g., E02 for internal water leakage, E03 for booster pump overwork, E04 for frequent booster pump starting/stopping) and emits beeps to alert users of issues.
Maintenance Features:
- Filter Life Indicators: Electronic filter indicators (F1, F2, F3) on both the system housing and the faucet screen notify users when filters need replacement through color changes (Blue for Normal, Yellow for Pre-warning, Red for Warning) and audible beeps.
- F1 (Activated Carbon Filter): Up to 12 months life.
- F2 (Pre-sediment and Carbon Block Filter): Up to 6 months life.
- F3 (Reverse Osmosis Membrane Filter): Up to 24 months life.
- Filter Replacement: Filters are replaced by twisting them counterclockwise to remove and clockwise to install new ones. Before replacement, the faucet should be turned off for 30 seconds to release internal pressure. After replacing F1 and F2, pressing the center knob of the old filter is recommended to release pressure and avoid spills.
- Filter Life Reset: After replacing a filter, its corresponding indicator can be reset by holding down the F1, F2, or F3 filter sign for 7 seconds until the system beeps.
- Post-Replacement Flushing: After filter replacement, specific flushing times are required: 15 minutes for F1, 5 minutes (automatic) for F2, and 30 minutes for F3. The display will show the flushing status.
- System Cleaning: The system should be cleaned with clear water; abrasive cleaners, steel wool, or corrosive liquids should not be used. No other liquids should be poured into the filter system.
- Long-Term Storage: If not used for more than a week, the smart faucet should be turned on, the cold water valve shut off, and power disconnected. Filters should be sealed and stored in the refrigerator (not freezer). Before re-use, the smart faucet should run for 10 minutes. Filters may need replacement if bacteria grow during prolonged disuse.
- Leakage Check: Regular checks of joints, fittings, and tubing connections are recommended to prevent water leakage.
- Power Supply Check: Regularly check the power supply and wires for damage or looseness to prevent electrical accidents.
- Drain Pipe Maintenance: Ensure the waste water pipe is unobstructed to prevent damage to filters or internal components and to avoid water soaking the floor.