
 Need help?
Do you have a question about the Waterpik Waterflosser WP-100 and is the answer not in the manual?
Remove the reservoir from base and fill with lukewarm water.
Replace the reservoir onto the base, pressing down firmly to ensure full seating.
Press tip firmly into handle. Ensure no gap between handle and colored tip ring for proper insertion.
Set pressure to high, point handle into sink, turn unit ON until water flows, then turn OFF.
For first-time users, set pressure to lowest position. Gradually increase to your liking.
Temporarily stop water flow by pressing the pause button on the handle.
Place tip in mouth before turning on. Lean over sink, close lips to prevent splashing. Turn unit ON.
Always pause or turn unit OFF before removing the tip from your mouth.
Aim water stream just above gumline at a 90-degree angle, starting with back teeth.
Follow gumline, pause between teeth. Clean all areas around and between teeth.
Push the tip eject button on the handle. The control knob will rise, releasing the tip.
Do not press the tip eject button while the unit is running.
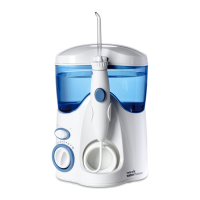
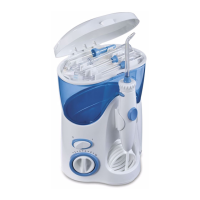
The Waterpik Water Flosser, Model WP-100, is a dental hygiene device designed to clean between teeth and below the gumline using a stream of water. It offers a comprehensive approach to oral care, complementing traditional brushing by reaching areas that toothbrushes often miss. The device is user-friendly, with clear instructions for setup, operation, and maintenance, ensuring an effective and comfortable experience for users.
The primary function of the Waterpik Water Flosser is to provide a powerful yet gentle stream of water to remove plaque and food debris from between teeth and below the gumline. This process, known as water flossing, helps to improve gum health, reduce gum inflammation, and prevent cavities. The device operates by drawing water from a reservoir, pressurizing it, and then delivering it through a specialized tip into the user's mouth. The adjustable pressure control allows users to customize the intensity of the water stream to suit their comfort level and specific oral care needs, making it suitable for a wide range of users, including those with sensitive gums, braces, implants, or crowns.
The Waterpik Water Flosser is designed for ease of use, with several features that enhance the user experience:
Reservoir Preparation: To begin, the user removes the reservoir from the base and fills it with lukewarm water. Lukewarm water is recommended for comfort. Once filled, the reservoir is placed back onto the base and pressed down firmly to ensure it is fully seated, preventing leaks and ensuring proper water flow.
Tip Selection and Insertion: The device comes with various tips, each designed for specific oral care needs (though the manual focuses on the general-purpose tip). To insert a tip, the user presses it firmly into the handle. A key indicator of proper insertion is the absence of a gap between the handle and the colored tip ring, ensuring a secure connection and efficient water delivery.
Priming the Unit (First-Time Use Only): Before the very first use, the unit needs to be primed to ensure water flows smoothly. This involves setting the pressure control dial on the base to "high." The user then points the handle and tip into a sink and turns the unit "ON" until water flows from the tip. Once water flows consistently, the unit is turned "OFF." This step purges any air from the system, preparing it for regular use.
Adjustable Pressure Control: For new users, it is recommended to start with the lowest pressure setting. The pressure control dial, located on the base of the unit, allows users to gradually increase the pressure to their liking as they become accustomed to water flossing. This feature is crucial for comfort and effectiveness, enabling users to find the optimal pressure for their individual needs.
Pause Control on Handle: A convenient pause button is located on the handle of the device. This allows users to temporarily stop the water flow without turning off the entire unit. This is particularly useful for repositioning the tip, taking a breath, or briefly interrupting the flossing session without losing the desired pressure setting.
Proper Usage Technique: For best results, the user should always place the tip in their mouth before turning the unit "ON." Leaning over the sink and closing lips enough to prevent splashing, while still allowing water to flow from the mouth into the sink, is the recommended posture. The water stream should be aimed just above the gumline at a 90-degree angle. Users should start with the back teeth, follow the gumline, and pause briefly between teeth, continuing until all areas around and between teeth have been cleaned.
Safe Tip Removal: To remove a tip, the user pushes the tip eject button on the handle. This action causes the control knob to rise, releasing the tip, which can then be removed. A crucial safety note is to never press the tip eject button while the unit is running, as this could cause damage or injury. Additionally, it is advised to always pause or turn the unit "OFF" before removing the tip from the mouth.
While the manual primarily focuses on usage, it implicitly guides users on aspects that contribute to the device's longevity and hygienic operation:
Regular Cleaning of Reservoir: Although not explicitly detailed as a maintenance step, the instruction to "remove the reservoir from base and fill with lukewarm water" implies that the reservoir is detachable and can be cleaned. Regular cleaning of the reservoir is essential to prevent the buildup of mineral deposits or bacteria, ensuring that the water used for flossing is clean and hygienic. The use of lukewarm water also suggests that the reservoir can be easily rinsed.
Proper Tip Handling: The instructions for inserting and removing tips correctly contribute to the maintenance of both the tips and the device's handle mechanism. Ensuring tips are firmly inserted prevents wear and tear on the connection point, while using the eject button for removal prevents damage to the tip's base or the handle's locking mechanism.
Draining Water After Use (Implied): Although not explicitly stated, it is good practice to drain any remaining water from the reservoir after each use. This prevents stagnant water from sitting in the reservoir, which can lead to bacterial growth or mineral buildup over time. The ease of removing and refilling the reservoir facilitates this implicit maintenance step.
Storage: The design of the unit, with a detachable reservoir, suggests that it can be stored compactly. Proper storage, perhaps with the reservoir empty and clean, helps maintain the device's condition and readiness for the next use.
In summary, the Waterpik Water Flosser Model WP-100 is a well-designed oral hygiene tool that offers effective cleaning and gum care through its powerful water stream. Its user-friendly features, including adjustable pressure, pause control, and clear instructions for setup and use, make it accessible for a broad audience. While specific maintenance steps are not extensively detailed, the design inherently supports hygienic practices and proper care, ensuring the device remains effective and durable over time.
 General
| Pressure Settings | 10 |
|---|---|
| Number of Tips Included | 7 |
| Pulse Rate | 1400 pulses per minute |
| Color | White |
| Tip Rotation | 360 degrees |
| Type | Countertop |
| Pulsation Rate | 1400 pulses per minute |
| Warranty | 3 years |
| Voltage | 120 VAC, 60Hz |
| Pressure Range | 10 to 100 PSI |
| Power Source | Electric |





 To Next Page
