Introduction
3
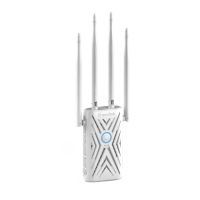
LED Indicators
POWER
LAN/WAN
WPS
ON: The Device is powered on
OFF: The Device is not receiving electrical power.
ON:
The Ethernet port is connected.
OFF: The Ethernet port is disconnected.
Flashing: Transferring data to/from a network device
Slow Flashing: The Device is trying to connect to your PC or Phone
Fast Flashing: The Device is connecting to your AP/Router
WPS Button:
Press and hold for 2 seconds, the Device is trying to connect to your PC or Phone
Press and hold for 6 seconds to connect to your Wi-Fi AP/Router (for Repeater Mode)
Reset Button: Press and hold for 3 seconds to Reset the Device.
1. Launch a web browser and type http://ap.setup
in the address field. Enter admin (all lowercase)
to login.
2. Click “Wizard”.
OPTION ONE
Wi-Fi Repeater Mode
Using a Web Browser
Power ON
1
1. Plug the Device into an electrical outlet near your
Wi-Fi router.
2. Wait until the POWER LED is on and solid green.
If the login window does not pop up, please
refer to the FAQ > Q1.
4. Verify your wireless settings and click "Connect".
For Windows User For Mac OS X User
1. Disconnect the Ethernet (Wired) connection
from your laptop (if any).
2. Turn your laptop’s Wi-Fi ON if it is OFF.
3. Click the Wi-Fi icon on the top right corner
of the screen, and connect to the Device’s
network: WAVLINK-N.
Not connected
Connections are available
Wireless Network Connection
WAVLINK-N
Connect
Connect automatically
Connect to the Device
2
Configure
3
1.
Disconnect the Ethernet (Wired) connection
from your laptop (if any).
2. Turn your laptop’s Wi-Fi ON if it is OFF.
3. Click the Wi-Fi icon on the taskbar and connect
to the Device’s network: WAVLINK-N.
Wi-Fi:On
Turn Wi-Fi Off
WAVLINK-N
Join Other Network....
Create Network....
Open Network Preferences...
Relocate4
1. Plug the Device into an electrical outlet about halfway between your router(Host Wi-Fi) and the Wi-Fi dead zone. The location you
choose must be within the range of your existing host Wi-Fi.
2. If the signal is weak, relocate it closer to the router to achieve a good (or better) signal quality.
Tips: Use your phone to find the ideal location for the Device.
If your phone’s Wi-Fi signal(received from your router) is higher
than 3 levels, it is the ideal spot to install the Device. If not, we
suggest you to move closer to your router for better Wi-Fi signal.
Wi-Fi Range Extender
English
login
This Device
Repeater
Router
Speed
0 KB/S
0 KB/S
1 Disconnet
Clients Internet
Device Information
WAN Type Repeater
192.168.10.1
192.168.10.1
0.0.0.0
0.0.0.0
82:3F:5D:09:EA:62
Wi-Fi SSID
Channel
Connect to
Status
Up Time
Firmware
Wireless-N
11
NONE
Disconnect
00h:10m
M78N_V3130.1121
Device IP
Gateway
DNS1
DNS2
WAN MAC
Wi-Fi Setup
3. Select a Wi-Fi SSID of your router (Host Wi-Fi) and enter
the password. Either keep the same SSID as your host
Wi-Fi or create a new name for the extended network.
Repeater Wizard
Status Wizard Wi-Fi Setup
Connect
Connect to:
Wi-Fi Password:
Repeater SSID:
Wavlink_530
Wavlink_530
********
Wavlink_Extend
Wireless-562
Wireless-N
Wireless-112
Wireless-MO
Select a Wi-Fi Manually enter
Host Wi-Fi Name
Extended Network Name
Host Wi-Fi Password
Status
Wizard
Host Wi-Fi
Default Parameters
- Default IP: 192.168.10.1 - URL: http://ap.setup
- Login Password: admin
- Wi-Fi SSID: Wireless-N
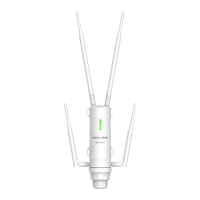
Hardware Overview
1
3
2
WPS Button
Reset Button
WAN/LAN Port
LAN Port
LAN LED
WAN/LAN LED
WPS LED
Wi-Fi LED
Power LED
2
3
4
5
6
7
8
1
9
4
5
9
8
7
6
The Device is mainly used for providing free Wi-Fi service in big area such as
actory, community, street or etc. The Device can take an existing 802.11n
wireless signal, repeat and extend it to a longer range where it is too far away
for the router or access point to reach. The device supports 2.4G wireless
network connection, and it can supports 2.4G transmission speeds of up to
300Mbps. It has two internal antennas which provide even better wireless
performance, transmission rates. Stability technology automatically avoids
channel conflicts using its channel selection feature.
- Wi-Fi key: no
WAVLINK (@WavlinkOfficial)
WAVLINK SUPPORT (@WavlinkTechSupport)
WL-WN523N2
WL-WN523N2x2
QUICK START GUIDE
300Mbps Wi-Fi Range Extender