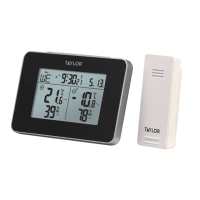
WeatherGuide™ Wireless Indoor/Outdoor Weather Station with Hygrometer
Model 1731
Instruction Manual
Welcome to the Taylor® WeatherGuide™ System. Simple, reliable, accurate…it allows you to monitor indoor or outdoor
locations from one room. The base unit reads indoor conditions, while the remote sensor wirelessly reports outdoor
weather conditions back to the base unit for an all-in-one weather display.
NOTE: Some units have a static cling label over the digital display. Please remove before use.
BATTERY INSTALLATION
The base unit operates on 2 AA batteries (not included).
The remote sensor operates on 2 AAA batteries (not included).
Replace the batteries if readings grow dim or irregular. Always replace both batteries at the same time; do not mix old and
new batteries. Do not mix alkaline, standard (carbon-zinc) or rechargeable (ni-cad, ni-mh, etc.) batteries.
IMPORTANT: Power the base unit first, and then the remote sensor, otherwise the units’ transmissions may not properly
connect. Place the base unit as close as possible to the remote sensor during set up.
TIP: When the temperature falls below freezing point, alkaline batteries used in outdoor units may freeze, lowering their
voltage supply and effective range. Use of Lithium batteries is recommended in extremely cold or hot locations.
Base Unit
Battery Power: The battery compartment is located on the back of the unit. Remove the battery compartment door. Install
(2) AA size batteries into the battery compartment according to the polarity markings. Replace the battery compartment
door.
Remote Sensor
The battery compartment is located on the back of the unit. Remove the battery compartment cover. Install (2) AAA size
batteries into the battery compartment according to the polarity markings. Replace the battery compartment door.
After Powering Up the Units:
When the base unit is powered up, it will beep and the LCD screen will light up.
The base unit will begin to display indoor temperature and humidity. The outdoor temperature and humidity displays will
show dashes “(--)”.
Allow at least 3 minutes for the base unit to connect with the remote sensor and analyze current outdoor temperature
conditions. A radio antenna icon moves next to the Outdoor Sensor icon (“ ”) in the right side of the base unit’s screen
during this time.
When the radio antenna icon is steady, the base unit has connected with the remote and is reporting the current outdoor
temperature and humidity readings.
If after 3 minutes the radio antenna icon stops moving and dashes remain, press and hold the “-” button on the back of the
base unit to send another signal. For best setup connection, keep the base unit and remote close to each other while trying
to connect. Keep away from other electronic equipment that may interfere with the connections, such as mobile phones,
appliances, computers, refrigerators, TVs, etc.
Indoor temperature and humidity readings update on the base unit approximately every 60 seconds. The remote sensor
transmits outdoor temperature and humidity readings to the base unit approximately every 57 seconds.
Note: While the base unit is in “analyzing” mode, some functions (such as Clock Setting) may not be operational, or using
the functions will interrupt the transmission reception. Once the “analyzing” mode is complete, the other functions will
become operational.