Heating System Tempura | Système de chauffage Tempura – Instructions for assembly, maintenance and use |
Notice de montage, instructions d’entretien et d’utilisation Version | Version 05.08.2019
Reserve technical changes | Sous réserve de modifications techniques Item no. | N° art. 115727-0000 Page | Page 14/20
Notice de montageAssembly instructions
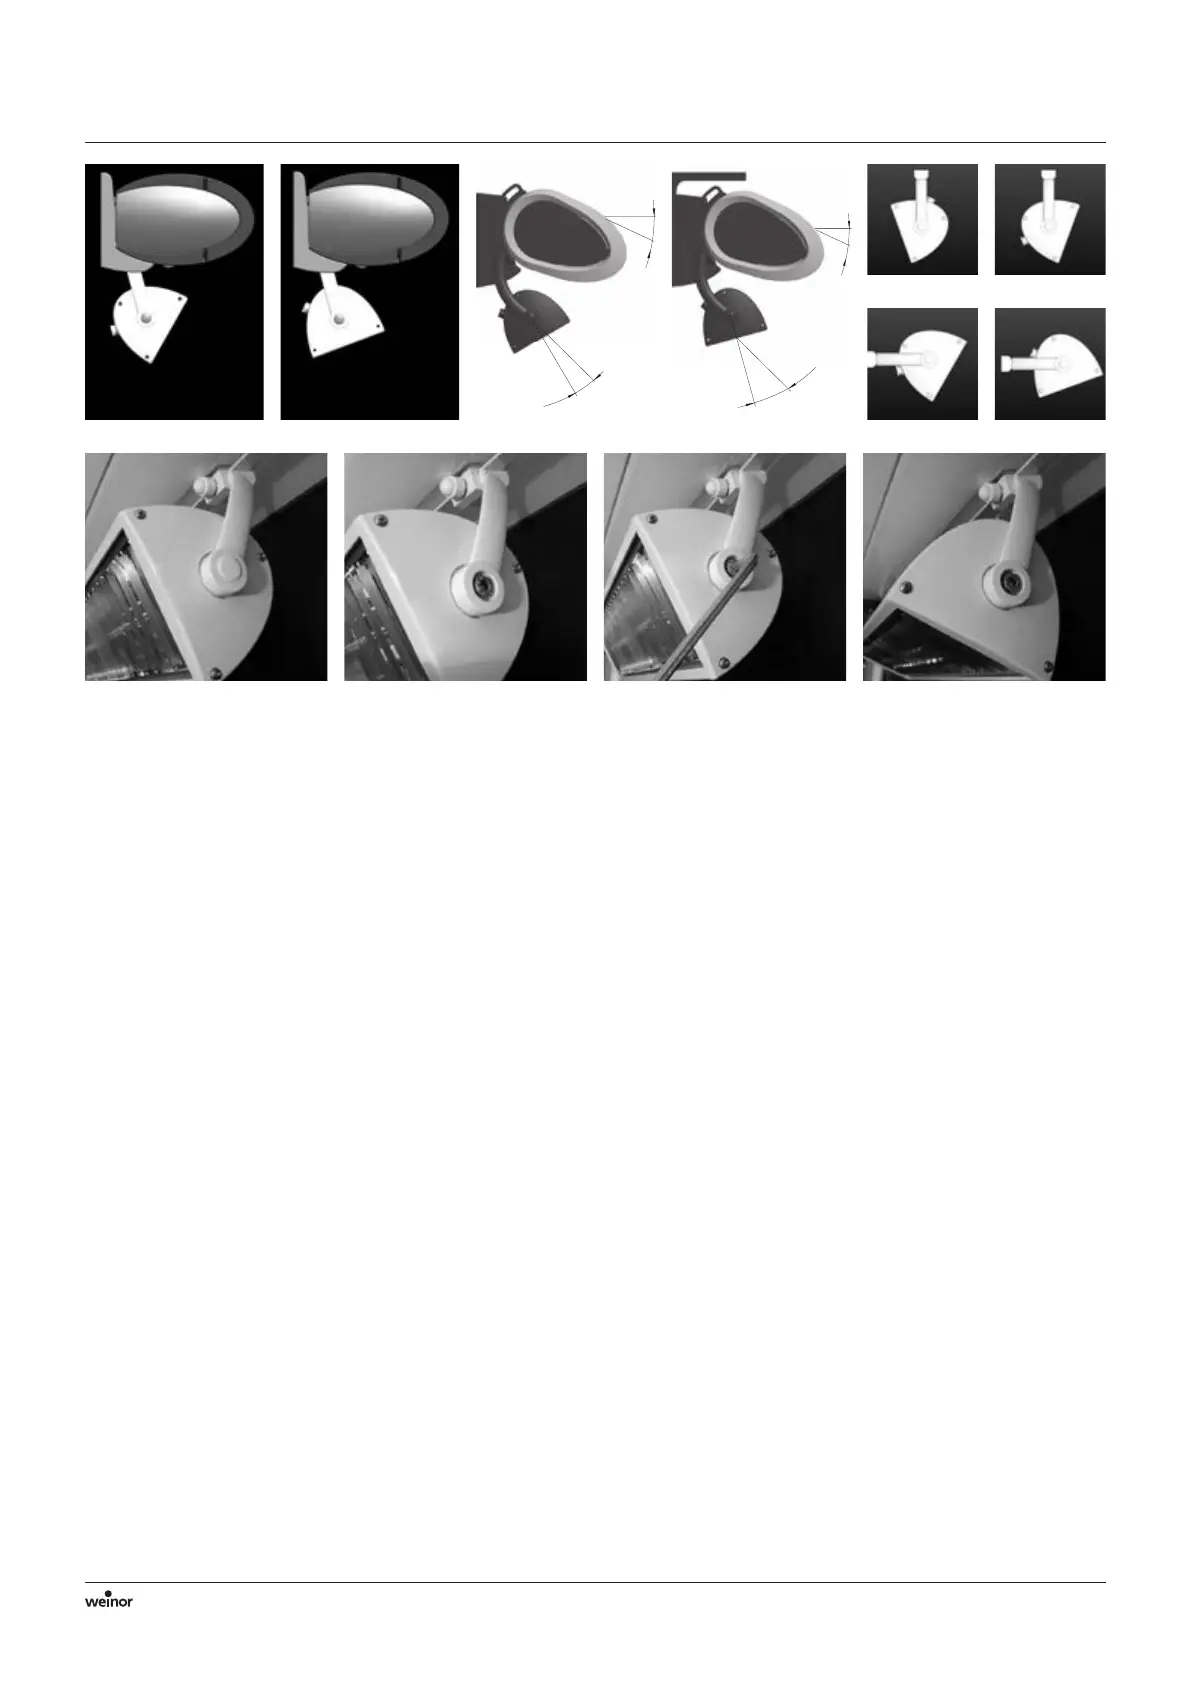
6. Rotating the Tempura
When attached to an Opal Design II, the Tempura can be swivelled
up to 40° (Pict 6.1 and 6.2).
The Tempura for the Semina Life can be swivelled infinitely by
15 degrees as standard (Pict 6.3 15°).
Due to the limitation of the tilting range it is guaranteed that the
temperatures on the fabric and mounting substrate do not rise
excessively when the awning is tilted at any angle (5° – 25°).
In the event that the Semina Life is fixed to the ceiling and to
ensure that no objects (mounting substrate) can be warmed up by
the Tempura, the limitation on the Tempura‘s tilting range can be
removed and thus increased from 15° to 30° (Pict 6.4 30°). For this
the shoulder screw (M3) is removed from the left arm of the
Tempura using a slotted screwdriver (size 3 x 0.5) (see Pict 3.2
Explosion).
Note: The grub screw for limiting the tiling may not be removed
under any circumstances if the awning is set to be tilted > 10°.
When mounted below the ceiling the Tempura Universal can be
rotated infinitely through 140° (Pict 6.5 and 6.6), when mounted
on a wall this is through 40° (Pict 6.7 and 6.8).
• Disconnect from the mains and allow the heater to cool down
(Pict 6.9).
• Remove the plastic caps from the Allen screws (M8) attaching the
headplates and arms (Pict 6.10).
• Loosen the Allen screws (M8) attaching the headplates and
arms so far that the Tempura can be rotated (For this you need
a 6 mm hexagonal screwdriver, Pict 6.11).
• Rotate the heater to the required position.
• Tighten the screws you have just loosened so far that it stays at
the set angle (Pict 6.12).
• Push the plastic caps back onto the Allen screws.
6. Orientation du système Tempura
Tempura pour Opal Design II peut être pivoté de 40° en continu
(Pict 6.1 et 6.2).
Par défaut, il est possible de faire pivoter le Tempura pour Semina
Life de 15° (Pict 6.3 15°).
Cette limitation de la plage de rotation garantit que les températures
sur la toile et le support de fixation n’augmentent pas de manière
excessive pour chaque inclinaison réglable du store (5° – 25°).
Si le Semina Life est fixé au plafond, il faut s’assurer que Tempura ne
chauffe aucun objet (support de fixation). Si c’est le cas il est possible
de retirer la limite d’inclinaison du Tempura afin que de pouvoir
augmenter la plage d’inclinaison de 15° à 30° (Pict 6.4 30°). Pour
cela, il faut retirer la vis à épaulement (M3) du bras gauche du
Tempura à l’aide d’un tournevis pour vis à fente (taille 3 x 0,5)
(voir Pict 3.2 Explosion).
Attention: il ne faut en aucun cas retirer la tige filetée de limitation
de l’inclinaison lorsque l’inclinaison du store est > 10°.
Le système Tempura Universal peut être orienté en continu sur 140°
(Pict 6.5 et 6.6) en cas de fixation au plafond et sur 40° en cas de
fixation murale (Pict 6.7 et 6.8).
• Couper l’alimentation électrique et laisser le système de
chauffage refroidir (Pict 6.9).
• Retirer les caches en plastique au niveau des vis à six pans
creux qui maintiennent les plaques de recouvrement et les bras
(Pict 6.10).
• Desserrer les vis à six pans creux (M8) qui relient les plaques de
recouvrement et les bras jusqu’à ce que le système Tempura
puisse être orienté (pour ce faire, une clé Allen de 6 mm est néces-
saire, Pict 6.11).
• Orienter le système de chauffage dans la position souhaitée.
• Resserrer les vis afin de bloquer le système dans la position réglée
(Pict 6.12).
• Enfoncer les caches de protection sur les vis à six pans creux.
25° Neigung
15°
Schwenk-
bereich
25° Neigung
30°
Schwenk-
bereich
Pict 6.1 Pict 6.3
Pict 6.9 Pict 6.10 Pict 6.11 Pict 6.12
Pict 6.2 Pict 6.4
Pict 6.7 Pict 6.8
Pict 6.5 Pict 6.6
 Loading...