Download App
Download the ViHealth App from
iOS App Store or Google Play Store,
or scan the QR code.
Notice: If you have installed the
App before, please update it to the
latest version.
1.
Introduction
1.1.Intended use
This Pulse Oximeter is intended to be used for
measuring, displaying and storing of oxygen level
(SpO2), pulse rate at home.
It's not a medical device. This device is for Sports
and Aviation use only and not intended for medical
use.
1.2.Warnings and Cautions
The Oximeter is not intended for medical use.
The Oximeter is not an apnea monitor and should
not be used for arrhythmia analysis.
Do not self-diagnose or self-medicate on the basis
of the measurements. Always consult your doctor.
The Oximeter is intended for spot-check use only.
DO NOT squeeze the sensor part or apply
excessive force on it.
Do not use this device during MRI examination.
Do not use this device with a defibrillator.
Do not store the device in the following locations:
locations in which the device is exposed to direct
sunlight, high temperatures or levels of moisture,
or heavy contamination; locations near to sources
of water or fire; or locations that are subject to
strong electromagnetic influences.
Do not use the device in a combustible
environment.
Never submerge the device in water or other
liquids.
Do not clean the device with acetone or other
volatile solutions.
Do not drop this device or subject it to strong
impact.
The device and accessories are provided
non-sterile.
Do not place this device in pressure vessels or gas
sterilization device.
Do not dismantle the device, as this could cause
damage or malfunctions or impede the operation
of the device.
Consult your doctor immediately if you experience
symptoms that could indicate acute disease.
Do not self-diagnose or self-medicate on the basis
of this device without consulting your doctor. In
particular, do not start taking any new medication
or change the type and/or dosage of any existing
medication without prior approval.
Use only cables, sensors and other accessories
specified in this manual.
Prolonged using may increase the risk of
undesirable changes in skin characteristics, such as
irritation, reddening, blistering or burns.
Do not open the device cover without
authorization. The cover should only be opened by
a qualified service personnel.
1.3.Guide to Symbols
Follow Instructions for Use.
MRI unsafe. Presents hazards in all
MR environments as device contains
strongly ferromagnetic materials.
Resistant to liquid ingress
This product complies with the rules
and regulations of the Federal
Communication Commission.
This product complies with
verpackG.
1.4.Unpacking
Device
User Manual
Data/Charging Cable
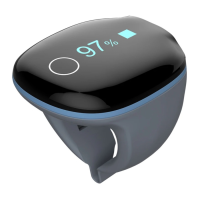
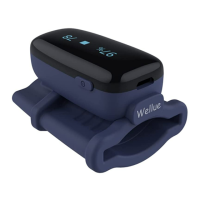
2. Overview
3. Using the Device
3.1.Charging
Charge the battery before using.
Connect the device to computer USB or USB charging
adapter with USB cable.
After fully charged, the device will power off
automatically.
3.2.POWER ON/OFF
POWER ON:
Wear the device, it will turn on automatically.
POWER OFF:
The device turns off automatically in a moment after
you take it off.
3.3.Typical steps
1. START. Charge the battery. Wear the device to
power on.
2. STOP. Take off the device, the recording will be
over after the countdown.
3. DATA SYNC. After the countdown, run App to sync
data. OR next time after you turn on the device, run
App to sync.
3.4.Start working
1) Wear the device on thumb finger, index finger
as option in case of too tight for thumb. Try to move
the device along the forefinger to find out a best fit.
Avoid being loose. Loose wearing causes inaccurate
measure.
2) Device will turn on automatically. After a few
seconds, the device will begin to monitor.
Notice:
Keep snug enough, loose wearing may cause
inaccurate readings.
DO NOT use middle finger; if too tight for
thumb or forefinger, try little finger.
If the working time is less than 2 minutes,
the data will not be saved.
Please avoid excessive motion.
Please avoid strong ambient light condition.
3.5.Stop working & sync data
Take off the device, the countdown will begin.
(If the working time is less than 2 minutes, there will
be no countdown)
During the countdown, if you wear
the device again, the record will be
resumed.
After the countdown, the data will
have been saved in device and ready to sync.
Sync data:
After the countdown, run App to sync data;
OR next time after you turn on the device, run
App to sync.
Notice: The built-in memory can store 4 sessions. The
oldest will be overwritten by the 5th. Please sync
data to your phone in time.
3.6.Screen Wake up
The screen will go off automatically for saving power
in Standard Mode; you can touch the key on top to
wake up the screen.
3.7.How to Check Battery
Touch the key on top, you can switch display between
readings and battery.
3.8.Unavailable Symbol
When this symbol displays on device screen, it
indicates the readings is unavailable right now.
It may caused by:
Excessive movement;
Poor signal, finger is too cold;
Usually, the readings will recover in
a few seconds when at rest.
3.9.Bluetooth Connection
The device Bluetooth will be enabled automatically
after it’s turned on.
To establish a Bluetooth connection,
1) Keep the device on.
2) Make sure the phone Bluetooth
is enabled.
3) Run the App and follow the
on-screen instructions.
Notice: DO NOT PAIR in the settings
of your smart device.
4.
PC software
PC Software: O2 Insight Pro
Download from:
https://getwellue.com/pages/pc-software
Install the software on Windows(win 7/8/10) or
MacOS(10.15 or above).
Install the software on PC:
1) Turn on device, connect the device to PC USB
port with the supplied Data Cable (it’s different
from universal USB cable)
2) Run the PC software, click the Download
button to download data from the device.
With the PC software, you can view and print sleep
report, which can also be exported as PDF or CSV
files.
Note: While the device is being connected to app, it
can’t connect to PC software.
5.
Maintenance
5.1.Time & Date
After connection with App, device time will sync from
your phone time automatically.
5.2.Cleaning
Use a soft cloth moistened with water or alcohol to
clean the device surface.
6. Troubleshooting
Device
does not
turn on or
no
response
Charge battery and
try again.
Please contact your
local distributor.
Keep device in
charging, touch the
key for 8 seconds.
The app
cannot
find the
device
The Bluetooth
of your phone is
off.
Turn on the
Bluetooth in the
phone.
The device
Bluetooth is off.
For Android,
Bluetooth
cannot work
without
location
permission