EasyManua.ls Logo

Wen 61723K - User Manual

Wen 61723K
16 pages
Print Icon
To Next Page IconTo Next Page
Loading...
18-GAUGE 2-INCH
BRAD NAILER
Instruction Manual
IMPORTANT: Your new tool has been engineered and manufactured to WEN’s highest standards for dependability,
ease of operation, and operator safety. When properly cared for, this product will supply you years of rugged,
trouble-free performance. Pay close attention to the rules for safe operation, warnings, and cautions. If you use
your tool properly and for its intended purpose, you will enjoy years of safe, reliable service.
NEED HELP? CONTACT US!
Have product questions? Need technical support? Please feel free to contact us:
TECHSUPPORT@WENPRODUCTS.COM1-800-232-1195 (M-F 8AM-5PM CST)
For replacement parts and the most up-to-date instruction manuals, visit WENPRODUCTS.COM
MODEL 61721, 61723K

Questions and Answers

  • H
    Heidi Martinez DVMAug 13, 2025
    What causes air to leak between the body and cylinder cap of my Wen Nail Gun?
    • J
      jenniferschaeferAug 13, 2025
      Air leaking between the body and cylinder cap of your Wen Nail Gun can be caused by a loose screw, which you should tighten. It could also be due to a damaged gasket, in which case you should check and replace the seal.
  • E
    Emily ReyesAug 17, 2025
    Why is air leaking between the body and drive guide on my Wen 61723K?
    • B
      Brian Fisher MDAug 17, 2025
      If you're experiencing air leaking between the body and drive guide of your Wen Nail Gun, it's likely due to a damaged piston O-ring or bumper. Check these parts and replace the O-ring or bumper as necessary.
  • A
    Allison PierceAug 21, 2025
    What to do if fasteners are jammed in my Wen 61723K Nail Gun?
    • H
      hannahwilliamsAug 21, 2025
      If fasteners are jammed in your Wen Nail Gun, it could be due to several reasons. The joint guider might be worn and need replacement. Alternatively, the fasteners could be the wrong size or damaged, so ensure you're using the recommended, undamaged fasteners. Loose magazine or front plate screws can also cause this issue, so tighten them. Lastly, a damaged blade in the piston assembly could be the culprit, requiring you to replace the piston assembly.
  • E
    Emily GeorgeAug 25, 2025
    Why does my Wen 61723K skip fasteners?
    • S
      Spencer CarpenterAug 25, 2025
      Your Wen Nail Gun might skip fasteners due to a few reasons. It could be a worn bumper or damaged spring, in which case you should replace the bumper or pusher spring. Dirt in the drive guide can also cause this, so clean the drive channel of the front plate. Inadequate airflow to the tool could be another reason, so check the hose and compressor fittings. Additionally, a worn or dry O-ring on the piston or a damaged O-ring on the trigger valve can cause this, so replace the O-ring or lubricate it as needed. Finally, a leaking cylinder cap seal could be the problem, requiring you to replace the seal.
  • D
    Darrell TurnerAug 28, 2025
    Why does my Wen Nail Gun run slowly or lose power?
    • K
      Kimberly GriffinAug 28, 2025
      If your Wen Nail Gun runs slowly or experiences power loss, several factors could be responsible. First, check if there is sufficient oil and lubricate as instructed. Next, verify that the air supply is adequate. A broken spring in the cylinder cap can also cause this issue, so replace the spring if necessary. Finally, a blocked exhaust port in the cylinder cap could be the problem, requiring you to replace the damaged internal parts.
  • W
    wacostaAug 31, 2025
    How to fix air leaking at the trigger area of my Wen 61723K Nail Gun?
    • A
      andrew10Sep 1, 2025
      If you notice air leaking at the trigger area of your Wen Nail Gun, there are several potential causes. The O-ring in the trigger valve might be damaged, so check and replace it if necessary. The trigger valve head could also be damaged, requiring replacement. Additionally, the trigger valve stem, seal, or O-ring might be damaged, so inspect and replace them as needed.
  • B
    Brad HoodSep 4, 2025
    What to do if my Wen Nail Gun will not drive down tight?
    • C
      Chelsea PageSep 4, 2025
      If your Wen Nail Gun isn't driving fasteners down tight, it could be due to a worn blade in the piston assembly, requiring you to replace the piston assembly. Another cause could be a lack of power, so adjust to an adequate air pressure. Slow cycling and loss of power can also be the reason. In this case, check the cylinder cap spring for broken coils or reduced length and inspect if the exhaust port of cylinder cap is restricted.
  • C
    Carolyn ThompsonSep 8, 2025
    Why is the blade driving fasteners too deeply with my Wen Nail Gun?
    • R
      rknightSep 9, 2025
      If the blade of your Wen Nail Gun is driving fasteners too deeply, it could be due to a worn bumper, which you should replace. Alternatively, the air pressure might be too high, so adjust it accordingly.

Summary

Introduction and Specifications

Specifications

Details the technical specifications of the 18-gauge brad nailer.

General Safety Rules

Work Area Safety

Guidelines for maintaining a safe work environment and preventing accidents.

Electrical Safety

Precautions related to electrical hazards when using power tools.

Personal Safety

Recommendations for operator protection and safe operating practices.

General Safety Rules Continued

Power Tool Use and Care

Best practices for operating and maintaining power tools safely.

Service and Maintenance

Instructions for servicing the power tool with qualified personnel.

California Proposition 65 Warning

Information on chemicals in dust and exposure reduction measures.

Brad Nailer Safety Warnings

Operational Guidelines and Restrictions

Adherence to tool design, material compatibility, and safe fastener driving practices.

Safe Handling and Trigger Control

Proper grip, body part awareness, and trigger discipline.

Maintenance and Tool Integrity

Preventing unauthorized modifications and ensuring proper tool maintenance.

Jamming and Disconnection Procedures

Safe procedures for clearing jams and disconnecting the tool from air supply.

Unpacking and Packing List

Unpacking Instructions

Instructions for carefully removing the nailer and checking contents.

Know Your Brad Nailer

Overview of tool purpose and identification of key components.

Preparations and Adjustments

Lubricating the Tool

Procedure for lubricating the tool before use to ensure performance and longevity.

Connecting to Air Supply

Steps for connecting the nailer to a compressed air supply.

Preparations and Adjustments Continued

Loading Fasteners

Instructions on how to load 18-gauge brad nails into the magazine.

Adjusting the Air Exhaust Cap

How to rotate the exhaust cap to direct airflow away from the user.

No-Mar Tip Usage

Information about the no-mar tip for protecting workpieces.

Operation

Adjusting Depth-Adjustment Wheel

How to adjust the wheel to set fastener penetration depth.

Firing Fasteners

Step-by-step guide on how to drive fasteners into a workpiece.

Operation Continued

Driving Modes

Explanation of single-sequential and bump-fire driving modes.

Clearing Jammed Fasteners

Procedure for safely removing jammed fasteners from the tool.

Maintenance

Lubrication

Routine lubrication procedure for optimal tool performance.

Compressor Maintenance

Air compressor maintenance recommendations for nailer longevity.

Cleaning Procedures

Methods for cleaning the tool for better performance and safety.

Tool Inspection

Checks for tool functionality, tightness of screws, and air supply quality.

Storage Guidelines

Guidelines for storing the tool and accessories safely.

Product Disposal

Information on responsible disposal of used pneumatic tools.

Troubleshooting Guide

Air Leaks and Sealing

Diagnosing and resolving air leaks around the trigger and body components.

Fastener Driving and Depth Issues

Addressing problems with fastener penetration depth and driving accuracy.

Tool Performance and Jam Resolution

Troubleshooting slow operation, power loss, jams, and non-driving issues.

Overview

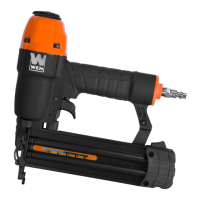
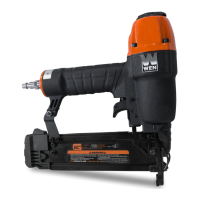
The WEN 18-Gauge 2-Inch Brad Nailer, models 61721 and 61723K, is a pneumatic power tool designed for various fastening tasks, particularly those involving trim installation and light construction projects like building birdhouses. This instruction manual provides comprehensive guidance on the safe operation, assembly, and maintenance of the tool, ensuring years of reliable service when properly cared for and used for its intended purpose.

Function Description

The WEN Brad Nailer is an air-powered fastening tool that drives 18-gauge brad nails into workpieces. It operates by connecting to a compressed air supply, which provides the necessary force to drive fasteners. The tool is designed for precision and efficiency, allowing users to quickly and securely attach materials. Key functional components include a trigger for activation, a depth adjustment wheel for controlling nail penetration, a jam-clearing latch for easy maintenance, and a safety bracket with a no-mar tip to protect the workpiece. The nailer features two driving modes: single-sequential and bump-fire, offering flexibility for different applications and user preferences. The air exhaust cap is adjustable, allowing users to direct the released air away from themselves and the workpiece, enhancing comfort and safety during operation.

Usage Features

Before operating the WEN Brad Nailer, it is crucial to perform initial lubrication. The tool requires 4-5 drops of air tool oil into the air inlet before each use, especially the first time, unless an inline oiler is already in place. This lubrication is vital for the longevity of the tool and to prevent voiding the warranty. After lubricating, the tool should be connected to a properly installed compressed air supply. The working pressure of the air compressor must be regulated between 60 and 100 PSI to match the nailer's operating requirements. It is imperative to ensure the nailer magazine is empty and the tip is pointed away from the user and others when connecting to the air supply to mitigate the risk of misfires. Only clean, dry, and regulated air should be used; bottled gases are strictly prohibited due to explosion risks.

Loading fasteners is a straightforward process. The magazine lock is depressed, and the movable magazine is pulled out. Brad nails, ranging from 3/8" to 2" in length, are then placed into the grooves of the fixed magazine with the nail tips pointing downwards and the nail heads resting against the appropriate groove. The movable magazine is then pushed forward until it clicks shut, ensuring it is securely locked. The nailer has a capacity of up to 100 fasteners. Users should regularly check the fastener gauge window and reload as necessary to avoid dry-firing, which can damage the tool and leave unwanted marks on the workpiece.

The depth adjustment wheel is a key feature for precise operation. Turning the wheel clockwise increases the firing depth, while turning it counterclockwise decreases it. Users are advised to experiment on scrap wood to determine the optimal depth for their specific workpiece, fastener length, and air pressure. The goal is to achieve the desired firing depth with the lowest possible air pressure, which conserves energy, reduces noise, and minimizes wear on the tool.

When firing fasteners, safety is paramount. Users must wear proper eye and hearing protection and maintain alertness and balance. The tool should be held upright on the workpiece, with the no-mar tip positioned where the fastener will be driven. The safety bracket is pressed against the workpiece, and then the trigger is pulled to drive a fastener. In single-sequential mode, the safety bracket must be removed from the workpiece and the tool repositioned before driving the next fastener. In bump-fire mode, the trigger is held, and the safety bracket is repeatedly pressed against the workpiece to drive fasteners in rapid succession. After operation, the air compressor should be turned off and depressurized, the air hose disconnected from the nailer, and all fasteners removed from the magazine.

Clearing jammed fasteners is a critical maintenance task that must be performed safely. First, the tool must be disconnected from the air supply, and all other fasteners removed from the magazine. The jam-clearing latch is then flipped open, and the front plate pulled up to access and remove the jammed fastener, using pliers or another tool if needed. If the piston assembly is in the down position, a screwdriver or rod should be inserted into the nosepiece to push it back into position. After clearing the jam, the front plate is closed, and the latch cover pushed down to secure it, ensuring the trigger and safety bracket move freely without sticking. Finally, the nailer is reconnected to the air supply, fasteners are loaded, and the tool is test-fired into scrap wood to confirm proper operation.

Maintenance Features

Regular maintenance is essential for the WEN Brad Nailer's performance and longevity. Routine lubrication, as described in the usage section, is required before each workday if an inline oiler is not used. This ensures that all moving components, seals, and O-rings remain properly lubricated.

The air compressor, which powers the nailer, also requires regular maintenance. Users should follow the compressor's owner's manual for its maintenance schedule, including checking the air filter and draining the tank weekly. This practice helps prevent water and other contaminants from entering the nailer, which are major causes of pneumatic tool wear.

Cleaning the tool contributes to better and safer performance. The nailer should be wiped clean with a damp towel and mild soap. Compressed air can be used to blow the tool clean, and non-flammable cleaning solutions can be used for the exterior. However, the tool should never be soaked in cleaning solutions, as this can damage internal parts.

Regular inspection of the tool is crucial. Users should check the trigger and safety mechanism to ensure they are complete and functional, with no loose, missing, binding, or sticking parts. Any damaged, inoperable, disconnected, or altered parts, or any air leaks, must be repaired or replaced before further use. All screws should be kept tight, as loose screws can cause personal injury or damage to the tool.

For storage, the nailer and its accessories should be placed inside the blow mold case to protect them from dust and moisture. The unit should be stored in a dark, dry, frost-free, and well-ventilated area, out of reach of children. The ideal storage temperature is between 50 to 86 °F (10 and 30 °C).

When the tool reaches the end of its useful life, it should be disposed of responsibly. Used pneumatic tools contain recyclable materials and should not be discarded with household waste. Users are encouraged to take the product to a local recycling facility to minimize its environmental impact.

Wen 61723K Specifications

General IconGeneral
Weight10.5 lbs
Nail Size2 in. to 3-1/2 in.
Operating Pressure70-110 PSI
Power SourceAir
Fastener Length2 - 3-1/2 in.

Related product manuals