This document is an instruction manual for the WEN BG625V 6-Inch Variable Speed Bench Grinder. It provides comprehensive information regarding the tool's function, technical specifications, usage, and maintenance.
The WEN BG625V Bench Grinder is designed for sharpening bits, drill bits, chisels, gouges, and other cutting tools. It is also suitable for general grinding tasks, deburring, material removal, and paint/rust removal. The variable speed feature allows users to adjust the grinding speed according to the specific task, with lower speeds recommended for light grinding and sharpening, and higher speeds for heavier tasks.
Important Technical Specifications:
- Model Number: BG625V
- Motor: 120V, 60 Hz, 2.5A
- Wheel Speed: 2000 - 3400 RPM (Variable Speed)
- Grinding Wheel Size: 6 in. x 3/4 in. x 1/2 in.
- Arbor Size: 1/2 Inch
- Arbor Thread: M12-1.75
- Wheel Grits: 36 Grit and 80 Grit (Included)
- Product Weight: 29.3 Pounds (13.3 kg)
- Product Dimensions: 15.6 in. x 6.3 in. x 10.2 in.
Usage Features:
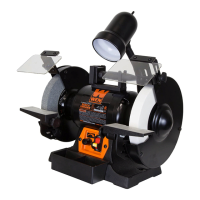
The bench grinder comes with several components and accessories to facilitate various grinding tasks:
- Grinding Wheels: Two grinding wheels are included, a 36-grit wheel and an 80-grit wheel, allowing for different levels of material removal and finishing.
- Tool Rests: Both left and right tool rests are provided. These are adjustable to ensure the inside edge is 1/16 of an inch from the grinding wheel. The lower knob allows for back-and-forth adjustment, while the upper knob enables tilting.
- Drill Bit Sharpening Rest: A specialized rest is included for sharpening drill bits, featuring a channel that guides the drill bit at the correct angle. This rest can only be installed on the right side of the grinder.
- Spark Arrestors: These are attached to the inside surface of the wheel covers and should be positioned 1/16 of an inch from the grinding wheel to prevent sparks from flying.
- Eye Shields: Clear eye shields attach to the spark arrestors, providing protection from sparks and debris during operation. They are adjustable for desired positioning.
- Quenching Tray: A quenching tray is integrated into the base of the grinder, designed to hold water, oil, or other quenching liquids to cool hot workpieces.
- Work Lamp: The grinder features a flexible work light to improve visibility. It requires a 120-volt, 40-watt or less track light bulb (type R20, medium base). The light's housing can become hot after use.
- Variable Speed Knob: This knob allows the user to select the desired grinding speed, from 2000 to 3400 RPM.
- Power Switch: For turning the grinder on and off.
Safety Precautions during Operation:
- Always wear ANSI-approved safety goggles and hearing protection.
- Ensure the work area is clean, well-lit, and free of slippery substances.
- Keep children and bystanders away from the operating area.
- Never operate the tool while tired or under the influence of drugs, alcohol, or medication.
- Ensure the power switch is in the OFF position before plugging in the tool or making adjustments.
- Remove any adjusting keys or wrenches before turning the tool on.
- Do not overreach; maintain proper footing and balance.
- Dress properly, avoiding loose clothing, jewelry, or long hair that could get caught in moving parts.
- Use a ground fault circuit interrupter (GFCI) when operating in damp locations.
- Do not force the power tool; use the correct power tool for the application.
- Disconnect the plug from the power source before making any adjustments, changing accessories, or storing the tool.
- Store idle power tools out of reach of children.
- Maintain power tools by checking for misalignment, binding, or breakage of parts.
- Keep guards in place and in working order.
- Do not grind or polish magnesium or magnesium alloys due to fire hazard.
- Always turn the variable speed knob to its lowest setting before turning on the grinder.
- Stand to the side of the grinder during start-up and allow it to reach full speed before applying a workpiece.
- Never grind on a cold wheel; run the grinder for one full minute to warm up the wheel.
- Only grind on the face of the grinding wheel, never on the side.
- Hold the workpiece firmly against the tool rest, using pliers or clamps for small pieces.
- Feed the workpiece smoothly and evenly, moving it side to side to prevent burning and ensure even grinding.
- Avoid jamming the workpiece against the wheel; release pressure if the wheel slows down.
- Disconnect the power source and allow wheels to stop completely before making adjustments.
- Clean the machine thoroughly when changing material types to prevent explosion or fire hazards.
- If any component is damaged or missing, shut off the switch, unplug the tool, and have a certified technician replace parts.
- The tool is equipped with an equipment grounding conductor and a grounding plug.
- Ensure the outlet is properly installed and grounded.
- Do not modify the plug.
- Use only three-wire extension cords suitable for outdoor use if operating outdoors.
- Refer to the provided table for recommended extension cord gauge based on amperage and length.
- Use a separate electrical circuit for the tool, not less than a 12-gauge wire, protected with a 15A time-delayed fuse.
Maintenance Features:
- Grinding Wheel Inspection and Replacement: Grinding wheels should be inspected before each use for cracks, grooves, chips, or being out of true. Damaged wheels must be replaced immediately. Wheels should be rated for a speed at least as high as the grinder's "NO LOAD" RPM.
- Wheel Dressing: If wheels become grooved, rounded, or loaded with foreign material, they can be remedied with a dressing tool (included). New wheels may also require dressing to make them round.
- Changing Grinding Wheels:
- Disconnect the grinder from the power supply.
- Rotate the eye shield out of the way.
- Loosen the tool rest knob and move the tool rest away.
- Remove three bolts around the wheel guard to remove the wheel cover.
- Use two 19mm / adjustable wrenches to remove the arbor hex nut. Note that the left side hex nut loosens with clockwise rotation, and the right side with counterclockwise rotation.
- Remove the outer wheel flange and the old grinding wheel.
- Replace with a new grinding wheel that matches the grinder's design (6” diameter, 1/2” arbor) and has a safe rated RPM higher than 3400 RPM. Do not remove labels from new wheels.
- Reattach the outer flange and arbor hex nut, avoiding overtightening. Do not use an impact driver or wrench.
- Replace the wheel cover, knobs, tool rest, and eye shield, ensuring all guards are correctly positioned.
- Wire or Buffing Wheel Installation: A wire or buffing wheel can be installed on either side. Spacers may be needed depending on wheel thickness. The first spacer always goes between the innermost wheel flange and the grinder body.
- Quenching Tray Maintenance: Periodically empty and rinse the quenching tray to remove metal filaments and refill with clean water.
- General Cleaning: Regularly check the tool and use a soft brush to remove dust. Wipe the body with a soft, damp cloth and mild detergent. Do not use alcohol, gasoline, or similar cleaning agents. Avoid contact between damp cloth and grinding wheels.
- Eye Shield Transparency: Ensure eye shields remain transparent and do not block the view of the grinding wheel.
- Lubrication: The unit has sealed lubrication within the motor housing bearings; no additional lubrication is required.
Troubleshooting Guide:
The manual includes a troubleshooting guide for common issues such as the motor not starting (low voltage, blown fuse/breaker, loose connections, bad PCB), motor getting too hot (overloaded motor, long/thin extension cord), motor stalling/tripping circuit (loose connections, low voltage, incorrect fuses, overloaded motor), wheel vibrating (out of round/balance), wavy condition on workpiece (machine vibrating, workpiece not held firmly, uneven wheel face), and machine running too loud (bad bearing/motor). Solutions range from checking power supply and connections to replacing fuses, reducing load, balancing/dressing the wheel, securing the workpiece, or contacting WEN customer service.
Permanent Mounting:
The grinder should be firmly attached to a reliable work surface using the two mounting holes (12mm diameter, 248mm apart center-to-center) on either side of the base. Mounting hardware is not included. This prevents vibration, walking, or tipping during operation.
The manual concludes with a warranty statement, offering a two-year limited warranty for home use (90 days for professional/commercial use) against defects in material or workmanship. It emphasizes the importance of keeping proof of purchase and contacting WEN customer service for any issues.