Page 6
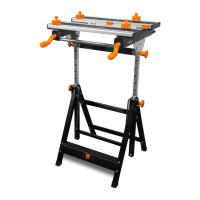
7. Attach Front (7F) and Back (7B) Drawer
Brackets to Top Beams (6). (See Figure E.)
Figure E
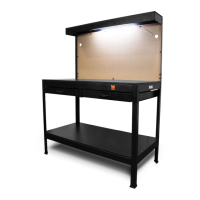
8. Attach Middle Drawer Mount (8) to the Front
(7F) and Back (7B) Drawer Brackets.
9. Attach Left (9L) and Right (9R) Drawer Mounts to
Front (1) and Back (2) Posts. (See Figure F.)
W
9L
8
9R
2
1
1
2
Figure F
10. Attach Drawer Handle (14) to the Front Drawer
Panel using Bolts, Washers and Nuts (A).
Repeat for second Front Drawer Panel.
11. Lay Drawer Bottom (13) down on a flat surface.
Attach Right (10R) and Left (10L) Drawer Panels
to the Front (11) and Back (12) Drawer Panels.
Repeat for second Drawer. (See Figure G.)
12. Install the Drawers, making sure the runners on
the Drawers are level with the Drawer Mounts
14
11
10R
11
10L
13
12
A
A
A
A
Figure G
13. Attach left and right Back Upper Posts (15)
to left and right Back Posts (2).
14. Attach Back Shelf Beam (16B) to Back Upper Posts.
15. Attach Left Shelf Beam (17L) and Right Shelf
Beam (17R) to the back Shelf Beam (16B).
16. Attach Front Shelf Beam (16F) to Left and Right
Shelf Beams (17L, 17R). (See Figure H.)
17L
15
15
16F
16B
17R
2
2
Figure H
7F
7B
Page 6
7. Attach Front (7F) and Back (7B) Drawer
Brackets to Top Beams (6). (See Figure E.)
Figure E
8. Attach Middle Drawer Mount (8) to the Front
(7F) and Back (7B) Drawer Brackets.
9. Attach Left (9L) and Right (9R) Drawer Mounts to
Front (1) and Back (2) Posts. (See Figure F.)
W
9L
8
9R
2
1
1
2
Figure F
10. Attach Drawer Handle (14) to the Front Drawer
Panel using Bolts, Washers and Nuts (A).
Repeat for second Front Drawer Panel.
11. Lay Drawer Bottom (13) down on a flat surface.
Attach Right (10R) and Left (10L) Drawer Panels
to the Front (11) and Back (12) Drawer Panels.
Repeat for second Drawer. (See Figure G.)
12. Install the Drawers, making sure the runners on
the Drawers are level with the Drawer Mounts
14
11
10R
11
10L
13
12
A
A
A
A
Figure G
13. Attach left and right Back Upper Posts (15)
to left and right Back Posts (2).
14. Attach Back Shelf Beam (16B) to Back Upper Posts.
15. Attach Left Shelf Beam (17L) and Right Shelf
Beam (17R) to the back Shelf Beam (16B).
16. Attach Front Shelf Beam (16F) to Left and Right
Shelf Beams (17L, 17R). (See Figure H.)
17L
15
15
16F
16B
17R
2
2
Figure H
7F
7B
7. Mounting
Drawer Brackets (7F, 7B)
Attach the front (7F) and back (7B)
drawer brackets to the outside of the
top beams (6), using M6x10 bolts,
washers and nuts (B). See Figure E.
8. Attaching Middle Drawer
Mount (8)
Attach the middle drawer mount (8)
to the front (7F) and back (7B) drawer
brackets, using M6x10 bolts, washers
and nuts (B). See Figure F.
NOTE: The open end of the drawer
mount should be facing towards the
front so the drawers can be assembled
later.
9. Attaching Left & Right
Drawer Mounts (9L, 9R)
Attach the left (9L) and right (9R)
drawer mounts to the inside of the
front (1) and back (2) posts, using
M6x10 bolts, washers and nuts (B).
See Figure F.
NOTE: The open end of the drawer
mounts should be facing towards the
front so the drawers can be assembled
later.
10. Attaching Drawer Handles
(14)
Attach one drawer handle (14) to the
front drawer panel, using M4x10 bolts,
washers and nuts (A). See Figure G on
next page.
Repeat for attaching the other handle
to the second front drawer panel.
ASSEMBLY & ADJUSTMENTS
10
 Loading...