EasyManua.ls Logo

Werner MULTILADDER MT-13 - User Manual

Werner MULTILADDER MT-13
8 pages
Print Icon
To Next Page IconTo Next Page
Loading...
300
!!!!
Combined Weight of
User and Materials
Type IA Duty Rating
LOAD CAPACITY
MULTI
LADDER
TELESCOPING
PROFESSIONAL GRADE
Telescoping design for maximum versatility
Operating Procedure
and Safety Instructions
Model MT-22
Model MT-13
WERNER CO., 93 WERNER ROAD, GREENVILLE, PA 16125-9499
Phone: (724) 588-8600
www.wernerladder.com
P/N62320-01 ©2003 Werner Co.
Printed in China September 2003
Question and Answer IconNeed help?

Do you have a question about the Werner MULTILADDER MT-13 and is the answer not in the manual?

Summary

1 DESCRIPTION

Product Overview and Working Heights

Details the Werner MT Series Telescoping Multiladder's features, working heights, and available positions.

Terminology

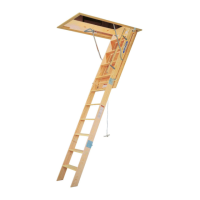
Familiarize yourself with the names of parts used to describe the Werner Telescoping Multiladder.

2 SAFETY

Product Inspection and General Warnings

Follow safety instructions for inspecting the ladder and general warnings before use.

Proper Set-up and Use Safety

Essential guidelines for safely setting up and using the ladder to prevent accidents.

Product Care and Safety

Instructions for maintaining the ladder and ensuring its safe condition for continued use.

3 SOFT TOUCH PUSH KNOB LOCKING HINGE

Hinge Operation and Adjustment

Learn how to adjust the angle of the ladder using the Soft Touch push knob locking hinge.

4 SPRING LOADED J LOCKS

Lock Operation and Height Adjustment

Instructions on how to operate the Spring Loaded "J" locks to adjust the ladder's height.

5 PROPER USE

How to Set Up Positions

Step-by-step guide on configuring the ladder into various positions like Twin Stepladder and Extension Ladder.

Overview

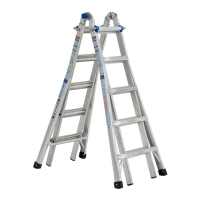
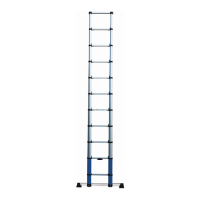
The Werner MT Series Telescoping Multiladder is a professional-grade, multi-purpose ladder designed for versatility and ease of use in various working environments. Its telescoping design allows for multiple configurations and adjustable heights, making it suitable for a wide range of tasks.

Function Description

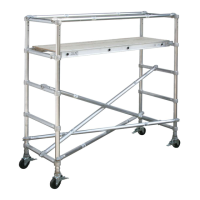
The Multiladder serves as a versatile access tool, capable of transforming into different ladder types to suit specific job requirements. It features two primary locking mechanisms: the Soft Touch Push Knob Locking Hinge and Spring Loaded "J" Locks. These mechanisms enable the ladder to be configured into four main positions: Twin Stepladder, Stairway Stepladder, Extension Ladder, and a 2-Scaffold Base. This adaptability allows users to safely reach various heights and work angles, whether on flat ground, stairways, or when requiring a stable scaffold platform. The ladder's design emphasizes safety and efficiency, providing a robust solution for both professional and DIY applications.

Usage Features

The Multiladder's key usage features revolve around its transformability and ease of adjustment.

Soft Touch Push Knob Locking Hinge: This mechanism is crucial for adjusting the angle of the ladder and folding it into its three set positions: extension ladder, twin stepladder, and storage. To adjust the angle, the user pushes the push knobs with the palm of their hand directly into the center of the ladder, which then stay in an open position. This open position is visually confirmed by exposed triple inner posts on the push knob. Once the ladder reaches one of the three set positions, the push knobs automatically spring back into the closed, locked position. To close the ladder to the folded position, the process is reversed. A crucial safety note is that excess pressure on the center hinge can make the push knob difficult to operate, and users are warned against using tools to pry or manipulate it. It is essential to ensure supporting hinges are locked before using the ladder to prevent serious injury.

Spring Loaded "J" Locks: These locks are responsible for telescoping the outer sections of the ladder, allowing for height adjustments in all configurations except the scaffold mode. There are four "J" locks, two on each side. To operate, the user pulls the "J" lock straight out and rotates it away from the rung hole. This independent operation allows for one-handed adjustment while holding the ladder. To adjust the height, the user unlocks the "J" locks, raises the inner section to the desired height, and then rotates the "J" locks into the locked position. Safety is paramount here, with warnings to ensure all "J" locks are secure in a rung hole before climbing and to maintain control of the inner section during raising or lowering to prevent injury.

Setup Positions:

  • Twin Stepladder: To configure, the user follows the directions for changing the angle of the ladder using the push knob locking hinge. This position is easiest to complete with the ladder standing up, as it avoids excess pressure on the hinge. Once configured, the height can be adjusted using the Spring Loaded "J" locks.
  • Stairway Stepladder: This position is designed for working in stairways. It is achieved by first configuring the ladder into the stepladder position, then raising it to the desired height. One side of the inner section is then lowered until the desired step height is reached. The ladder is then positioned on the stairway, ensuring all legs are on firm ground or steps.
  • Extension Ladder: Similar to the stepladder position, the extension ladder configuration begins by changing the angle using the push knob hinge. The push knob hinge will catch in each of the three positions, and users continue to disengage and rotate sections until the desired position is reached. With the ladder standing up, the user unlocks the upper section "J" locks and walks the upper ladder section out. If more height is needed, the opposite section is extended similarly. Outer sections are slid apart until the desired length is met.
  • 2-Scaffold Base: This configuration requires the use of a dynamic hinge kit (included with the MT Series ladder) and a plank (not included). First, the inner and outer sections are completely separated by unlocking the "J" locks and sliding the outer sections off the inner section. The inner section is placed in a stepladder position. The dynamic hinge is then placed into the outer section rail by threading the narrow tab of the hinge into the inside of the rail, with the wider tab on the outside. The "J" locks are used to secure the dynamic hinge. This process is repeated on the other side. It is crucial to ensure rungs face out opposite the hinge hook direction. Finally, the outer sections are spread apart. To close the ladder, outer sections are brought together, "J" locks are unlocked, and dynamic hinges are removed. A critical safety note for this position is that the plank should not be placed on the top step and must be secured to the ladder on both ends by tying it down. Tie-downs should also be used to secure the plank to both ladder sections.

General Safety Instructions:

  • Always read instructions completely before use.
  • Never overload the ladder; the maximum weight of person, tools, and materials must not exceed the duty rating of 300 lbs.
  • Use the ladder only in the positions shown in the manual.
  • Always face the ladder and maintain a firm grip while on it.
  • Do not stand on or above the second rung from the top of the ladder in stepladder or extension ladder configurations.
  • Never straddle front and rear sections.
  • Ensure all hinges and "J" locks are secure before climbing.
  • Never use ladder jacks on this ladder.
  • Do not walk, bounce, or move the ladder while on it.
  • Do not overreach; always keep the belt buckle between the side rails.
  • Exercise caution in windy conditions or when pushing/pulling anything.
  • Never use the ladder as a brace.
  • Do not use any components not supplied or approved by Werner Co.
  • When setting up, support the ladder by laying it on its side, opening it to the desired position, and then standing it up. Watch for overhead wires.
  • Never use ladder jacks on this ladder, regardless of the manner in which it is being used.
  • Metal conducts electricity; never use the aluminum product near an electrical current.

Maintenance Features

Proper care and inspection are essential for the safe and prolonged use of the Werner Multiladder.

Inspection of Product: Before each use, the ladder must be inspected for missing, worn, or damaged parts. Users are warned against repairing a damaged ladder without permission from Werner Co. If the ladder has been exposed to excessive heat (e.g., house fire) or corrosive agents (e.g., acids or alkalis), it must be destroyed. For information on replacing parts or labels, users should contact Werner Co., providing the model number if possible.

Proper Care:

  • Always keep the ladder clean of all foreign materials. Clean after each use.
  • Regularly check moving parts and lubricate them as needed.
  • Use caution to avoid getting lubricant on rungs or side rails.

General Set-up and Use Instructions:

  • Read all labels on the ladder.
  • Do not use the ladder if not in good physical condition.
  • Do not use the ladder in front of unlocked doors.
  • Place the feet on firm, level ground. If on a slippery surface, secure the ladder from sliding before climbing.
  • Be aware that using ladders on drop cloths may present a sliding hazard.
  • Never place anything on or under the ladder to gain height, or use unstable means to adjust for uneven surfaces.
  • Check that all four ladder ends are firmly supported to prevent excessive movements.
  • Use extreme caution when getting on or off the ladder.
  • When possible, have someone hold the ladder.

Werner MULTILADDER MT-13 Specifications

General IconGeneral
ModelMT-13
MaterialAluminum
ANSI TypeType IA
Load Capacity300 lbs
ReachUp to 13 ft
Duty RatingHeavy Duty
TypeMulti-Ladder
Maximum Height13 ft

Related product manuals