Do you have a question about the Westin Pro Series and is the answer not in the manual?
Loosely assemble the winch tray and support brackets to the frame using M12 hardware.
Assemble main mounting brackets to winch tray and mount winch and accessories.
Loosely attach the bumper assembly to the main mounting brackets using M12 hardware.
Adjust components and torque all hardware (M6, M8, M12) to specified values.
Failure to follow instructions can lead to severe consequences; verify fasteners.
Exercise caution when drilling, wear eye protection, and adhere to towing limits.
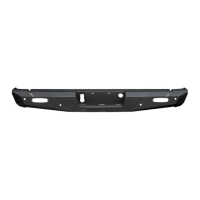
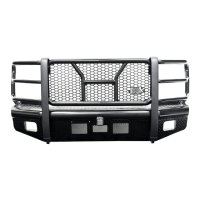
This document provides installation instructions for the Westin Pro-Series Front Bumper, specifically designed for the 2016-2022 Toyota Tacoma. The part number for this product is 58-411045.
The Westin Pro-Series Front Bumper is an aftermarket accessory designed to replace the OEM front bumper on a 2016-2022 Toyota Tacoma. It offers enhanced protection, a more rugged aesthetic, and provides mounting points for additional accessories such as a winch and LED lights. The installation process involves removing several OEM components, including the grill, fender flares, valance, and the original aluminum bumper bar, followed by trimming specific parts of the OEM bumper assembly and fender flares to accommodate the new bumper. The new bumper integrates a winch tray and includes provisions for LED lighting, either with dedicated light brackets or a mesh cover if no light bar is installed. Relocation brackets for the front oil cooler are also part of the installation to ensure proper fitment and function with the new bumper.
The installation requires various fasteners and tools, indicating the robust nature of the bumper and its mounting system.
| Brand | Westin |
|---|---|
| Model | Pro Series |
| Category | Automobile Accessories |
| Language | English |