6. Spark Electrode.
See
Figs.
9b and
35.
Check
that the electrical supply has been turned
off
.
Remove
the inner casing cover and
facia
.
See
Section 13.3.
(c)
and
14.2
(a)
.
Pull
off
the lead
from
its tab
on
the
ignition
board.
See
Fig.
9b.
Unscrew
the securing nut holding the electrode to its mounting
bracket and withdraw the electrode and lead.
See
Fig
. 35.
Fit
a new electrode assembly
in
the
reverse
order.
Check
that the
electrode tip
is
the correct height above the burner blade.
See
Fig.
35.
7. Flame
Sensing Electrode.
See
Figs
. 9b and 35.
Check
that the electrical supply has been turned
off
.
Replace
the electrode as described
in
Section
14.4.6 preceding.
8.
Gas
Valve
.
See
Figs
.
9b
and
26.
Check
that the electrical supply has been turned
off.
Lower
the control box.
See
Section 14.2
(b).
Remove
the cabinet
bottom panel by unscrewing the two
screws
.
See
Fig
.
22
.
Pull
off
the suction pressure compensating tube.
See
Fig.
26.
Unscrew
and
move
aside the
main
solenoid
cover
on
the
gas
valve.
Carefully
disconnect the leads
from
the two solenoids and the
Modureg head on the gas valve and unscrew the earth lead.
Unscrew
the
four
screws securing the
flange
at the top of the gas
valve.
Unscrew the union connection at the mounting manifold
and
remove
the gas
valve.
Transfer
the inlet
pipe
and gaskets to the new
valve
.
Fit
the new
valve
ensuring that the
two
gaskets are seated
in
their
housings.
Fit
a new
valve
in
the reverse
order.
See
Fig
. 9a.
To
replace the Modureg head only
Pull
off
the suction pressure compensating tube and the electrical
connections.
Unscrew
the two screws securing the
Modureg
head
to the main body and remove.
Fit
the new
Modureg
head
(Honeywell
2032)
in
the
reverse
order
ensuring
that
the gasket
is
in
the correct position.
Transfer
the
compensating tube connection.
Test
for
gas soundness at
all
joints as described
in
Section
11
.2.
To
set the burner pressure.
See
Fig
.
26.
The
minimum and maximum burner pressures must be set after a
new gas control has been fitted.
Follow the procedure described
in
Section
11
.4 - Appliance
Start-Up.
The
minimum burner pressure must
be
set
first
as any adjustment
of
the minimum pressure influences the maximum pressure set·
tin g.
Remove
the
fixing
screw and remove the
Modureg
head
cover.
Remove
the compensating tube
from
the gas valve.
See
Fig
. 26.
Th
e tube and the
Modur
eg cap, must
be
replaced immediat
ely
the
adjustments have been made to ensure the proper operation
of
the gas control.
Remove
a lead
from
the
Modureg
control and start the appliance
in
the domestic hot water mode as described
in
Section
11
.5 -
Appliance Operation. Adjust the minimum pressure adjustment
nut to
give
a burner pressure of 1 .3
mbar.
See
Fig
. 2
6.
Switch o
ff
the applian
ce
and turn
off
the electricity supply.
Refi
t
the lead to the
Modureg
head.
Switch
on
the
electricity
supply to the appliance and
re
-
light
in
the
domestic hot water mode.
The
burner pressure
will
immediately
increase to the maximum.
Turn
the maximum pressure adjustment screw until the burner
press
ure
is
14.5
mbar.
See
F
ig
. 26. The operating pressure
of
14.2
mb
ar is obtained when the compensating tube is
re
fi
tted to the
gas
valve
.
It
should not be necessary to alter the central heating potentiome-
ter setting when the gas control
is
replaced
and the
minimum
and
maximum burner pressures are set.
24
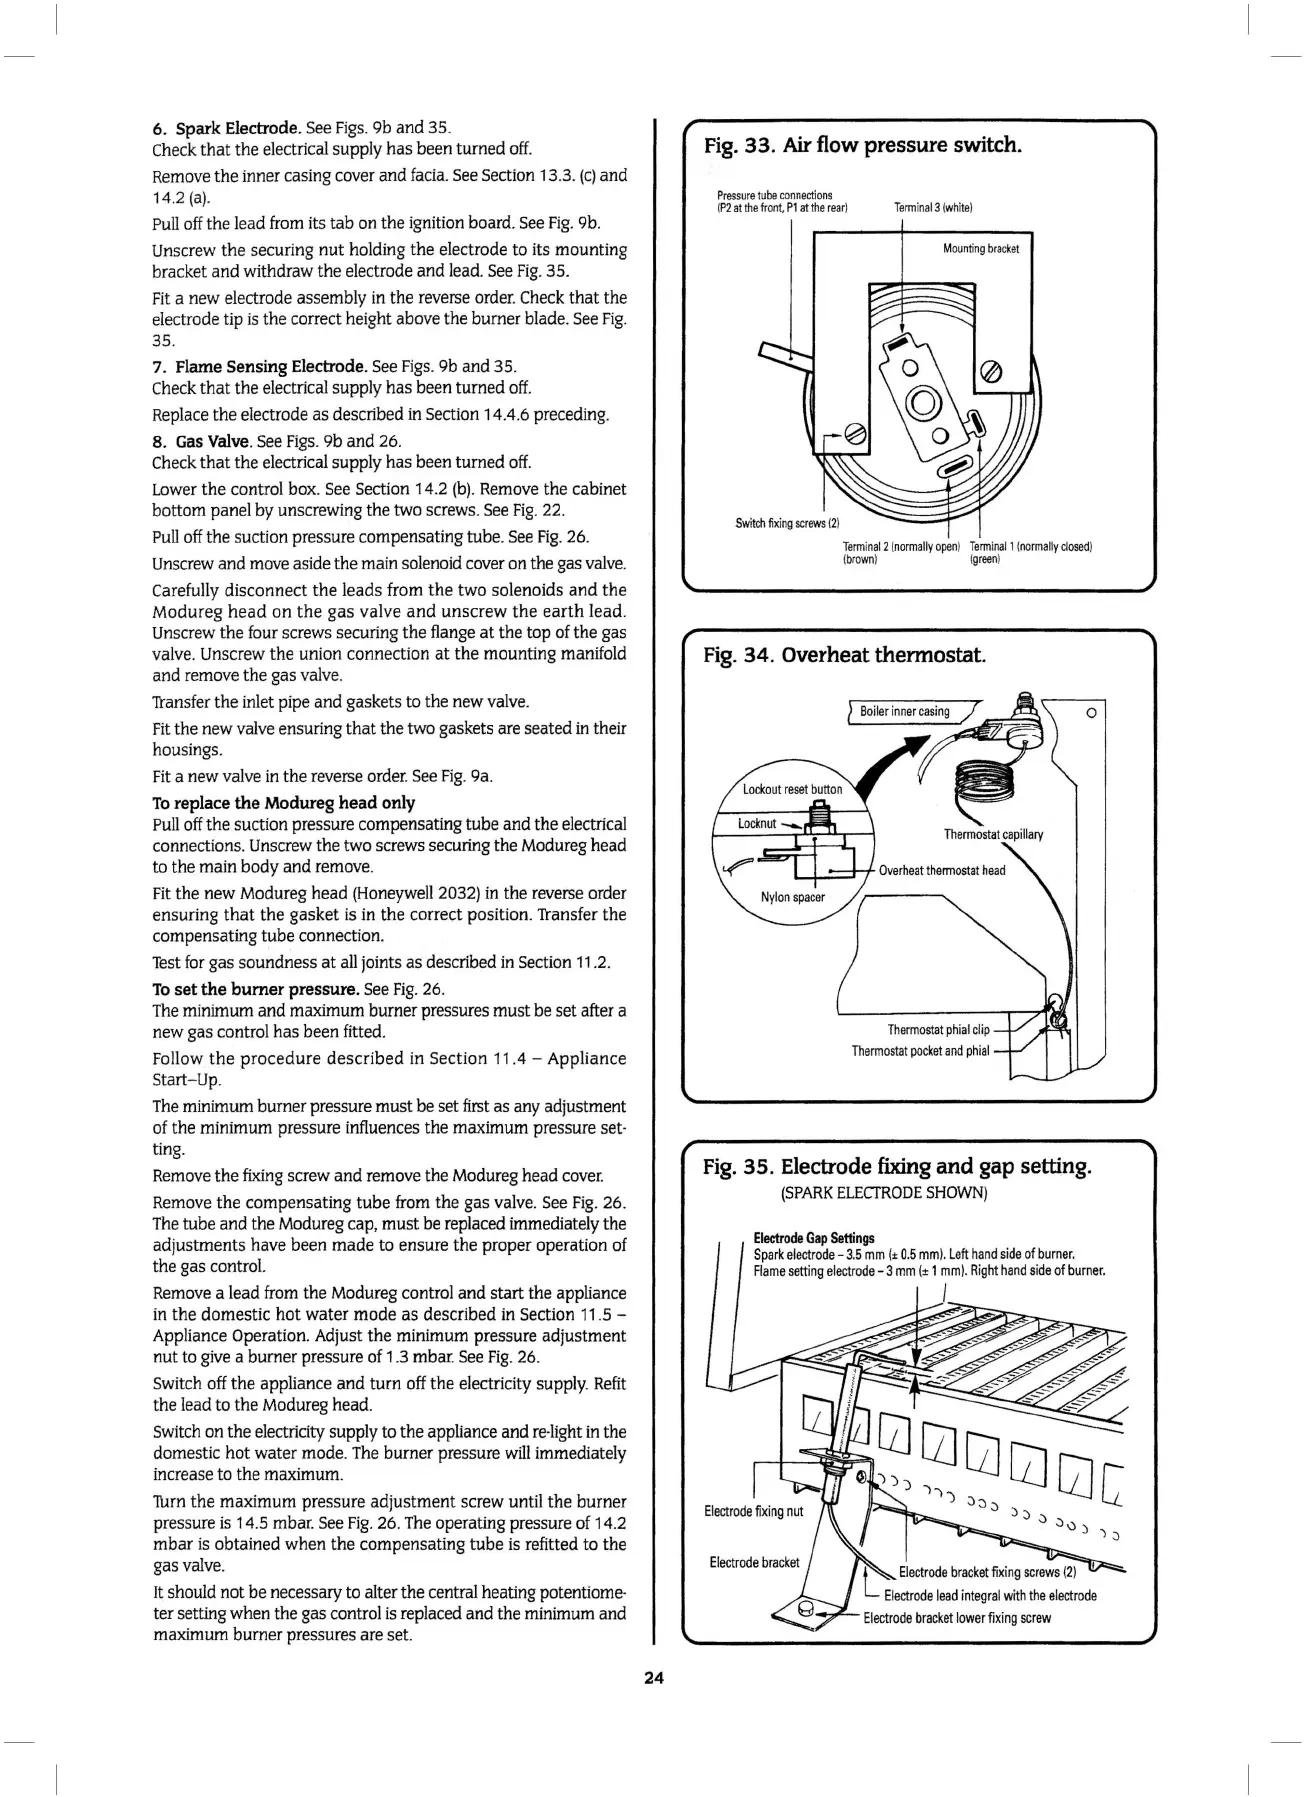
Fig.
33.
Air
flow pressure switch.
P
ress
ure
tube
conne
ct
ions
I
P2
at
the
fr
ont,
Pl
at
the
r
ear
)
Swit
ch
fi
xin
g
sc
re
ws
121
Tennin
al3 (whi
te
)
M
ou
n
ting
bracket
Tenn
i
na
l 2 (
no
rmall
y
open
)
Tenn
inall l
norma
lly cl
ose
d)
(b
ro
wn
) (
green
)
Fig.
34. Overheat thermostat.
The
rm
o
stat
phi
al
clip
Thermostat
poc
ket
an
d p
hial
0
Fig.
35. Electrode fixing
and
gap setting.
(SPARK
ELE
CTRODE
SHOWN
)
Electrode
Gap
Settings
Spark
electrode-
3.5 mm (± 0.5
mm
).
Left
h
an
d side
of
burn
er.
Flame
setting
e
lectro
de- 3 mm (± 1
mm)
. Ri
gh
t ha
nd
side
of
burner.
I
C
Electrode
bra
ck
et
fi
x
in
g s
cr
ews
(
2)
1
El
ect
rode
lead
integ
ral w
ith
th
e e
lect
rod
e
E
lectrod
e
bracket
lowe
r
fixing
s
crew