12
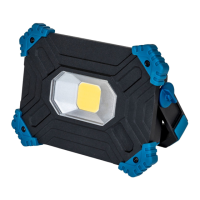
Operation
The product cannot be switched on during the charge process. It is,
therefore, not suitable for continuous operation.
The light provides three levels of brightness (100%, 50%, and 25%).
1. To find out the battery‘s charging level, press the Battery level indicator button
4
to view
the battery level indicator (see Fig. B).
If the battery is fully charged, all four lights on the battery level indicator
3
shine
green. The lower the charging level, the lower the number of lit lights. Each light
represents 25% of the battery charge. The operating time on a fully charged bat-
tery is approx. 2 hours.
2. Using the handle
1
carry the light to the desired location of use.
3. To set up the light, unfold the handle in such a way that the light hits the area of use at the
desired angle.
4. To switch on the light, press the on/off switch
8
(see Fig. B).
The LED shines at 100% brightness level.
5. To reduce the brightness, press the on/off switch very lightly.
The LED shines at 50% brightness level.
6. To further reduce the brightness, press the on/off switch very lightly once again.
The LED shines at 25% brightness level.
7. Press the on/off switch a third time to switch off the light.
Using the battery as a power bank
− Connect the device you would like to charge to the light via a USB charging cable
(not included) by plugging the USB connector into the USB port
6
(see Fig. B).