Do you have a question about the Worx LANDROID WG757E and is the answer not in the manual?
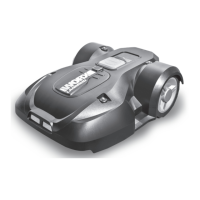
The Landroid® is an unmanned mowing vehicle designed to maintain a healthy and better-looking lawn. It's an expert for robots in your home, offering an easy installation process that takes little time, depending on the size of your garden. The Landroid® is designed to mow regularly, and can be programmed to operate at any time or frequency with no restrictions, working for you to keep your lawn in top condition.
Before installation, it's recommended to read the entire Installation Guide carefully and sketch the working area, including all obstacles, to identify ideal positions for the charging base and boundary wire routing. The Landroid® is designed to navigate various garden features and obstacles. When encountering rigid, stable obstacles taller than 10cm, such as walls or fences, it will stop and redirect. Stones too heavy to be moved can be safely hit, but if a stone has an inclined surface that the Landroid® can climb, it should be removed or excluded from the working area.
For driveways level with the lawn and without protruding surfaces, the Landroid® can freely run over them. If you prefer it to avoid the driveway, the boundary wire should be placed 10cm away. If the driveway is covered with gravel, the Landroid® should not travel over it, and a 26cm space should be maintained between the boundary wire and the driveway using the provided distance gauge. Flowerbeds, ponds, and pools should be avoided to prevent damage to flowers or the Landroid® falling into water. Obstacles between 2cm and 10cm high should also be excluded. Roots emerging from the ground should be avoided to prevent damage to the Landroid®.
The Landroid® can handle depressions and bumps. For large bumps (higher than 2cm) or dips (wider than 10cm and deeper than 2.5cm), it's important to assess if the blades would touch the ground or if the Landroid® would get stuck. If so, inclines should be smoothed or these areas excluded. The Landroid® can safely climb slopes up to 35% (20°), but areas steeper than this should be avoided. The slope of your lawn can be calculated by dividing the elevation (35cm) by the length (100cm) to get 35% (slope).
When placing the boundary wire on slopes, the upper boundary wire should not be placed on slopes steeper than 35% (20°) and should be 26cm from any obstacle. The lower boundary wire should not be placed on slopes steeper than 17% (10°) and should be at least 40cm away from any obstacle when positioned on a 17% slope. It's important to note that the lower boundary wire cannot be laid across a slope steeper than 17% as the Landroid® may slip and cross outside the wire, especially when the grass is wet. For right-angle turns, the boundary wire should be laid as illustrated in the manual.
The Landroid® needs the boundary wire to define its working area and create an invisible fence, which also guides it to its charging base. In cases of two islands close to each other, the wire can be laid out as illustrated, allowing the Landroid® to travel freely over the boundary wire between areas and the mowing boundary. If your lawn has multiple areas connected by a corridor, it should be at least 1 meter wide. If narrower, the Landroid® may have difficulty traveling between. In such cases, it's recommended to set up a main area and a secondary area. For secondary areas, the Landroid® needs to be manually placed there for mowing and returned to the charging base when the battery runs out.
The charging base should be placed on a flat, dry surface, out of direct sunlight, with the charging components facing your lawn. It can be placed against a wall or fence, preferably in the shade for better battery recharging. The adapter and electrical outlet must always be kept dry. The charging base can be permanently fixed to the ground using the supplied base fixing nails and hex key. The charging station must be on relatively level ground, not on an inclined surface or anywhere that causes its plate to bend.
Before the first operation, the Landroid® needs to be charged. When connecting the power cord to the adapter, align the notch on the power cord with the groove on the adapter. Connect the adapter to an electrical outlet; the LED on the charging base will turn red. Manually dock the Landroid® into the charging base while it's powered off. The green light on the charging base indicates charging, and the Landroid® will begin to charge. If the power cord is within the Landroid®'s working area, it can be buried. If the adapter is plugged into an indoor electrical outlet, the power cord needs to be routed through a hole in the wall.
The boundary wire needs to be pegged down. Before doing so, it's recommended to cut the grass along the boundary with a lawn mower or grass trimmer. The wire should be laid as close as possible to the ground to prevent accidental cutting by the Landroid®. The boundary wire is powered by a very low voltage, safe for humans and pets. A length of about 80cm of boundary wire should be pulled out and fastened near the charging base. This end (IN-wire) will later connect to the BLACK terminal. The extended boundary wire should not exceed 400m to avoid signal problems.
To complete the boundary wire setup, lay it around the entire working area as illustrated. After pegging the wire, take the Landroid® away from the charging base. Lead the boundary wire back to the charging base, leaving about 80cm of the OUT-wire. Cut the wire, insert both ends into the grooves on the charging base, peel off about 1cm of plastic skin from the ends, and connect the naked metal wire end of the IN-wire to the BLACK terminal and the OUT-wire to the RED terminal. For extending the boundary wire, refer to "Joining the Boundary Wire" in the Owner's Manual.
Before the first mowing, ensure the Landroid®'s working area is clear of objects like toys and branches. Set the cutting height to the maximum level (50mm for WR130E/WR131E or 60mm for WR141E/WR144E). Place the Landroid® a few meters in front of the charging base. Press the power button until the Landroid® turns on. For the first use, input the default PIN code 0000 by pressing OK four times when the number 0 is blinking. When the Landroid® turns on, all lights on the display will illuminate and then turn off; check for any damaged lights. Shield the display with your hand if outdoor light is too strong. The Landroid® will turn off if no input is received within 30 seconds. Entering the wrong PIN code three times will trigger an alarm.
After initial setup, fine-tune the outline shape of the boundary wire if necessary. If the boundary wire is broken or needs extension, refer to "Joining the Boundary Wire" in the Owner's Manual. Check the LED light indicator on the charging base for connection status. If the verification test is smooth, start mowing by pressing START then OK. If there are problems, refer to "Owner's manual-Troubleshooting." The LED indicator provides status: no light means no power, green light means successful connection and full charge, red light means the boundary wire is not connected, and green flashing light means auto charging.
If the Landroid® is outside its territory, it will not move and "-E1-" will be displayed; move it back inside and repeat verification. If "-E :-" is displayed while inside its territory, refer to "Error Messages" in the Owner's Manual. The Landroid® should always remain switched on. If it needs to be turned off, place it within its boundary area before switching it back on. If it stops operating, simply restart it.
The Landroid®'s settings can be adjusted manually or via a mobile app. If setting manually, the Landroid® will enter standby if no input is received within 30 seconds. To change the PIN code, press START and OK simultaneously for 5 seconds. The icon will blink, and "P10!" will flash. The first number will blink, use START or SET to select the number, and press OK to confirm. Repeat for subsequent numbers. After setting the new PIN (e.g., 0326), "P102" will flash, requiring re-entry of the new PIN. Finally, "P100326" will flash, confirming the PIN change.
Setting the year, date, and time are compulsory as they affect the schedule. Set these in order. For the year, press START for 3 seconds until the icon and a number (e.g., 2018) blink. Use START or SET to select the year and OK to confirm. The icon will flash again, displaying the date (e.g., 09.29 for September 29). Use START or SET to select the month and day, confirming with OK. The icon will flash again, displaying the time (e.g., 14:08). Use START or SET to select the hour and minute, confirming with OK. The time setting is complete, and the Landroid® will enter standby.
To set the work area, press OK for 3 seconds. The icon will blink, press OK. A number (e.g., 8 50) representing the lawn area will blink. The working time is automatically set based on garden size. Use START or SET to adjust the lawn area (increasing/decreasing by 50m² each time START is pressed), and press OK to confirm. The Landroid® will then enter standby. The default start time of 8:00 can be changed by pressing START and STOP simultaneously until a ding sound is heard. For example, pressing them at 14:05 will set the mowing start time to 14:05.
The Landroid® can connect to a smartphone via an app. This allows changing general settings and viewing machine status and error messages. Before connecting, ensure your smartphone's Wi-Fi is 2.4GHz (not 5GHz) and the app is the latest version. The Landroid® should be in the same router environment as your smartphone, have the latest firmware, and be within 3 meters of the smartphone during connection, and within 3 meters of the router. Ensure your router is 2.4GHz or 2.4GHz mixed 5GHz, with the 2.4GHz band enabled, 802.11 mode set to b/g/n mixed, and channel/band width set to Auto or 20M or 20M mixed 40M. Enable SSID Broadcast during connection, then it can be closed. DHCP function must be enabled. If using a "Fritz!box" Router, activate "Allow communication between devices in same network." Ensure Port 8883 TCP is open; if blocked, modify the setting.
To connect the smartphone, download the Landroid® App from Playstore, AppleStore, or worx.com. Press START or SET for 3 seconds until the icon blinks. Use START or SET to choose the icon, then press OK to confirm. Enter the Landroid® APP and follow instructions to connect to your Wi-Fi. The serial number is on the rear of the Landroid®. If Wi-Fi information changes, the Landroid® needs to be re-set. In areas with low or no Wi-Fi signal, app instructions may not execute immediately but will be received when the Landroid® returns to a good signal area. For stable connection, Wi-Fi extenders are recommended for weak or no Wi-Fi signal areas.
| Type | Robotic Lawn Mower |
|---|---|
| Power Source | Battery |
| Cutting Height | 30-60 mm |
| Cutting Height Adjustment | Yes |
| Battery Type | Lithium-ion |
| Battery Voltage | 20 V |
| Battery Capacity | 2.0 Ah |
| Max Area Coverage | 700 m² |
| Slope Capability | 35% |
| Mulching | Yes |
| Rain Sensor | Yes |
| Automatic Charging | Yes |
| Programmable | Yes |
| Charging Time | 90 min |