13
EN
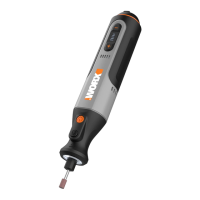
20V Cordless Brushless
SWITCHDRIVER 2.0
Removing the Bit
Pull the 6.35mm Hex drive chuck forward
to
release the bitRemoving the Bits.
See Fig. D
OPERATION
Forward/Reverse Rotation Control
1.) To lock the trigger, push the control
switch to the center position. The trigger
will not work when the control switch is in
the locked position. (E1)
2.) For forward (clockwise) rotation, push
the control switch in the direction shown.
Check the direction of rotation before
use. (E3)
3.) For reverse (counterclockwise)
rotation, push the control switch in the
direction shown. Check the direction of
rotation before use. (E2)
WARNING: Never change the
direction of rotation when the
chuck is rotating, wait until it has
stopped!
See Fig.
E1, E2, E3
Two-speed Gear Control
Push the speed gear control switch back
to “1” for low speed.
Push the speed gear control switch
forward to “2” for high speed.
WARNING: To prevent gear
damage, always allow the chuck
to come to a complete stop before
changing gears.
See Fig. F
Drilling/driving Mode and Torque Setting
Press the drill digital keypad to toggle
between screwdriving and drilling
modes.
Press the screwdriving digital keypad to
adjust torque level.
Short press for single level change, long
press for consecutive level change.
See Fig.
G1,G2
ONOFF SWITCH
1.) To power the tool, pull the trigger.
NOTE An LED is turned on when the
trigger is pulled.
2.) To vary the driving speed, increase or
decrease pressure on the trigger. The
further the trigger is pulled, the greater
the speed, up to the maximum speed set
by the speed control switch.
3.) To stop the tool, release the trigger
and the electric brake stops the tool
instantly.
WARNING Do not operate for
long periods at low speed, or
excess internal heat will be produced.
See Fig. H
USING THE LED LIGHT
WARNING To turn on the light,
press the On/Off Switch and
make sure the Forward/Reverse Rotation
Control is on right/left position.
LED lighting increases visibility-great
for dark or enclosed area. LED is also a
battery capacity indicator. It will flash
when power gets low.
The tool and battery pack are equipped
with a protection system. When the LED
Light is quickly flashing and turn off, the
system will automatically cut off power
to the tool to extend battery life. The tool
will automatically stop during operation
if the tool and/or battery pack are placed
under one of the following conditions:
• Overloaded: The tool is operated
in a manner that causes it to draw an
abnormally high current. In this situation,
release the Trigger Switch on the tool
and stop the application that caused the
tool to become overloaded. Then pull the
Trigger Switch again to restart.
• Overheated: Under the condition
above, if the tool does not start, the Tool
and Battery Pack are overheated. In this
situation, let the Tool and Battery Pack
cool before pulling the Trigger Switch
again.
• Low battery voltage: The remaining
Battery capacity is too low and the tool
will not operate. In this situation, remove
and recharge the Battery Pack.
See Fig. H
SLEEP MODE AND REACTIVATION
When the Switchdriver is left without
any operation for 15 seconds, it will enter
sleep mode automatically.
By pressing
/ button or the on/
off switch, the Switchdriver will be
reactivated.
See Fig. I
 Loading...