14
Test preparation
■ Be sure area around battery is well ventilated while battery is being tested.
■ Clean battery terminals. Be careful to keep corrosion from coming in contact with eyes.
■ Inspect the battery for cracked or broken case or cover. If battery is damaged, do not use tester.
■ If the battery is not sealed maintenance free, add distilled water in each cell until battery acid reaches
level specied by the manufacturer. This helps purge excessive gas from cells. Do not overll.
■ If necessary to remove battery from vehicle to test, always remove ground terminal from battery rst.
Make sure all accessories in the vehicle are o to ensure you do not cause any arcing.
Initial Use
■ Before you test a battery in a vehicle, turn o the ignition, all accessories and loads. Close all the vehicle
doors and the trunk lid.
■ 4 pieces of 1.5 V alkaline batteries (item no. 0827 02) must be in the battery compartment of the testing
device (on the rear). If these batteries runs out of power, screen will show "replace internal battery" or
"power low". Replace these 4 alkaline batteries before starting the test. Consider that the display shows
no message until the battery test is not correctly connected to the battery of the vehicle.
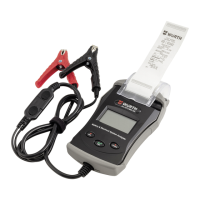
■ Make sure the battery terminals are clean. Wire brush them if necessary. Clamp the black load lead to
the vehicle negative battery terminal. Clamp the red load lead to the vehicle positive battery terminal.
■ Paper load: Open the printer cover. Insert paper so that the printer is fed automatically with paper. (This
is only necessary in case of paper change or if the device is put into operation.)
Inserting the paper roll (g. I)
■ Connect the terminals to the checked battery.
■ Open the clear cover (printer cover) and raise the green lever (right).
■ Insert the paper and close the printer cover.
Replacing the paper roll (g. II)
■ Open the printer cover.
■ Raise the (green) rail ion the left to lift the printer head and roll and to pull the paper out of the compart-
ment or to insert the paper in the compartment.
■ Draw slowly the paper directly from the paper roll out of the compartment.