PRE-FLIGHT FOR THE XPLORER
• Of course, ying the Xplorer is fun and exciting. However,
prior to doing so we strongly recommend adhering to the
pre-ight check list that follows. Doing so will ensure a safe
and pleasant ying experience.
Step 1: Determine if you will be ying with, or without, the
Xplorer’s camera/gimbal unit.
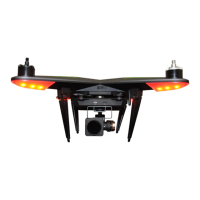
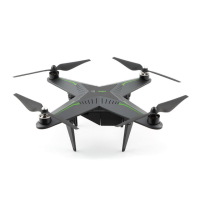
• If ying without the Xplorer gimbal, please make sure the
landing gear are in the horizontal position. That is, the gear
should be positioned so that they are extended towards the
drone’s body. This will lower the center of gravity and prevent
any inadvertent tip-overs during take-offs and landings.
• If ying with the gimbal, please make sure the landing gear
are in the vertical position. This will provide ample clearance
for the gimbal and camera assembly and prevent any
damage from occurring to these components.
• Additionally, if ying with the gimbal installed, please conrm
that the gimbal is securely locked into place.
Step 2: Conrm that the battery is locked into position as
described elsewhere in this manual.
Step 3: Ensure that you have good weather to y in and that
the area is safe and free of people and obstructions before
ying. Failure to do so could result in an unenjoyable ying
experience, damage to the Xplorer, etc.
Step 4: Turning on the transmitter and power to the Xplorer:
• Slide the transmitter’s power switch to the ON position.
• To power up the Xplorer press the triangular button on top of
the drone until it turns green.
Flight Precautions
• Do not y the Xplorer in severe weather conditions, such as
high winds, snow, rain or smog.
• Ensure that the ight path does not have the Xplorer ying
over any persons, animals, etc.
• Make sure that there is ample room and a safe area to take
off and land the Xplorer. It should be clear of obstacles.
• Flying near tall buildings and steel structures may affect the
accuracy of the on-board compass and should be avoided.
• Do not operate your Xplorer in Polar Regions.
• Do not y your Xplorer in No-Fly zones specied by law
enforcement or other such regulations.
Arming/Starting the motors
• With all of the pre-ight checklists completed, it is safe to
arm and start the motors for the Xplorer’s ight.
Step 1: Ensure that
everything and everyone
is clear from the Xplorer’s
propellers. A stick
combination command
is used to start the
motors. For a transmitter
congured for Mode 1
or Mode 2 operation,
both sticks have to be moved to the bottom outside corners at
the same time. Hold the sticks in this position until the motors
are armed and the propellers begin to spin. (If in Modes 3 or 4
then move both sticks to the bottom inner corners.)
Step 2: Once the motors have started, release the sticks
simultaneously.
**Note**: You cannot start the motors when the ight level is
set to Level 1 and the Xplorer is in Attitude Flight Mode. The
rear indicators will blink rapidly as a reminder.
Stopping the motors
Please note: This will immediately stop/disarm the motors.
As such, it is not recommended to do so in ight, unless
necessary in an emergency situation. Rather, this should be
performed once the Xplorer has safely landed.
Step 1: The same stick combination command for starting the
motors is used for stopping the motors. If the transmitter is
operating in the Mode 1 or 2 conguration, place both sticks to
the bottom and outside corners. (If in Modes 3 or 4 then move
both sticks to the bottom inner corners.)
Step 2: Once the
motors have stopped,
release both sticks
simultaneously.
**Note** Again, do
not execute this stick
combination command
during ight. By doing
so you will cause
the motors to stop
immediately and the Xplorer will fall from the air. Alternatively,
with the Xplorer on the ground, hold the throttle stick in the
lowest position for approximately three (3) seconds.
FLIGHT TEST
Step 1: After all of the pre-ight checklist, etc. have been
completed, place the Xplorer in a wide-open area with the front
of the drone directly facing away. That is, the smart battery
should be closest to the pilot.
Step 2: Select an appropriate ight level (1, 2 or 3).
Step 3: Power on the transmitter, ensuring that the LED
indicators are as desired.
Step 4: Power on the drone.
Step 5: Wait until the rear light indicators blink green for GPS
mode or yellow for attitude mode, as dictated by the selected
ight level.
Step 6: Calibrate the drone’s compass following the
procedures noted elsewhere in this manual.
Step 7: Arm/Start the motors as described previously. Be sure
to follow all safe practices when doing so.
**Note** Please keep as least 5 meters away from the Xplorer
during take-off and landing.
TAKE-OFF AND LANDING USING THE GPS FLIGHT
MODE
• With the GPS ight mode active, it is possible to allow the
Xplorer to automatically take off and/or land as desired.
Flying Your Xplorer
Mode 1/2:
Left Stick
Right Stick
Mode 3/4:
Mode 1/2:
Left Stick
Right Stick
Mode 3/4:
10
 Loading...