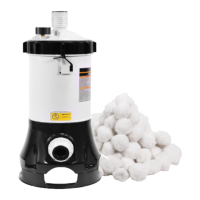
The XtremePower Cartridge Filter with Built-In Pump, Item #75203, is a compact and portable filtration system designed for use with family pools. Its primary function is to filter pool water, removing dirt and debris to maintain water clarity and hygiene. The system features a thread locking design that simplifies the process of cleaning and replacing the filter balls, making it convenient for operation and maintenance. The casing of the unit is constructed from anti-corrosion material, ensuring durability and longevity. A key feature is its built-in pump, which streamlines the setup and operation of the filtration system. The filter balls, which are the primary filtration medium, are washable and reusable, offering a cost-effective and environmentally friendly solution for pool maintenance.
Technical Specifications:
- Design-flow rate: 3.5 M³/H
- Maximum working pressure: 3.45 Bar (50 PSI)
- Gross Weight: 18.73 lbs
- Power: 0.25 HP
- Dimensions: 8.8" (width) x 11.8" (depth) x 24" (height)
The system comprises several key components:
- Gaskets (2): Essential for sealing connections.
- Connector (1): Used for plumbing connections.
- Pressure gauge (1): Monitors the system's internal pressure, indicating when cleaning or replacement of filter media is needed.
- Drain plug with gasket (1): Allows for easy draining of the filter tank.
- Locking ring (1): Secures the top cover and filter balls within the main body.
- Block cover (2): Likely covers or protects internal components.
- Filter ball (1): The primary filtration medium, consisting of numerous small balls.
- Locking ring latch (1): A mechanism to secure the locking ring.
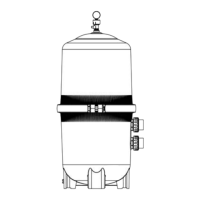
- Main body (1): The central housing for the filter balls and pump.
- Cover (1): The top part of the filter housing.
- O-ring (1): Provides a seal for the cover.
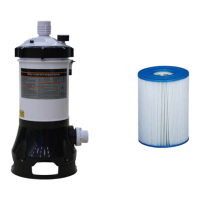
- Basket (1): Likely pre-filters larger debris before water reaches the filter balls.
- Bottom cover (1): The base of the unit.
- Screws (5): For assembly of various components.
- Motor (1): The power unit for the built-in pump.
Installation:
Proper installation is crucial for the filter's performance and safety.
- Location: The filter should be positioned as close to the swimming pool as local codes allow to minimize resistance to water flow from plumbing fittings. A well-drained area that will not flood is recommended. If the pump is above the water line, a self-priming pump is necessary.
- Surface: The filter must be set on a solid, level surface, ensuring that the filter, pump, drain, and pressure gauge are easily accessible.
- Drainage: Position the filter so the tank can drain by gravity.
- Shade: If possible, place the pump and filter in the shade to protect them from continuous direct heat from the sun.
Assembly Steps:
- Unlock the locking ring (NO.5) and remove the filter balls bag.
- Fill the filter balls into the main body, then lock the locking ring.
- Wrap the pressure gauge (NO.3) with Teflon tape and screw it into the threaded hole on the locking ring (NO.5).
- Place the basket (NO.12) inside.
- Insert the O-ring (NO.11) and gasket (NO.1) into the cover (NO.10) and tighten.
- Wrap the connector with Teflon tape, screw it into the middle hole of the locking ring (NO.5), then install the gasket (NO.1).
- Connect the IN pipe (inlet).
- Connect the OUT pipe (outlet).
- All electrical connections must comply with local codes.
- Before operating, check for any joint leaks.
Operation:
Starting the Filter:
- Ensure the filter drain plug is closed.
- Open the manual air relief valve a few turns and open the suction and return valves (if used). It is critical that all suction and discharge valves are open when starting the system to prevent severe personal injury or property damage. The locking knob should be hand-tightened securely.
- Stand clear of the filter, prime, and start the pump according to the manufacturer's instructions. Air trapped in the system will automatically vent to the pool and out through the air relief valve. Close the air relief valve as soon as air stops venting.
Filtering:
Filtration begins once a steady flow is established through the filter. As the filter balls remove dirt from the pool water, accumulated dirt increases resistance to flow, causing the gauge pressure to rise and the flow rate to decrease. The filter balls should be cleaned or replaced when the pressure rises 7-10 psi (0.49-0.70 Bar) above the starting pressure, or when the flow rate drops below the desired level.
Clean/Replace Filter Balls:
- Turn off all system circulation pumps and electric power to the equipment pad.
- Set all system valves to prevent water flow to the filter.
- Unfasten the clamp on the inlet, remove the hose, and drain the water. (Opening the air vent a few turns can assist drainage.)
- Unscrew and remove the locking ring (counter-clockwise).
- Carefully lift off the top cover to access the filter balls.
- Remove the filter balls for cleaning or replace them with clean, spare filter balls.
How to Wash the Filter Ball:
The filter balls should be washed when the gauge pressure rises 7-10 psi (0.49-0.70 Bar) above the starting pressure or when the flow rate decreases below the desired rate, indicating accumulated dirt.
Re-installation after Cleaning:
- Clean any debris from the bottom of the filter body.
- Place the washed filter balls into the main body.
- Tighten the locking ring in a clockwise direction.
- Connect the hose to the inlet.
- Proceed with the "Starting the Filter" steps.
Winterizing the Filter:
- Turn off the pump.
- Remove the filter balls.
- Drain water from the filter.
- Wash the filter balls.
- Re-install the components.
- Store the filter indoors.
Troubleshooting:
Safety Instructions:
- General Safety: Read all warnings and instructions. Failure to do so may result in electric shock, fire, or serious injury. Common sense and caution are essential.
- Children: Do not permit children to use this product unless closely supervised.
- Electric Shock Hazard:
- Install the pool no closer than 6 feet (1.8 m) from any electrical outlet.
- Do not place portable appliances closer than 5 feet (1.5 m) from the pool.
- Do not bury the cord; locate it to minimize abuse from lawn mowers or other equipment.
- Replace damaged cords immediately.
- Do not use an extension cord; provide a properly located outlet.
- Connect only to a grounding type receptacle. Do not remove the ground pin.
- Inspect the cord before using; do not use if damaged.
- Do not touch the plug with wet hands.
- For double-insulated units, use only identical replacement parts when servicing.
- Pool Type: This pump is for use with storable pools only, not permanently-installed pools. A storable pool can be readily disassembled for storage and reassembled.
- Parts: Ensure all components are present before use. Notify XtremePowerUS for any damaged or missing parts.
- Mounting: For continued protection against electric shock, this unit must be mounted to its base according to installation instructions.
- Replacement Parts: Use only identical replacement parts when servicing to ensure continued protection against shock hazards.