EasyManua.ls Logo

XtremepowerUS 62FT - User Manual

XtremepowerUS 62FT
12 pages
Print Icon
To Next Page IconTo Next Page
Loading...
ATTENTION INSTALLER: THIS MANUAL CONTAINS IMPORTANT INFORMATION ON THE
OPERATION, AND SAFE USE OF THIS EQUIPMENT.
THIS MANUAL IS INTENDED FOR THE END USER OF THIS PRODUCT
MODEL
EFFECTIVE FIL
TRA
TION RA
TE
DESIGN FLOWRA
TE
Residential Commercial
FT
2
M
2
GPM LPM
 7 1204
 44 6 63
MAXIMUM WORKING PRESSURE FOR
ALL MODELS 50 PSI (3.45 BAR)
DE FILTER 62FT / 48FT
ITEM:75205 / 75206
75205
75206
Question and Answer IconNeed help?

Do you have a question about the XtremepowerUS 62FT and is the answer not in the manual?

Summary

Safety and Operation Instructions

Child Safety

Caution to reduce injury and supervise children when using the product.

Component Separation Hazard

Hazard of explosive component separation due to system pressure if instructions are ignored.

Avoiding Component Separation

Instructions to prevent explosive component separation, including proper assembly and maintenance.

Excess Pressure Hazard

Hazard of explosive separation from pressure testing exceeding 50 PSI.

Electrocution Hazard

Suction Entrapment Hazard

Entrapment hazards from damaged, broken, or unsecured suction outlets causing severe injury or death.

Reducing Entrapment Risks

Measures to reduce entrapment risks, including proper installation and maintenance of suction outlets.

General Information

Installation

Installation Steps and Guidelines

Guidelines for positioning the filter, connecting plumbing, and ensuring proper installation.

Starting the Pump and Filter System

Pre-Start Pump Procedures

Procedures to follow before starting the pump, including component verification and valve settings.

Pump Starting Procedure

Steps for safely starting the system pump and monitoring for leaks.

Filtering Operation

Explanation of the filtering process, pressure rise, and when to backwash the filter.

Filter Control Valve Functions

Six-Way Filter Control Valve Functions

Details on the FILTER, BACKWASH, RINSE, WASTE, RECIRCULATE, and CLOSED functions.

Four-Way Filter Control Valve Functions

Details on the FILTER, WASTE, BACKWASH, and POOL OR SPA BOOST functions.

Two-Way Slide Valve Functions

Details on the FILTER and BACKWASH functions for the two-way slide valve.

Maintaining Your Filter

Filter Disassembly Instructions

Steps for safely disassembling the filter, including shutting off power and releasing pressure.

Removing Element Cluster

Procedure for removing the filter element cluster from the filter body.

Cleaning Filter Element Cluster

Methods for cleaning the filter element cluster using a garden hose and brushing.

Filter Re-Assembly Instructions

Re-installing Element Cluster

Steps for lubricating and correctly re-installing the filter element cluster assembly.

Cleaning Seal Surfaces

Procedure for cleaning the filter body seal surfaces before reassembly.

Body and Clamp Re-Assembly

Steps for correctly seating the filter bodies and tightening the clamp with a torque wrench.

Vacuuming the Pool

Removing the Manual Air Relief Valve

Re-installing the Manual Air Relief Valve

Steps for cleaning and properly re-installing the Manual Air Relief Valve.

Winterizing the Filter

Winterizing Steps

Steps for disassembling, cleaning, and draining the filter for winter storage.

Service and Repairs

Suggested Pool Chemistry Levels

Recommended pH, alkalinity, hardness, and chlorine levels for pool water.

Problem Solving

Troubleshooting common issues like low water flow, short filter cycles, and cloudy water.

Parts List and Diagram

Of Note

Important Disclaimer on Repairs

Manufacturer states repairs should be done by certified technicians; buyer assumes all risk.

Customer Support Information

Contact details for questions, problems, or missing parts.

Overview

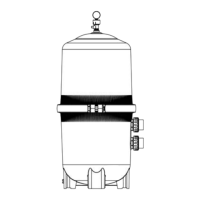
This document describes the XtremePower DE Filter, available in 62 sq. ft. (Item: 75205) and 48 sq. ft. (Item: 75206) models. It is a vertical grid diatomaceous earth (DE) filter designed for superior water filtration in pools and spas.

Function Description

The DE filter uses diatomaceous earth, which is considered the most efficient dirt remover and filter medium. DE is typically fed through the skimmer at initial start-up, forming a uniform coating on custom-fitted monofilament polypropylene filter cloth elements. As pool water is pumped through the control valve into the bottom of the filter tank, the DE coating filters out even the minutest particles, resulting in clear, sparkling water.

Over time, accumulated dirt in the filter causes resistance to flow, leading to increased pressure and diminished flow. This indicates that the filter's dirt-holding capacity has been reached, and it's time to clean (backwash) the filter. During backwash, the control valve is set to the backwash position, reversing water flow through the filter to flush trapped dirt, debris, and DE out the waste line. After backwashing, the control valve is manually reset to the filter position, and a fresh charge of DE is added to resume normal filtering.

Important Technical Specifications

  • Models:
    • 75205: 62 sq. ft. (5.7 m²) effective filtration rate, 120 GPM (454 LPM) design flowrate.
    • 75206: 48 sq. ft. (4.4 m²) effective filtration rate, 96 GPM (363 LPM) design flowrate.
  • Maximum Working Pressure: 50 PSI (3.45 BAR) for all models.
  • Required Clearance:
    • Model 75206: "A" dimension 37 inches (94 cm), "B" side 18 inches (46 cm), "C" above 18 inches (46 cm).
    • Model 75205: "A" dimension 44.3 inches (112.5 cm), "B" side 18 inches (46 cm), "C" above 22 inches (56 cm).
  • Clamp Nut Torque: 150 inch-lbs (using a ¾" socket on a torque wrench).

Usage Features

The filter system is designed for ease of operation and is totally corrosion-free. It requires installation on a level concrete slab or rigid base in a well-drained and vented area, positioned for convenient access to piping connections, winter drain, and for operation, service, maintenance, and winterizing. Ideally, the pump and filter should be placed in the shade to protect from direct heat.

Starting the Pump and Filter System:

  1. Ensure only original components are used and the filter bodies are properly secured with the filter body clamp, torqued to 150 inch-lbs.
  2. Verify the filter manual air relief body is in the LOCK position, and no components are missing or damaged.
  3. Close the filter drain (which requires an o-ring seal).
  4. Open all system valves to allow water flow to and from the filtration system.
  5. Place the manual air relief valve in the OPEN position.
  6. When starting the pump, do not stand over or near the filter. If leakage occurs at the filter tank clamp, immediately shut off all circulation pumps and electrical power and reassemble the clamp system.
  7. Return to the filter to CLOSE the manual air relief valve only when a steady stream of water (not air or air and water mix) is discharged.

Filtering: Filtration begins after the filter has been pre-coated with DE. As dirt accumulates, pressure rises, and flow decreases. When the pressure rises 8-10 psi (.55-.69 bar) above the pre-coat pressure, backwashing is required. The pressure gauge has a green arrow to align with the current reading, and a red or second arrow indicating when cleaning is due. For new or very dirty pools, more frequent backwashing may be necessary.

Filter Control Valve Functions (Six-Way, Four-Way, and Two-Way Slide Valves):

  • FILTER: Normal filtering and regular vacuuming.
  • BACKWASH: Cleans the filter by reversing water flow. Involves shutting off the pump, setting the valve to BACKWASH, running the pump for about two minutes until waste water is clean, shutting off the pump, setting to RINSE, running for 20 seconds, shutting off the pump, setting to FILTER, and then adding fresh DE.
  • RINSE: Water flows through the filter to WASTE. Used for pre-coating if a large cloud is observed returning to the pool.
  • WASTE: Bypasses the filter for draining or lowering water level, or for vacuuming heavy debris directly to WASTE.
  • RECIRCULATE (or POOL OR SPA BOOST): Water is re-circulated through the pool system, bypassing the filter.
  • CLOSED: Shuts off flow from pump to filter.

Vacuuming Pool: Vacuuming can be performed directly into the filter. Backwash the filter afterward if required.

Maintenance Features

Filter Disassembly Instructions:

  1. Turn off all system circulation pumps and electrical power.
  2. Set all system valves to prevent water flow to the filter.
  3. Place the manual air relief valve in the OPEN position.
  4. Remove the filter drain plug and drain water.
  5. Loosen and remove the clamp nut and bolt using ¾" wrenches or hex sockets.
  6. Carefully spread the clamp ends and lift the clamp over the upper filter body. Do not drop or strike the clamp.
  7. Lift off the upper filter body, avoiding using the pressure gauge for lifting.

Removing Element Cluster:

  1. Remove the upper filter body, unscrew the retainer nut, and take off the manifold.
  2. Remove the filter element cluster assembly using a slight rocking motion and lifting up.
  3. Clean the filter element cluster.

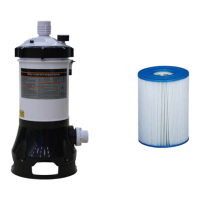
Cleaning Filter Element Cluster: The cluster can be cleaned by washing inside and outside with a garden hose. For best results, carefully brush the pleated surface to remove fine particles. Do not pressure wash, as it can damage the cluster.

Filter Re-assembly Instructions:

  1. Re-installing filter element cluster assembly: Lubricate outlet elbow O-rings, replace the cluster into the filter tank, fitting the top collector manifold outlet over the outlet elbow O-ring.
  2. Clean seal ring and seal surface: Remove the filter tank seal, wipe the lower filter body seal surface and the seal of all dirt and debris with a clean cloth (do not use solvents). Wipe the upper filter body seal surface.
  3. Body and clamp re-assembly:
    • Place the metal-reinforced seal on the lower filter body.
    • Place the upper filter body on the seal and lower filter body, aligning operation and safety labels and centering the upper body. Press down firmly and evenly to seat the seal.
    • Replace the filter clamp around the upper and lower filter bodies, positioning the clamp ends adjacent to the safety and operation labels.
    • Insert the clamp bolt through the clamp ends and thread the clamp nut onto the clamp bolt with the rounded end of the nut towards the clamp ends.
    • Torque the clamp nut to clamp bolt to 150 inch-lbs using a ¾" socket on a torque wrench. Do not hit or strike the clamp with a hammer or metal tools.
    • Follow the "Starting the Pump and Filter System" instructions.

Removing the Manual Air Relief Valve (MAR): For qualified pool professionals only: Turn off all system circulation pumps and electrical power, set all system valves to prevent water flow, place the MAR in the OPEN position, wait for water leakage to stop, then remove the air relief valve by screwing the whole parts counter-clockwise.

Re-installation of the Manual Air Relief Valve: Check o-ring seals and replace as needed. Wipe the upper filter body and o-ring groove clean. Align the notch in the MAR flange with the notch on top of the upper filter body. Press the MAR straight down, turn it clockwise until the indicator is aligned with "LOCK," and verify discharge points away from electrical connections.

Winterizing Filter: In areas with subfreezing temperatures, the filter should be drained to prevent damage. Disassemble the filter, clean or replace elements, and reassemble. Leave the drain plug unattached during winter to avoid cracking the filter body.

Suggested Pool Chemistry Levels:

  • PH: 7.2 to 7.8
  • Total Alkalinity: 80 to 120 ppm
  • Calcium Hardness: 200 to 400 ppm
  • Combined Chlorine: .2 ppm Maximum
  • Chlorine (Stabilized): 1.0 to 3.0 ppm
  • Chlorine Stabilizer (Cyanuric Acid): 60 to 80 ppm

Problem Solving List:

  • Low Water Flow: Check element cluster and pump strainer baskets for debris, restrictions in intake/discharge lines, air leaks in intake line, and backwash (clean) filter.
  • Short Filter Cycles: Check for algae in pool and super-chlorinate, ensure chlorine and pH levels are in proper range.
  • Pool Water Won't Clear Up: Check and adjust chlorine, pH, and total alkalinity levels, ensure sufficient flow rate, and operate filter for longer periods.

Head Loss Graph: A graph illustrating head loss in feet of water versus flow rate in GPM is provided to help understand system performance.

XtremepowerUS 62FT Specifications

General IconGeneral
BrandXtremepowerUS
Model62FT
CategoryWater Filtration Systems
LanguageEnglish

Related product manuals