Motor: 1600W
Impact Energy: 43J
Impact Rate: 1900/min
Chuck: 30mm Hex
Noise Level: 105dB
Tool Weight: 14.7kg
SPECIFICATIONS MAINTENANCE
CLEANING
CAUTION! Excessive build up of dust
particles may cause the tool to overheat and
fail.
1. Keep the ventilation slots of the tool clean at all times.
If possible prevent foreign matter from entering the
vents.
2. After each use, blow air through the tool housing to
ensure it is free from all dust particles that may build
up.
3. If the enclosure of the tool requires cleaning, use a
soft, moist cloth only. Do not use solvents.
CAUTION! Never immerse any part of the
tool in liquid.
Checking the Oil Level
The oil level should be checked before each use.
1. Lay the tool on its side with the base facing you.
2. Inspect the oil view window. The level should be half
way up the view window.
3. If the level is lower than this then you must add more
oil following the procedure below.
Adding Oil
The oil tank is approximately 45ml, therefore you should
add oil in small amounts.
Recommended Oil: SAE 15W/40 or an alternative
of the same quality.
1. Lay the tool upside down so that the view window is
facing up.
2. Unscrew the view window anti-clockwise using the
supplied spanner. FIG. D
3. Add a small amount of oil through the view window
hole.
4. Screw the view window back in and tighten using the
supplied spanner in a clockwise direction.
5. Recheck the oil level and repeat this process if
necessary.
Carbon Brushes
Carbon brushes will wear out after many uses, causing
the sander to spark and/or stop. The brushes are
a wearing component of the sander and should be
replaced prior to the carbon wearing out completely.
Take the sander to a suitably qualied electrician or
power tool repairer for replacement. Always replace
both brushes at the same time.
Note: XU1 will not be responsible for any damage
or injuries caused by the repair of the tool by an
unauthorised person or by mishandling of the tool.
4
WARNING! Ensure the tool is turned off
and disconnected from the power supply
before performing any of the following
operations.
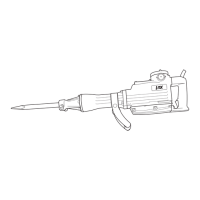
PROPER USE
This tool is intended for use in a DIY (Do It Yourself)
context or for hobbyist purposes. It is not built for
continuous daily use in a trade or professional capacity.
Before using the machine, carefully read these
instructions, especially the safety rules to help ensure
that your machine always operates properly.
Before attempting to operate the machine, familiarise
yourself with the controls and make sure you know how
to stop the machine quickly in an emergency.
Save these instructions and the other documents
supplied with this machine for future reference.
SETUP
WARNING! Ensure the tool is turned off,
disconnected from the power supply before
performing any of the following operations.
Secondary Handle
The secondary handle must be tted securely before
operating the demolition breaker. The handle can be
adjusted to suit all users by simply rotating into the
desired orientation.
1. Loosen the Secondary Handle Securing Knob by
rotating anti-clockwise.
2. Rotate the handle into the desired position.
3. Tighten the Secondary Handle Securing Knob to
secure in position. FIG. A
Fitting Accessories
IMPORTANT! Always lubricate the
accessory tment prior to inserting. Using
your nger apply grease sparingly to the shaft
of the accessory.
1. Pull the Accessory Chuck bolt out as far as possible
then rotate 180 degrees and release.
2. Insert the accessory into the chuck. FIG. B
3. Pull the Accessory Chuck bolt out and rotate 180
degrees to secure the accessory
4. Ensure the accessory is secure by trying to pull it out.
Note: The accessory should slide in the chuck but not
be able to be removed.
OPERATION
IMPORTANT! Do not use the at chisel as
a “pry bar” as this will damage the at chisel
and potentially the demolition breaker. Such
damage will void your warranty.
Using the Demolition Breaker
For best penetration rates in concrete, run the
demolition breaker with a steady pressure, but do not
use excessive force as this will decrease the efciency
of the tool.
1. Ensure the accessory and secondary handle are
secure.
2. Position the tip of the tool in the desired starting
position.
3. Ensure you have a stable stance and hold the tool
rmly with both hands.
4. Press the On/Off Trigger to begin operation.
5. Apply steady pressure to allow the tool to break
through the material.
6. Once the tool has completed the rst pass through
the material, reposition and repeat.
CONTROLS
WARNING! The power supply for this
product should be protected by a residual
current device (rated at 30mA or less).
On/O Switch
1. To turn the demolition breaker on, squeeze the On/Off
Trigger. FIG. C
2. To turn the tool off, release the On/Off Trigger.
WARNING! After use, hold the tool away
from your body until the demolition breaker
stops completely. This may help to prevent
serious injury.
 Loading...