Do you have a question about the Xvive U6 and is the answer not in the manual?
Advice for optimizing wireless system performance and minimizing interference from other wireless devices.
Instructions for powering on units and setting the same channel for transmitter and receiver for pairing.
Guide on attaching the fur windshield to reduce wind noise during outdoor or difficult environmental recording.
Guidance on positioning the transmitter at an optimal distance from the mouth or audio source for clear audio capture.
Steps to connect the receiver to a DSLR camera's input using the supplied 3.5 mm TRS cable.
Instructions for connecting the receiver to a smartphone via TRRS adapter or USB-C/Lightning port.
Explanation of the receiver's three output gain level presets: 0 dB, -10 dB, and -20 dB for audio adjustment.
Instructions on how to attach the clip to the transmitter for discreet wear on clothing or shirts.
Guide for attaching hook fastener pieces to the transmitter and loop pieces to clothing for secure mounting.
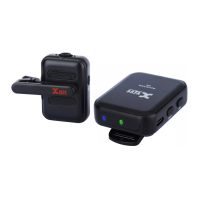
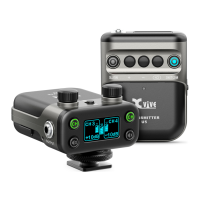
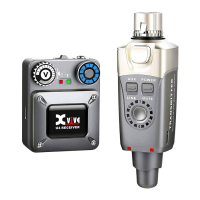
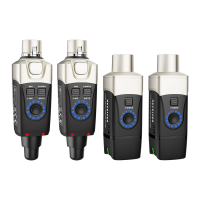
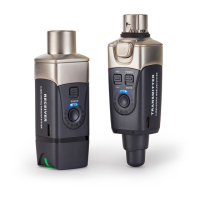
The Xvive U6 is an ultra-compact wireless microphone system designed primarily for video production, offering a discreet and versatile solution for capturing high-quality audio. This system comprises a transmitter and a receiver, both engineered for ease of use and reliable performance in various recording environments.
The core function of the U6 system is to provide crystal-clear, studio-quality digital audio wirelessly. The transmitter features a built-in omnidirectional condenser microphone, eliminating the need for external lavalier microphones and simplifying setup. It operates on the 2.4 GHz ISM band, a globally open frequency band also used by Wi-Fi and Bluetooth, ensuring broad compatibility without requiring a license. The system employs true diversity wireless technology, meaning the receiver has two antennas to minimize signal dropouts and ensure a stable connection. With a high-resolution 24-bit/48 kHz audio capture, the U6 delivers professional-grade sound suitable for a wide range of content creation, including filmmaking, vlogging, YouTube videos, and live streaming. The system boasts a low latency of less than 5 ms, ensuring that audio and video remain synchronized, which is crucial for professional productions. It also offers a dynamic range and signal-to-noise ratio of 100 dB, contributing to clean and clear audio recordings.
The U6 system is designed for intuitive operation. To begin, both the transmitter and receiver are turned on by pressing and holding their respective power buttons for three seconds until the display screens illuminate. The system supports four wireless channels, allowing users to switch channels with short presses of the power button to avoid interference from other wireless devices. Successful pairing between the transmitter and receiver is indicated by a green LED on the receiver. For optimal audio capture, the transmitter should be positioned at least 10 inches (25 cm) away from the audio source, such as the speaker's mouth.
The transmitter offers two discreet wearing methods:
The receiver is designed to connect to various recording devices:
The receiver also features three output gain level presets (0 dB, -10 dB, and -20 dB), allowing users to adjust the audio output to match the input sensitivity of their recording device, preventing clipping or low signal levels.
To enhance audio quality in outdoor or challenging environmental conditions, a fur windshield is included. This windshield is specially designed to reduce wind noise, ensuring clearer recordings.
The U6 system is powered by rechargeable lithium-ion batteries, offering up to 4 hours of battery life. A dual USB charging cable is provided, enabling simultaneous charging of both the transmitter and receiver. Users can plug this cable into any 5V USB charger adapter or USB power source. It is important to turn off the devices while charging, as using them during charging may reduce battery life. The power status LED on the devices indicates the battery level: LED off signifies 100% to 30% charge, solid red indicates 29% to 11% charge, and blinking red means less than 10% charge. Charging times are approximately 35 minutes for 1 hour of battery life, 1 hour and 15 minutes for 2 hours, and 2.5 hours for a full 4 hours of operation. For long-term storage, it is recommended to store the units at room temperature and regularly check the battery charge level, recharging if necessary (about every three months) to maintain battery health. The devices should be cleaned only with a damp cloth. Users are advised against performing service operations beyond those described in the manual, and any repairs should be handled by qualified service personnel, especially if the device is damaged by liquid, impact, or exposure to moisture. Prolonged listening at high volume levels should be avoided to prevent irreparable hearing loss.
| Type | Wireless Microphone System |
|---|---|
| Operating Frequency | 2.4 GHz |
| Frequency Response | 20 Hz - 20 kHz |
| Modulation | GFSK |
| Transmission Distance/Operating Range | Up to 100 meters |
| Battery Type | Lithium-ion |
| Latency | Less than 5 ms |
| Dynamic Range | 100 dB |
| Charging Time | 2 hours |