EasyManua.ls Logo

Xyron PRO 1250 User Manual

Default Icon
8 pages
To Next Page IconTo Next Page
Page #1 background imageLoading...
Page #1 background image
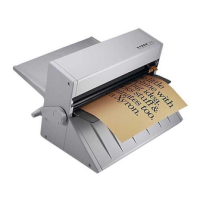
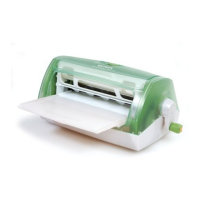
Your Xyron Pro1250 is designed to permanently apply an adhesive or clear film to the
front and/or back of any substrate that is run through the machine. The lamination film
and adhesive are not designed to be removed without substantial damage to the laminated
substrate or mounting surface. This process is NOT recommended for any precious or single
source documents. Always test before use – may not be compatible with some surfaces.
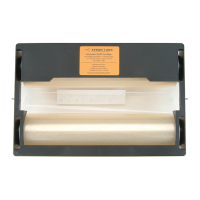
The system is designed to be used with one of the following replacement cartridges:
DL1201-150 Two-Sided Lamination – General Use – 150'
SL1201-150 Single-Sided Lamination – General Use – 150'
LAT1201-100 One Side Laminate / One Side Adhesive Application – High Tack – 100'
LAT1206-100 One Side Laminate / One Side Adhesive Application – Repositionable – 100'
AT1201-100 Adhesive Application – High Tack – 100'
AT1202-100 Adhesive Application – Low Tack – 100'
AT1205-100 Adhesive Application – Acid Free – 100'
AT1206-100 Adhesive Application – Repositionable – 100'
Consult your authorized Xyron dealer for information on other supplies.
Please follow the attached directions carefully.
Adhesive Application &
Laminating System
USER’S GUIDE
Adhesive Application and Laminating System
Pro 1250
®
EDNord - Istedgade 37A - 9000 Aalborg - Telefon 9633 3500

Questions and Answers:

Xyron PRO 1250 Specifications

General IconGeneral
BrandXyron
ModelPRO 1250
CategoryLaminator
LanguageEnglish

Summary

User's Guide

Product Overview and Cartridge Types

Introduction to the Xyron Pro1250 system and a list of available replacement cartridges for various applications.

Understanding the Xyron Pro1250's Parts & Functions

Input Tray

Guides items into the machine, requires correct document alignment for best results.

Paddle

Provides back tension for delicate items to prevent wrinkles and ensure smooth results.

Crank Handle

Used to advance cartridge supplies and items through the machine by rotating clockwise.

Top Cover

Opens to allow for cartridge replacement and maintenance access.

Cut Blade

Trims items after they exit the machine; used by pressing down and sliding.

Upper Cut Bar and Upper Roller Assembly

Slides out to facilitate output tray extension and access.

Lifting Points

Designated areas on the sides of the machine for safe and proper lifting.

Output Tray

Extends to receive processed items and is crucial for cartridge removal.

Setting Up

Crank Handle Installation

Instructions for installing the crank handle by threading it into the side plate until snug.

Cartridge Replacement

Step 1: Tray Preparation

Slide input tray out and lift output tray away from the machine for cartridge access.

Step 2: Cartridge Installation

Open top cover, remove old cartridge, install new one ensuring even film on roller and correct label orientation.

Step 3: Film Advance

Grasp and pull film forward 2-4 inches (4-6 cm) to begin the replacement process.

Step 4: Film Placement

Place film under the metal bar with the orange blade holder and under the top black roller.

Step 5: Tray Seating

Slide output tray back into the machine completely, pushing down to ensure it is seated.

Step 6: Film Alignment

Turn handle clockwise, advancing film below the blade holder until aligned and wrinkle-free.

Step 7: Film Trimming

Press orange blade holder down, slide to trim excess film, then close the top cover.

Step 8: Input Tray Return

Slide the input tray back into the machine completely after cartridge replacement.

Basic Operation

Initial Film Preparation

Turn crank one revolution to ensure film is wrinkle-free before inserting the document.

Document Insertion and Guidance

Align document on feed tray and extend it under the paddle into the cartridge opening.

Trimming Excess Material

Trim excess material from the leading edge of the output using the cut blade before full advancement.

Applying Adhesive and Finishing

Remove protective film for adhesive, peel liner for mounting, and trim to desired length.

Application Methods

Two-Sided Lamination

Procedure for performing two-sided lamination using the DL1200 series cartridge.

Single-Sided Lamination

Procedure for single-sided lamination using the SL1200 series cartridge.

Adhesive to One Side

How to apply adhesive to one side of an item using the AT1200 series cartridge.

Lamination with Back-Side Adhesive

Procedure for applying laminate to one side and adhesive to the other using LAT1200 series.

TIP: Saving Trimming Operations

Advance document to align with blade bar for efficient trimming of leading edge material.

Refill Cartridges

Troubleshooting

Films Not Aligned

Cause: Cartridge not squarely seated. Solution: Reinstall cartridge and ensure output tray is seated.

Cut Blade Issues

Cause: Adhesive build-up. Solution: Apply adhesive cleaner to blade bar and blade.

Film Exit Problems

Cause: Material curled or adhesive transfer to nip roller. Solution: Remove material, clean rollers.

Film Wrinkles Persist

Cause: Adhesive build-up on idler bars. Solution: Apply adhesive cleaner to idler bars.

Lamination/Adhesion Poor

Cause: No pressure between rollers. Solution: Ensure output tray is pushed forward and down.

Laminate Not Advancing

Cause: Material not positioned or adhered to input tray. Solution: Reinstall cartridge, ensure tray seating.

Crooked Document Exit

Cause: Adhesive build-up on input/output tray edges. Solution: Remove adhesive, ensure tray seating.

Warranty and Support

Product Warranty

Xyron Inc. warrants the Pro1250 against defects for one year from purchase date.

Contact Information

Provides addresses for Xyron Inc. and Xyron Europe A/S, and technical support contact details.

Related product manuals